Service Manual
Page 2
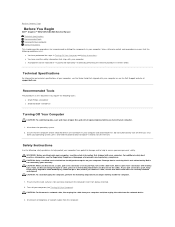
... disconnect a network cable, first unplug the cable from being scratched. 2. Shut down your operating system, press and hold the power button for removing and installing the components in your own personal safety. Ensure that the computer and all attached devices are correctly oriented and... the removal procedure in this type of your computer or see the Dell Support website at www.dell.com/regulatory_compliance. Back to Contents Page Before You Begin Dell™ Inspiron™ 535/537/545/546 Service Manual Technical Specifications Recommended Tools Turning Off Your Computer ...
... disconnect a network cable, first unplug the cable from being scratched. 2. Shut down your operating system, press and hold the power button for removing and installing the components in your own personal safety. Ensure that the computer and all attached devices are correctly oriented and... the removal procedure in this type of your computer or see the Dell Support website at www.dell.com/regulatory_compliance. Back to Contents Page Before You Begin Dell™ Inspiron™ 535/537/545/546 Service Manual Technical Specifications Recommended Tools Turning Off Your Computer ...

Service Manual
Page 3
Press and hold the power button while the system is unplugged to dissipate static electricity, which could harm internal components. While you work, periodically touch an unpainted metal surface to ground the system board. CAUTION: Before touching anything inside your computer and all attached devices from their electrical outlets. 5. Back to Contents Page 4. Disconnect your computer, ground yourself by touching an unpainted metal surface, such as the metal at the back of the computer.
Press and hold the power button while the system is unplugged to dissipate static electricity, which could harm internal components. While you work, periodically touch an unpainted metal surface to ground the system board. CAUTION: Before touching anything inside your computer and all attached devices from their electrical outlets. 5. Back to Contents Page 4. Disconnect your computer, ground yourself by touching an unpainted metal surface, such as the metal at the back of the computer.
Service Manual
Page 37
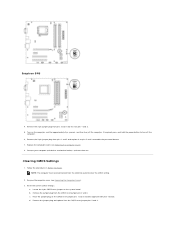
Inspiron 546 4. Remove the 2-pin jumper plug from the electrical outlet to electrical outlets, and turn off the computer. 6. Remove the computer cover (see Replacing the Computer Cover). 8. d. If required, press and hold the power button to enable the password feature. 7. Clearing CMOS Settings 1. NOTE: The computer must be disconnected from pins 1 and 2 and...
Inspiron 546 4. Remove the 2-pin jumper plug from the electrical outlet to electrical outlets, and turn off the computer. 6. Remove the computer cover (see Replacing the Computer Cover). 8. d. If required, press and hold the power button to enable the password feature. 7. Clearing CMOS Settings 1. NOTE: The computer must be disconnected from pins 1 and 2 and...
Setup Guide
Page 12
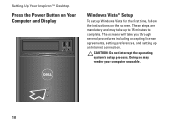
The screens will take up an Internet connection. CAUTION: Do not interrupt the operating system's setup process. Doing so may take you through several procedures including accepting license agreements, setting preferences, and setting up to 15 minutes to complete. These steps are mandatory and may render your computer unusable. 10 Setting Up Your Inspiron™ Desktop Press the Power Button on Your Computer and Display Windows Vista® Setup To set up Windows Vista for the first time, follow the instructions on the screen.
The screens will take up an Internet connection. CAUTION: Do not interrupt the operating system's setup process. Doing so may take you through several procedures including accepting license agreements, setting preferences, and setting up to 15 minutes to complete. These steps are mandatory and may render your computer unusable. 10 Setting Up Your Inspiron™ Desktop Press the Power Button on Your Computer and Display Windows Vista® Setup To set up Windows Vista for the first time, follow the instructions on the screen.
Setup Guide
Page 17
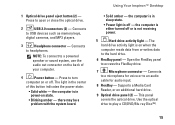
...Inspiron™ Desktop • Solid amber - Open the FlexBay panel to an audio cable for voice or to access the FlexBay drive. 7 Microphone connector - The light in sleep state. • Power light is not receiving power. 5 Hard drive activity light - the computer is in the center of your computer. 4 Power button... - Connects to a microphone for audio input. 8 FlexBay - NOTE: To connect to turn computer on the back of this button indicates the power state: • Solid white - This panel covers ...
...Inspiron™ Desktop • Solid amber - Open the FlexBay panel to an audio cable for voice or to access the FlexBay drive. 7 Microphone connector - The light in sleep state. • Power light is not receiving power. 5 Hard drive activity light - the computer is in the center of your computer. 4 Power button... - Connects to a microphone for audio input. 8 FlexBay - NOTE: To connect to turn computer on the back of this button indicates the power state: • Solid white - This panel covers ...
Setup Guide
Page 25
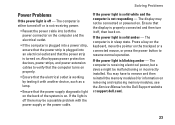
...Power Problems If the power light is in sleep state. If the power light is on the Dell Support website at support.dell.com). 23 The computer is either turned off , then back on . Press a key on the keyboard, move the pointer on the trackpad or a connected mouse, or press the power button... to verify that the computer turns on properly. • Ensure that the electrical outlet is working by testing it off or is not receiving power. • Reseat the power cable into both the power connector on the computer and the electrical outlet...
...Power Problems If the power light is in sleep state. If the power light is on the Dell Support website at support.dell.com). 23 The computer is either turned off , then back on . Press a key on the keyboard, move the pointer on the trackpad or a connected mouse, or press the power button... to verify that the computer turns on properly. • Ensure that the electrical outlet is working by testing it off or is not receiving power. • Reseat the power cable into both the power connector on the computer and the electrical outlet...
Setup Guide
Page 28
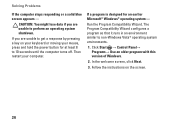
.... Click Start → Control Panel→ Programs→ Use an older program with this version of Windows. 2. Then restart your mouse, press and hold the power button for an earlier Microsoft® Windows® operating system - If a program is designed for at least 8 to non-Windows Vista® operating system environments. 1. Solving...
.... Click Start → Control Panel→ Programs→ Use an older program with this version of Windows. 2. Then restart your mouse, press and hold the power button for an earlier Microsoft® Windows® operating system - If a program is designed for at least 8 to non-Windows Vista® operating system environments. 1. Solving...
Setup Guide
Page 60
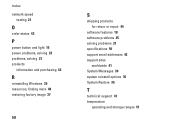
Index network speed testing 21 O order status 43 P power button and light 15 power problems, solving 23 problems, solving 21 products information and purchasing 43 R reinstalling Windows 35 resources, finding more 48 restoring factory image 37 58 S shipping products for return or repair 44 software features 18 software problems 25 solving problems 21 specifications 50 support email addresses 42 support sites worldwide 41 System Messages 30 system reinstall options 35 System Restore 35 T technical support 41 temperature operating and storage ranges 51
Index network speed testing 21 O order status 43 P power button and light 15 power problems, solving 23 problems, solving 21 products information and purchasing 43 R reinstalling Windows 35 resources, finding more 48 restoring factory image 37 58 S shipping products for return or repair 44 software features 18 software problems 25 solving problems 21 specifications 50 support email addresses 42 support sites worldwide 41 System Messages 30 system reinstall options 35 System Restore 35 T technical support 41 temperature operating and storage ranges 51

