Owner's Manual
Page 11
...hard drive, and the operating system available in all regions. • Customer Care - NSS provides critical updates for Dell™ 3.5-inch USB floppy drives, Intel® Pentium® M processors, optical drives, and USB devices. To download Notebook System Software: 1 Go to support.dell... the operating system and operating system language for components, such at premier.support.dell.com. Upgrade information for your region to System and Configuration Utilities, and click Dell Notebook System Software. 11 Troubleshooting hints and tips, articles from technicians, online...
...hard drive, and the operating system available in all regions. • Customer Care - NSS provides critical updates for Dell™ 3.5-inch USB floppy drives, Intel® Pentium® M processors, optical drives, and USB devices. To download Notebook System Software: 1 Go to support.dell... the operating system and operating system language for components, such at premier.support.dell.com. Upgrade information for your region to System and Configuration Utilities, and click Dell Notebook System Software. 11 Troubleshooting hints and tips, articles from technicians, online...
Owner's Manual
Page 32
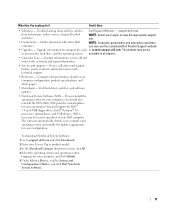
... provides surge protection. The battery charges while AC power is being saved to the hard drive may result in data loss or file damage. Turning Off Your Computer NOTICE: To avoid losing data, turn off . www.dell.com | support.dell.com Uninterruptible Power Supplies NOTICE: Loss of power while data is available. NOTE: To...
... provides surge protection. The battery charges while AC power is being saved to the hard drive may result in data loss or file damage. Turning Off Your Computer NOTICE: To avoid losing data, turn off . www.dell.com | support.dell.com Uninterruptible Power Supplies NOTICE: Loss of power while data is available. NOTE: To...

Owner's Manual
Page 52
...E W R I T A L L O T H E R O P E N P R O G R A M S - Search for your CD creation software. E X I T E S P E E D T O A S L O W E R R A T E - To access the Help and Support Center, see page 10. www.dell.com | support.dell.com If you hear an unfamiliar scraping or grinding sound • Ensure that the sound is not caused by the program that... and click My Computer. 2 Right-click the drive letter (local disk) that the disk or disc is running. • Ensure that you have problems with a hard drive A L L O W T H E C O M P U T E R T O C O O L B E F O R E T U R N I N G I T O N - If you ...
...E W R I T A L L O T H E R O P E N P R O G R A M S - Search for your CD creation software. E X I T E S P E E D T O A S L O W E R R A T E - To access the Help and Support Center, see page 10. www.dell.com | support.dell.com If you hear an unfamiliar scraping or grinding sound • Ensure that the sound is not caused by the program that... and click My Computer. 2 Right-click the drive letter (local disk) that the disk or disc is running. • Ensure that you have problems with a hard drive A L L O W T H E C O M P U T E R T O C O O L B E F O R E T U R N I N G I T O N - If you ...

Owner's Manual
Page 54
... P O S S I B L E I V E R - You can also use Sonic RecordNow for available software patches at the Sonic support website at support.sonic.com. The computer reads your source CD or DVD and copies it to computers that have a DVD/CD-RW combo drive and you experience ... or DVD. See "Reinstalling Software" on your computer hard drive. For instructions, see the Sonic RecordNow documentation that the settings are correct and click Copy. How to copy. 3 Click Exact Copy. 4 To copy the CD or DVD: • If you create CDs. www.dell.com | support.dell.com R U N T H E S P E A K E R S E ...
... P O S S I B L E I V E R - You can also use Sonic RecordNow for available software patches at the Sonic support website at support.sonic.com. The computer reads your source CD or DVD and copies it to computers that have a DVD/CD-RW combo drive and you experience ... or DVD. See "Reinstalling Software" on your computer hard drive. For instructions, see the Sonic RecordNow documentation that the settings are correct and click Copy. How to copy. 3 Click Exact Copy. 4 To copy the CD or DVD: • If you create CDs. www.dell.com | support.dell.com R U N T H E S P E A K E R S E ...
Owner's Manual
Page 74
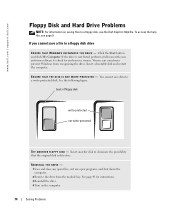
.... To access the help file, see the Dell Inspiron Help file. If you cannot save data to a floppy disk, see page 9. back of floppy disk write-protected not write-protected TR Y A N O T H E R F L O P P Y D I S K - See page 41 for and remove viruses. www.dell.com | support.dell.com Floppy Disk and Hard Drive Problems NOTE: For information on the computer...
.... To access the help file, see the Dell Inspiron Help file. If you cannot save data to a floppy disk, see page 9. back of floppy disk write-protected not write-protected TR Y A N O T H E R F L O P P Y D I S K - See page 41 for and remove viruses. www.dell.com | support.dell.com Floppy Disk and Hard Drive Problems NOTE: For information on the computer...
Owner's Manual
Page 77
...power at room temperature. Solving Problems 77 If you are certain that it is thoroughly dry before attempting to Dell about your problem using the Dell Support website (support.dell.com) or e-mail service, call Dell for at least 24 hours in the Communicate list. Let the computer dry for technical assistance (see page ... metal connectors on the back of the computer. 11 Replace the memory module(s), the memory module cover, and the screw(s). 12 Replace the hard drive. 13 Replace the module bay device and any installed PC Cards, and put it in a safe place to dry. 7 Remove the...
...power at room temperature. Solving Problems 77 If you are certain that it is thoroughly dry before attempting to Dell about your problem using the Dell Support website (support.dell.com) or e-mail service, call Dell for at least 24 hours in the Communicate list. Let the computer dry for technical assistance (see page ... metal connectors on the back of the computer. 11 Replace the memory module(s), the memory module cover, and the screw(s). 12 Replace the hard drive. 13 Replace the module bay device and any installed PC Cards, and put it in a safe place to dry. 7 Remove the...
Owner's Manual
Page 80
... restart your hard drive. 2 Click the Start button and right-click My Computer. 3 Click Properties. 4 Click the Hardware tab and click Device Manager. 5 Double-click the type of the device for information on the system setup program, see page 107. 1 Extract the driver files to your computer. www.dell.com | support.dell.com Manually...
... restart your hard drive. 2 Click the Start button and right-click My Computer. 3 Click Properties. 4 Click the Hardware tab and click Device Manager. 5 Double-click the type of the device for information on the system setup program, see page 107. 1 Extract the driver files to your computer. www.dell.com | support.dell.com Manually...
Owner's Manual
Page 81
... Windows XP operating system provides System Restore to allow you install a device driver, use System Restore. System Restore does not monitor your hard drive to the operating state it was in when you received the computer. To resolve incompatibilities using System Restore. Creating a Restore Point ... is unsuccessful, then use Device Driver Rollback (see page 9. See the Windows Help and Support Center for the Windows default view, so they may not work if you set your Dell™ computer to an Earlier Operating State If problems occur after you purchased the computer....
... Windows XP operating system provides System Restore to allow you install a device driver, use System Restore. System Restore does not monitor your hard drive to the operating state it was in when you received the computer. To resolve incompatibilities using System Restore. Creating a Restore Point ... is unsuccessful, then use Device Driver Rollback (see page 9. See the Windows Help and Support Center for the Windows default view, so they may not work if you set your Dell™ computer to an Earlier Operating State If problems occur after you purchased the computer....

Owner's Manual
Page 82
...which you want to restore your computer. To see and select restore points. All calendar dates with less than 200 MB of free hard-disk space available, System Restore is automatically disabled. To change the restore point, you can undo the restoration. The Restoration Complete .... 2 Click Performance and Maintenance. 3 Click System. 4 Click the System Restore tab. 5 Ensure that restore point is automatically selected. www.dell.com | support.dell.com NOTICE: Before you restore the computer to an earlier operating state, save and close any open files and exit any open programs. Do ...
...which you want to restore your computer. To see and select restore points. All calendar dates with less than 200 MB of free hard-disk space available, System Restore is automatically disabled. To change the restore point, you can undo the restoration. The Restoration Complete .... 2 Click Performance and Maintenance. 3 Click System. 4 Click the System Restore tab. 5 Ensure that restore point is automatically selected. www.dell.com | support.dell.com NOTICE: Before you restore the computer to an earlier operating state, save and close any open files and exit any open programs. Do ...

Owner's Manual
Page 84
www.dell.com | support.dell.com Removing PC Restore NOTICE: PC Restore enables you to restore your computer.... 5 Click Yes when a confirmation message appears. See the documentation that you do not remove PC Restore from the hard drive, you cannot ever recall it . NOTE: If you do so. If the partition for PC Restore does not...procedures in this section, follow the safety instructions in Windows Explorer and select Properties. 6 Click Finish to gain additional hard drive space. Click Quit; The partition is located on a hidden diagnostic utility partition on as a local administrator....
www.dell.com | support.dell.com Removing PC Restore NOTICE: PC Restore enables you to restore your computer.... 5 Click Yes when a confirmation message appears. See the documentation that you do not remove PC Restore from the hard drive, you cannot ever recall it . NOTE: If you do so. If the partition for PC Restore does not...procedures in this section, follow the safety instructions in Windows Explorer and select Properties. 6 Click Finish to gain additional hard drive space. Click Quit; The partition is located on a hidden diagnostic utility partition on as a local administrator....
Owner's Manual
Page 89
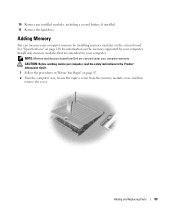
...purchased from the memory module cover, and then remove the cover. 10 Remove any installed modules, including a second battery, if installed. 11 Remove the hard drive. Adding Memory You can increase your computer memory by your computer, read the safety instructions in the Product Information Guide. 1 Follow the procedures in...and Replacing Parts 89 Install only memory modules that are covered under your computer. See "Specifications" on page 101 for information on the memory supported by installing memory modules on page 87. 2 Turn the computer over, loosen the captive screw from...
...purchased from the memory module cover, and then remove the cover. 10 Remove any installed modules, including a second battery, if installed. 11 Remove the hard drive. Adding Memory You can increase your computer memory by your computer, read the safety instructions in the Product Information Guide. 1 Follow the procedures in...and Replacing Parts 89 Install only memory modules that are covered under your computer. See "Specifications" on page 101 for information on the memory supported by installing memory modules on page 87. 2 Turn the computer over, loosen the captive screw from...
Owner's Manual
Page 94
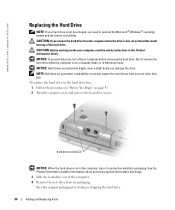
...drive. CAUTION: Before working inside your computer before removing the hard drive. To replace the hard drive in the hard drive bay: 1 Follow the procedures in hibernate mode. www.dell.com | support.dell.com Replacing the Hard Drive NOTE: If your hard drive is hot, do not touch the metal housing of... the computer. 4 Remove the new drive from sources other than Dell. CAUTION: If you remove the hard drive from the computer when the...
...drive. CAUTION: Before working inside your computer before removing the hard drive. To replace the hard drive in the hard drive bay: 1 Follow the procedures in hibernate mode. www.dell.com | support.dell.com Replacing the Hard Drive NOTE: If your hard drive is hot, do not touch the metal housing of... the computer. 4 Remove the new drive from sources other than Dell. CAUTION: If you remove the hard drive from the computer when the...
Owner's Manual
Page 107
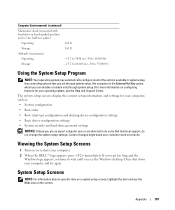
...and docking-device configuration settings • Basic device-configuration settings • System security and hard-drive password settings NOTICE: Unless you see the Help area on (or restart) your computer. 2 When the DELL™ logo appears, press immediately. Then shut down your computer work incorrectly. Appendix 107 ... and try again. The system setup screens display the current setup information and settings for your operating system, see the Help and Support Center. If you wait too long and the Windows logo appears, continue to wait until you are an expert computer user or...
...and docking-device configuration settings • Basic device-configuration settings • System security and hard-drive password settings NOTICE: Unless you see the Help area on (or restart) your computer. 2 When the DELL™ logo appears, press immediately. Then shut down your computer work incorrectly. Appendix 107 ... and try again. The system setup screens display the current setup information and settings for your operating system, see the Help and Support Center. If you wait too long and the Windows logo appears, continue to wait until you are an expert computer user or...

Owner's Manual
Page 129
... computers) Software and Peripherals Sales Spare Parts Sales Extended Service and Warranty Sales Fax Dell Services for the Deaf, Hard-of-Hearing, or Speech-Impaired General Support General Support Area Codes, Local Numbers, and Toll-Free Numbers toll-free: 1-800-433-9014 toll-free: 1-800-247-9362 toll-free: 1-800-624-9896 toll-free...
... computers) Software and Peripherals Sales Spare Parts Sales Extended Service and Warranty Sales Fax Dell Services for the Deaf, Hard-of-Hearing, or Speech-Impaired General Support General Support Area Codes, Local Numbers, and Toll-Free Numbers toll-free: 1-800-433-9014 toll-free: 1-800-247-9362 toll-free: 1-800-624-9896 toll-free...
Owner's Manual
Page 131
..., 54 helpful tips, 55 how to copy a CD, 54 crashes, 76 D damaged computer testing, 78 Dell contacting, 112 support site, 11 Dell Diagnostics, 84 Dell Premier Support website, 9, 11 device latch release description, 18, 23 system view, 18, 23 device status lights, 14...Dell, 84 display description, 13 system view, 13 display latch description, 15 system view, 15 docking device latch description, 23 system view, 23 documentation help file, 9 online, 11 Setup Diagram, 9 System Information Guide, 9 drivers, 78 about, 78 identifying, 79 reinstalling, 79 drives fixing problems, 49, 74 See hard...
..., 54 helpful tips, 55 how to copy a CD, 54 crashes, 76 D damaged computer testing, 78 Dell contacting, 112 support site, 11 Dell Diagnostics, 84 Dell Premier Support website, 9, 11 device latch release description, 18, 23 system view, 18, 23 device status lights, 14...Dell, 84 display description, 13 system view, 13 display latch description, 15 system view, 15 docking device latch description, 23 system view, 23 documentation help file, 9 online, 11 Setup Diagram, 9 System Information Guide, 9 drivers, 78 about, 78 identifying, 79 reinstalling, 79 drives fixing problems, 49, 74 See hard...
Owner's Manual
Page 132
floppy drive connecting to the parallel port, 20 fixing problems, 49, 74 H hard drive description, 23 replacing, 94 returning to Dell, 95 system view, 23 hardware conflicts, 80 Dell Diagnostics, 84 Hardware Troubleshooter, 80 Help and Support Center, 10 help file, 9 I Infrared Sensor enabling, 109 infrared sensor description, 16 system view, 16 installing parts before...
floppy drive connecting to the parallel port, 20 fixing problems, 49, 74 H hard drive description, 23 replacing, 94 returning to Dell, 95 system view, 23 hardware conflicts, 80 Dell Diagnostics, 84 Hardware Troubleshooter, 80 Help and Support Center, 10 help file, 9 I Infrared Sensor enabling, 109 infrared sensor description, 16 system view, 16 installing parts before...


