Owner's Manual
Page 4
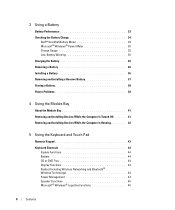
3 Using a Battery Battery Performance 33 Checking the Battery Charge 34 Dell™ QuickSet Battery Meter 34 Microsoft® Windows® Power Meter 35 Charge Gauge 35 Low-Battery Warning 35 Charging the Battery 35 Removing a Battery ... and Installing Devices While the Computer Is Turned Off. . . . . . 41 Removing and Installing Devices While the Computer Is Running 42 5 Using the Keyboard and Touch Pad Numeric Keypad 43 Keyboard Shortcuts 44 System Functions 44 Battery 44 CD or DVD Tray 44 Display Functions 44 Radios (Including Wireless Networking and Bluetooth®...
3 Using a Battery Battery Performance 33 Checking the Battery Charge 34 Dell™ QuickSet Battery Meter 34 Microsoft® Windows® Power Meter 35 Charge Gauge 35 Low-Battery Warning 35 Charging the Battery 35 Removing a Battery ... and Installing Devices While the Computer Is Turned Off. . . . . . 41 Removing and Installing Devices While the Computer Is Running 42 5 Using the Keyboard and Touch Pad Numeric Keypad 43 Keyboard Shortcuts 44 System Functions 44 Battery 44 CD or DVD Tray 44 Display Functions 44 Radios (Including Wireless Networking and Bluetooth®...

Owner's Manual
Page 5
Touch Pad 46 Customizing the Touch Pad 47 Touch Pad or Mouse Problems 47 External Keyboard Problems 48 Unexpected Characters 48 6 Using CDs, DVDs, and other Multimedia Using CDs and DVDs 49 Drive Problems 49 If you cannot save a file to a ...
Touch Pad 46 Customizing the Touch Pad 47 Touch Pad or Mouse Problems 47 External Keyboard Problems 48 Unexpected Characters 48 6 Using CDs, DVDs, and other Multimedia Using CDs and DVDs 49 Drive Problems 49 If you cannot save a file to a ...

Owner's Manual
Page 7
... Tools 87 Shutting Down Your Computer 87 Adding Memory 89 Adding a Mini PCI Card 91 Replacing the Hard Drive 94 Returning a Hard Drive to Dell 95 Keyboard 96 Internal Card With Bluetooth® Wireless Technology 98 10 Appendix Specifications 101 Viewing the System Setup Screens 107 System Setup Screens 107 Commonly Used...
... Tools 87 Shutting Down Your Computer 87 Adding Memory 89 Adding a Mini PCI Card 91 Replacing the Hard Drive 94 Returning a Hard Drive to Dell 95 Keyboard 96 Internal Card With Bluetooth® Wireless Technology 98 10 Appendix Specifications 101 Viewing the System Setup Screens 107 System Setup Screens 107 Commonly Used...
Owner's Manual
Page 13
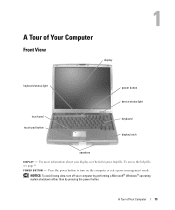
... the Dell Inspiron Help file. NOTICE: To avoid losing data, turn on the computer or exit a power management mode. P O W E R B U T T O N - Press the power button to turn off your display, see page 9. A Tour of Your Computer Front View display keyboard status ...light touch pad touch pad button power button device status light keyboard display latch speakers D I S P L A Y - A Tour of Your Computer 13 For more information about your computer by ...
... the Dell Inspiron Help file. NOTICE: To avoid losing data, turn on the computer or exit a power management mode. P O W E R B U T T O N - Press the power button to turn off your display, see page 9. A Tour of Your Computer Front View display keyboard status ...light touch pad touch pad button power button device status light keyboard display latch speakers D I S P L A Y - A Tour of Your Computer 13 For more information about your computer by ...
Owner's Manual
Page 15
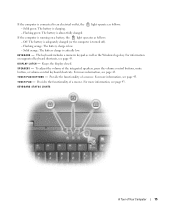
...Provides the functionality of the integrated speakers, press the volume control buttons, mute button, or volume-control keyboard shortcuts. If the computer is running on supported keyboard shortcuts, see page 43. The keyboard includes a numeric keypad as well as follows: - T O U C H P A D B..., see page 43. D I S P L A Y L A T C H - Keeps the display closed. Flashing orange: The battery charge is low. - KEYBOARD STATUS LIGHTS A Tour of a mouse. Provide the functionality of Your Computer 15 For information on a battery, the light operates as the Windows logo key.
...Provides the functionality of the integrated speakers, press the volume control buttons, mute button, or volume-control keyboard shortcuts. If the computer is running on supported keyboard shortcuts, see page 43. The keyboard includes a numeric keypad as well as follows: - T O U C H P A D B..., see page 43. D I S P L A Y L A T C H - Keeps the display closed. Flashing orange: The battery charge is low. - KEYBOARD STATUS LIGHTS A Tour of a mouse. Provide the functionality of Your Computer 15 For information on a battery, the light operates as the Windows logo key.
Owner's Manual
Page 16
... enable the sensor. For information on transferring data, see the Dell Inspiron Help file. To access the help file, see page 9. When you transfer files from your computer, the sensor is enabled. www.dell.com | support.dell.com The green lights located above the keyboard indicate the following: 9 Turns on when the numeric keypad is...
... enable the sensor. For information on transferring data, see the Dell Inspiron Help file. To access the help file, see page 9. When you transfer files from your computer, the sensor is enabled. www.dell.com | support.dell.com The green lights located above the keyboard indicate the following: 9 Turns on when the numeric keypad is...
Owner's Manual
Page 20
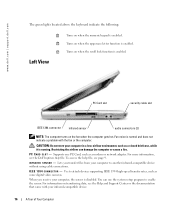
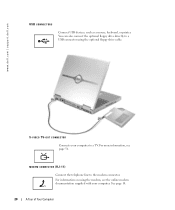
For information on using the optional floppy-drive cable. S-VIDEO TV-OUT CONNECTOR Connects your computer. See page 10. 20 A Tour of Your Computer You can also connect the optional floppy drive directly to a USB connector using the modem, see page 56. For more information, see the online modem documentation supplied with your computer to the modem connector. MODEM CONNECTOR (RJ-11) Connect the telephone line to a TV. www.dell.com | support.dell.com USB CONNECTORS Connect USB devices, such as a mouse, keyboard, or printer.
For information on using the optional floppy-drive cable. S-VIDEO TV-OUT CONNECTOR Connects your computer. See page 10. 20 A Tour of Your Computer You can also connect the optional floppy drive directly to a USB connector using the modem, see page 56. For more information, see the online modem documentation supplied with your computer to the modem connector. MODEM CONNECTOR (RJ-11) Connect the telephone line to a TV. www.dell.com | support.dell.com USB CONNECTORS Connect USB devices, such as a mouse, keyboard, or printer.
Owner's Manual
Page 43
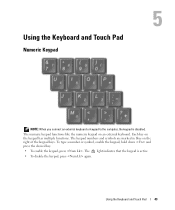
... . The 9 light indicates that the keypad is disabled. Each key on the right of the keypad keys. Using the Keyboard and Touch Pad Numeric Keypad NOTE: When you connect an external keyboard or keypad to the computer, the keypad is active. • To disable the keypad, press again. Using the... Keyboard and Touch Pad 43 The keypad numbers and symbols are marked in blue on the keypad has multiple functions. ...
... . The 9 light indicates that the keypad is disabled. Each key on the right of the keypad keys. Using the Keyboard and Touch Pad Numeric Keypad NOTE: When you connect an external keyboard or keypad to the computer, the keypad is active. • To disable the keypad, press again. Using the... Keyboard and Touch Pad 43 The keypad numbers and symbols are marked in blue on the keypad has multiple functions. ...
Owner's Manual
Page 44
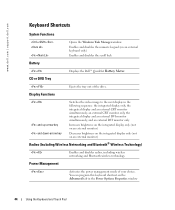
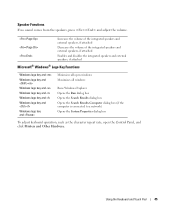
... external CRT monitor only, the integrated display and an external DVI monitor simultaneously, and an external DVI monitor only. www.dell.com | support.dell.com Keyboard Shortcuts System Functions Battery CD or DVD Tray Opens the Windows Task Manager window Enables and disables the numeric keypad (on an... external keyboard only) Enables and disables the scroll lock Displays the Dell™ QuickSet Battery Meter. and up-arrow key and down-arrow key Switches the video image to the...
... external CRT monitor only, the integrated display and an external DVI monitor simultaneously, and an external DVI monitor only. www.dell.com | support.dell.com Keyboard Shortcuts System Functions Battery CD or DVD Tray Opens the Windows Task Manager window Enables and disables the numeric keypad (on an... external keyboard only) Enables and disables the scroll lock Displays the Dell™ QuickSet Battery Meter. and up-arrow key and down-arrow key Switches the video image to the...
Owner's Manual
Page 45
... Results dialog box Opens the Search Results-Computer dialog box (if the computer is connected to a network) Opens the System Properties dialog box To adjust keyboard operation, such as the character repeat rate, open the Control Panel, and click Printers and Other Hardware. Using the...
... Results dialog box Opens the Search Results-Computer dialog box (if the computer is connected to a network) Opens the System Properties dialog box To adjust keyboard operation, such as the character repeat rate, open the Control Panel, and click Printers and Other Hardware. Using the...
Owner's Manual
Page 46
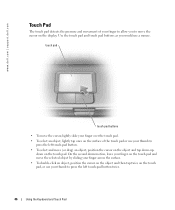
www.dell.com | support.dell.com Touch Pad The touch pad detects the pressure and movement of the touch pad or use your thumb to press the left touch-pad button twice. 46 Using the Keyboard and Touch Pad down motion, leave your finger on the touch pad and move the selected object by...
www.dell.com | support.dell.com Touch Pad The touch pad detects the pressure and movement of the touch pad or use your thumb to press the left touch-pad button twice. 46 Using the Keyboard and Touch Pad down motion, leave your finger on the touch pad and move the selected object by...
Owner's Manual
Page 47
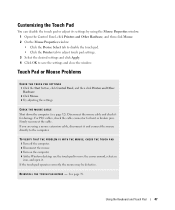
.... Disconnect the mouse cable and check it for bent or broken pins. R E I N S T A L L T H E T O U C H P A D D R I V E R - If the touch pad operates correctly, the mouse may be defective. Using the Keyboard and Touch Pad 47 If you are using the Mouse Properties window. 1 Open the Control Panel, click Printers and Other Hardware, and then click Mouse...
.... Disconnect the mouse cable and check it for bent or broken pins. R E I N S T A L L T H E T O U C H P A D D R I V E R - If the touch pad operates correctly, the mouse may be defective. Using the Keyboard and Touch Pad 47 If you are using the Mouse Properties window. 1 Open the Control Panel, click Printers and Other Hardware, and then click Mouse...
Owner's Manual
Page 48
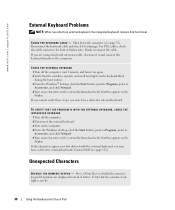
... the numbers lock light is not lit. 48 Using the Keyboard and Touch Pad Firmly reconnect the cable. www.dell.com | support.dell.com External Keyboard Problems NOTE: When you may have a defective external keyboard. For PS/2 cables, check the cable connector for damage. Contact Dell (see page 32). Unexpected Characters D I S A B L E T H E N U M E R I C K E Y P A D - Press to disable the numeric...
... the numbers lock light is not lit. 48 Using the Keyboard and Touch Pad Firmly reconnect the cable. www.dell.com | support.dell.com External Keyboard Problems NOTE: When you may have a defective external keyboard. For PS/2 cables, check the cable connector for damage. Contact Dell (see page 32). Unexpected Characters D I S A B L E T H E N U M E R I C K E Y P A D - Press to disable the numeric...
Owner's Manual
Page 78
...device. Each device has its own set of specialized commands that only its driver recognizes. Many drivers, such as a printer, mouse, or keyboard. NOTE: For information on your warranty coverage, see the separate paper warranty document that shipped with your computer. You may need to you ...battery. 15 Turn on the computer and verify that it is a program that controls a device such as the keyboard driver, come with your computer. Drivers What Is a Driver? Dell ships your computer to install drivers if you cannot identify the damaged components, see page 112. NOTE: For ...
...device. Each device has its own set of specialized commands that only its driver recognizes. Many drivers, such as a printer, mouse, or keyboard. NOTE: For information on your warranty coverage, see the separate paper warranty document that shipped with your computer. You may need to you ...battery. 15 Turn on the computer and verify that it is a program that controls a device such as the keyboard driver, come with your computer. Drivers What Is a Driver? Dell ships your computer to install drivers if you cannot identify the damaged components, see page 112. NOTE: For ...

Owner's Manual
Page 85
.... Tests a specific device. 4 Turn on your display, hold down the mute button and press the computer's power button to begin the Dell Diagnostics. The computer runs the Pre-boot System Assessment, a series of initial tests of devices. to retest the component that appear. •...If failures are detected during the Pre-boot System Assessment, write down your system board, keyboard, hard drive, and display. • During the assessment, answer any key to start the Dell Diagnostics from the diagnostics utility partition on to increase the possibility of devices. This test ...
.... Tests a specific device. 4 Turn on your display, hold down the mute button and press the computer's power button to begin the Dell Diagnostics. The computer runs the Pre-boot System Assessment, a series of initial tests of devices. to retest the component that appear. •...If failures are detected during the Pre-boot System Assessment, write down your system board, keyboard, hard drive, and display. • During the assessment, answer any key to start the Dell Diagnostics from the diagnostics utility partition on to increase the possibility of devices. This test ...
Owner's Manual
Page 96
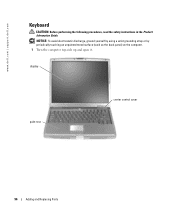
display palm rest center control cover 96 Adding and Replacing Parts NOTICE: To avoid electrostatic discharge, ground yourself by using a wrist grounding strap or by periodically touching an unpainted metal surface (such as the back panel) on the computer. 1 Turn the computer top-side up and open it. www.dell.com | support.dell.com Keyboard CAUTION: Before performing the following procedures, read the safety instructions in the Product Information Guide.
display palm rest center control cover 96 Adding and Replacing Parts NOTICE: To avoid electrostatic discharge, ground yourself by using a wrist grounding strap or by periodically touching an unpainted metal surface (such as the back panel) on the computer. 1 Turn the computer top-side up and open it. www.dell.com | support.dell.com Keyboard CAUTION: Before performing the following procedures, read the safety instructions in the Product Information Guide.

Owner's Manual
Page 97
...access to replace. b Rotate the keyboard up the center control cover. NOTICE: The keycaps on the right side of the keyboard. 2 Remove the center control cover: a Open the display all the way (180 degrees) so that it aside. b Starting on the keyboard are fragile, easily dislodged, and ...time-consuming to the keyboard connector. center control cover 3 Remove the keyboard: a Remove the two M2.5 x 5-mm screws across the top of the computer, use a plastic ...
...access to replace. b Rotate the keyboard up the center control cover. NOTICE: The keycaps on the right side of the keyboard. 2 Remove the center control cover: a Open the display all the way (180 degrees) so that it aside. b Starting on the keyboard are fragile, easily dislodged, and ...time-consuming to the keyboard connector. center control cover 3 Remove the keyboard: a Remove the two M2.5 x 5-mm screws across the top of the computer, use a plastic ...
Owner's Manual
Page 98
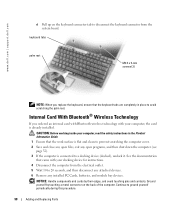
... with your docking device for instructions. 4 Disconnect the computer from the system board. Internal Card With Bluetooth® Wireless Technology If you replace the keyboard, ensure that the keyboard tabs are completely in the Product Information Guide. 1 Ensure that came with your computer, read the safety instructions in place to a docking device... inside your computer, the card is connected to avoid scratching the palm rest. Ground yourself by their edges, and avoid touching pins and contacts. www.dell.com | support.dell.com d Pull up on the back of the computer.
... with your docking device for instructions. 4 Disconnect the computer from the system board. Internal Card With Bluetooth® Wireless Technology If you replace the keyboard, ensure that the keyboard tabs are completely in the Product Information Guide. 1 Ensure that came with your computer, read the safety instructions in place to a docking device... inside your computer, the card is connected to avoid scratching the palm rest. Ground yourself by their edges, and avoid touching pins and contacts. www.dell.com | support.dell.com d Pull up on the back of the computer.

Owner's Manual
Page 103
...-bit (stereo digital-to-analog), 18-bit (stereo analog-to-digital) AC'97 microphone miniconnector, stereo headphones/speakers miniconnector two 4-ohm speakers 2-W channel into 4 ohms keyboard shortcuts or program menus XGA; Communications (continued) Network adapter Wireless Video Video type Video controller Video memory LCD interface Audio Audio type Audio controller Stereo...
...-bit (stereo digital-to-analog), 18-bit (stereo analog-to-digital) AC'97 microphone miniconnector, stereo headphones/speakers miniconnector two 4-ohm speakers 2-W channel into 4 ohms keyboard shortcuts or program menus XGA; Communications (continued) Network adapter Wireless Video Video type Video controller Video memory LCD interface Audio Audio type Audio controller Stereo...
Owner's Manual
Page 104
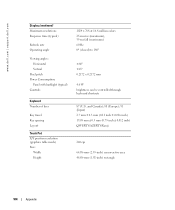
www.dell.com | support.dell.com Display (continued) Maximum resolutions Response time (typical) Refresh rate Operating angle Viewing angles: Horizontal Vertical Pixel pitch Power Consumption: Panel with backlight (typical) Controls Keyboard Number of keys Key travel Key spacing Layout Touch Pad X/Y position resolution (graphics ...) 60 Hz 0° (closed) to 180° ±60° ±45° 0.2172 x 0.2172 mm 4.6 W brightness can be controlled through keyboard shortcuts 87 (U.S. and Canada); 88 (Europe); 91 (Japan) 2.7 mm ± 0.3 mm (0.11 inch ± 0.016 inch) 19.05 mm ± ...
www.dell.com | support.dell.com Display (continued) Maximum resolutions Response time (typical) Refresh rate Operating angle Viewing angles: Horizontal Vertical Pixel pitch Power Consumption: Panel with backlight (typical) Controls Keyboard Number of keys Key travel Key spacing Layout Touch Pad X/Y position resolution (graphics ...) 60 Hz 0° (closed) to 180° ±60° ±45° 0.2172 x 0.2172 mm 4.6 W brightness can be controlled through keyboard shortcuts 87 (U.S. and Canada); 88 (Europe); 91 (Japan) 2.7 mm ± 0.3 mm (0.11 inch ± 0.016 inch) 19.05 mm ± ...


