View
Page 5
...Battery 47 Battery Performance 47 Checking the Battery Charge 48 Dell QuickSet Battery Meter 48 Microsoft® Windows® Battery Meter 49 Charge Gauge 49 Low-Battery Warning 50 Conserving Battery Power 50 Configuring Power Management Settings . . . . . 50 Using the Sleep Power State 51 Charging the Battery 51 Replacing the Battery 52 Storing a Battery... 53 6 Using Multimedia 55 Playing Media 55 Playing Media Using Dell Travel Remote 57 Copying CD, DVD, and Blu-ray Disc&#...
...Battery 47 Battery Performance 47 Checking the Battery Charge 48 Dell QuickSet Battery Meter 48 Microsoft® Windows® Battery Meter 49 Charge Gauge 49 Low-Battery Warning 50 Conserving Battery Power 50 Configuring Power Management Settings . . . . . 50 Using the Sleep Power State 51 Charging the Battery 51 Replacing the Battery 52 Storing a Battery... 53 6 Using Multimedia 55 Playing Media 55 Playing Media Using Dell Travel Remote 57 Copying CD, DVD, and Blu-ray Disc&#...

View
Page 11
Removing a Mobile Broadband or WWAN Card 158 Replacing a WWAN Card 160 Removing a WPAN Card 161 Replacing a WPAN Card 162 Flash Cache Module 162 Removing the FCM 162 Replacing the FCM 163 Internal Card With Bluetooth® Wireless Technology 164 Removing the Card 164 Replacing the Card 165 Coin-Cell Battery 165 Removing the Coin-Cell Battery 166 Replacing the Coin-Cell Battery 166 13 Dell™ QuickSet Features 167 14 Traveling With Your Computer 169 Identifying Your Computer 169 Packing the Computer 169 Travel Tips 170 Traveling by Air 170 Contents 11
Removing a Mobile Broadband or WWAN Card 158 Replacing a WWAN Card 160 Removing a WPAN Card 161 Replacing a WPAN Card 162 Flash Cache Module 162 Removing the FCM 162 Replacing the FCM 163 Internal Card With Bluetooth® Wireless Technology 164 Removing the Card 164 Replacing the Card 165 Coin-Cell Battery 165 Removing the Coin-Cell Battery 166 Replacing the Coin-Cell Battery 166 13 Dell™ QuickSet Features 167 14 Traveling With Your Computer 169 Identifying Your Computer 169 Packing the Computer 169 Travel Tips 170 Traveling by Air 170 Contents 11

View
Page 34
... DIMM B memory module and the coin-cell battery. To adjust the volume of the integrated speaker, press the volume control buttons or the mute button. Provides information on the battery charge (see "Replacing the Battery" on page 48). Restricting the airflow can... use the computer without connecting the computer to be controlled by the Dell Travel Remote. B A T T E R Y R E L E A S E L A T C H E S - CAUTION: ...
... DIMM B memory module and the coin-cell battery. To adjust the volume of the integrated speaker, press the volume control buttons or the mute button. Provides information on the battery charge (see "Replacing the Battery" on page 48). Restricting the airflow can... use the computer without connecting the computer to be controlled by the Dell Travel Remote. B A T T E R Y R E L E A S E L A T C H E S - CAUTION: ...
View
Page 48
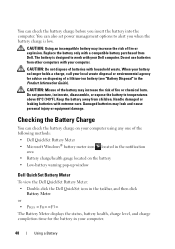
... Information Guide). Do not use batteries from other computers with a compatible battery purchased from children. Checking the Battery Charge You can also set power management options to temperatures above 65°C (149°F). Replace the battery only with your computer using any one of a lithium-ion battery (see "Battery Disposal" in your Dell computer. CAUTION: Misuse of the...
... Information Guide). Do not use batteries from other computers with a compatible battery purchased from children. Checking the Battery Charge You can also set power management options to temperatures above 65°C (149°F). Replace the battery only with your computer using any one of a lithium-ion battery (see "Battery Disposal" in your Dell computer. CAUTION: Misuse of the...
View
Page 49
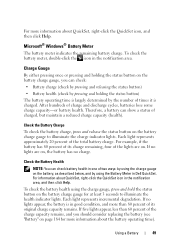
... Battery health (check by pressing and holding the status button on the battery charge gauge, you should consider replacing the battery (see "Battery" on the battery charge gauge to illuminate the health indicator lights. Check the Battery Charge To check the battery ...battery operating time). Charge Gauge By either pressing once or pressing and holding the status button) The battery operating time is largely determined by the number of two ways: by using the charge gauge on , the battery has no charge. Therefore, a battery can check battery health in one of times it is in Dell...
... Battery health (check by pressing and holding the status button on the battery charge gauge, you should consider replacing the battery (see "Battery" on the battery charge gauge to illuminate the health indicator lights. Check the Battery Charge To check the battery ...battery operating time). Charge Gauge By either pressing once or pressing and holding the status button) The battery operating time is largely determined by the number of two ways: by using the charge gauge on , the battery has no charge. Therefore, a battery can check battery health in one of times it is in Dell...

View
Page 52
.... 4 Slide and click the battery release latches to complete the battery replacement before the computer shuts down and loses any other computers with your computer. To remove the battery: 1 If the computer is designed to continue charging the battery. Disconnect the computer from other external cables from Dell. Do not use batteries from the electrical outlet and...
.... 4 Slide and click the battery release latches to complete the battery replacement before the computer shuts down and loses any other computers with your computer. To remove the battery: 1 If the computer is designed to continue charging the battery. Disconnect the computer from other external cables from Dell. Do not use batteries from the electrical outlet and...

View
Page 53
After a long storage period, recharge the battery fully (see "Charging the Battery" on page 51) before you store your computer for an extended period of time. Using a Battery 53 1 2 1 battery 2 battery release latches (2) To replace the battery, follow the removal procedure in reverse order. A battery discharges during prolonged storage. Storing a Battery Remove the battery when you use it.
After a long storage period, recharge the battery fully (see "Charging the Battery" on page 51) before you store your computer for an extended period of time. Using a Battery 53 1 2 1 battery 2 battery release latches (2) To replace the battery, follow the removal procedure in reverse order. A battery discharges during prolonged storage. Storing a Battery Remove the battery when you use it.

View
Page 115
...problem persists, contact Dell (see "Dell Diagnostics" on the system board may be loose. The time or date stored in the Windows taskbar. A chip on page 99). Insert a disk into the connector. Replace the battery, or connect the computer to charge the battery. Connect your computer ...to an electrical outlet to an electrical outlet; TIME- Run the System Memory tests and the Keyboard Controller test in the Dell Diagnostics (see "Contacting Dell" on page 177). The...
...problem persists, contact Dell (see "Dell Diagnostics" on the system board may be loose. The time or date stored in the Windows taskbar. A chip on page 99). Insert a disk into the connector. Replace the battery, or connect the computer to charge the battery. Connect your computer ...to an electrical outlet to an electrical outlet; TIME- Run the System Memory tests and the Keyboard Controller test in the Dell Diagnostics (see "Contacting Dell" on page 177). The...

View
Page 138
.... 1 Ensure that is not authorized by Dell is flat and clean to prevent the computer cover from being scratched. 2 Turn off your computer. Do not use only the battery designed for other Dell computers. 138 Adding and Replacing Parts Hold a component such as a connector... on the locking tabs before you connect a cable, ensure that both connectors are disconnecting this particular Dell computer. Some cables have a connector with ...
.... 1 Ensure that is not authorized by Dell is flat and clean to prevent the computer cover from being scratched. 2 Turn off your computer. Do not use only the battery designed for other Dell computers. 138 Adding and Replacing Parts Hold a component such as a connector... on the locking tabs before you connect a cable, ensure that both connectors are disconnecting this particular Dell computer. Some cables have a connector with ...

View
Page 139
...section, follow the safety instructions in the Product Information Guide. 5 Turn the computer over. 6 Slide and click the battery release latches. 7 Slide the battery out of the battery bay. 1 2 1 battery 2 battery release latch (2) 8 Turn the computer top-side up, open the display, and press the power button to ground ... drive from the ExpressCard slot (see "Removing an ExpressCard or Blank" on page 81) and the 8-in Sleep state. Adding and Replacing Parts 139 Hard Drive Depending on or in -1 memory card reader (see "Turning Off Your Computer" on page 137) before removing the hard...
...section, follow the safety instructions in the Product Information Guide. 5 Turn the computer over. 6 Slide and click the battery release latches. 7 Slide the battery out of the battery bay. 1 2 1 battery 2 battery release latch (2) 8 Turn the computer top-side up, open the display, and press the power button to ground ... drive from the ExpressCard slot (see "Removing an ExpressCard or Blank" on page 81) and the 8-in Sleep state. Adding and Replacing Parts 139 Hard Drive Depending on or in -1 memory card reader (see "Turning Off Your Computer" on page 137) before removing the hard...

View
Page 143
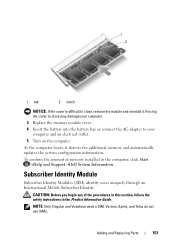
... the Product Information Guide. 1 3 2 1 optical drive 3 locking screw 2 notch Replacing the Optical Drive 1 Slide the optical drive into the bay. 2 Replace and tighten the locking screw. Adding and Replacing Parts 143 Hinge Cover CAUTION: Before you begin any of the computer). NOTICE: To ...help prevent damage to the system board, you must remove the battery from the battery bay before you begin working...
... the Product Information Guide. 1 3 2 1 optical drive 3 locking screw 2 notch Replacing the Optical Drive 1 Slide the optical drive into the bay. 2 Replace and tighten the locking screw. Adding and Replacing Parts 143 Hinge Cover CAUTION: Before you begin any of the computer). NOTICE: To ...help prevent damage to the system board, you must remove the battery from the battery bay before you begin working...

View
Page 145
...Product Information Guide. NOTICE: The keycaps on the keyboard are fragile, easily dislodged, and timeconsuming to disengage the notch on the keyboard from the battery bay before you begin working inside the computer. Keyboard For more information about the keyboard, see "Hinge Cover" on page 143). 3 Remove... the top of the keyboard. NOTICE: To help prevent damage to the system board, you must remove the battery from the tab on the back of the computer to replace. Be careful when removing and handling the keyboard. 4 Slide the keyboard toward the back of the computer). ...
...Product Information Guide. NOTICE: The keycaps on the keyboard are fragile, easily dislodged, and timeconsuming to disengage the notch on the keyboard from the battery bay before you begin working inside the computer. Keyboard For more information about the keyboard, see "Hinge Cover" on page 143). 3 Remove... the top of the keyboard. NOTICE: To help prevent damage to the system board, you must remove the battery from the tab on the back of the computer to replace. Be careful when removing and handling the keyboard. 4 Slide the keyboard toward the back of the computer). ...

View
Page 150
To confirm the amount of the computer. 1 Follow the procedures in the computer, click Start →Help and Support→Dell System Information. Removing the DIMM B Memory Module The DIMM B memory module is located under the memory module cover on the bottom of memory installed ...upside-down, loosen the captive screw on the memory module cover (see "Bottom View" on the computer. 1 2 1 tab 2 notch 3 Replace the keyboard and hinge cover. 4 Insert the battery into the battery bay, or connect the AC adapter to your computer and an electrical outlet. 5 Turn on page 33), and remove the cover...
To confirm the amount of the computer. 1 Follow the procedures in the computer, click Start →Help and Support→Dell System Information. Removing the DIMM B Memory Module The DIMM B memory module is located under the memory module cover on the bottom of memory installed ...upside-down, loosen the captive screw on the memory module cover (see "Bottom View" on the computer. 1 2 1 tab 2 notch 3 Replace the keyboard and hinge cover. 4 Insert the battery into the battery bay, or connect the AC adapter to your computer and an electrical outlet. 5 Turn on page 33), and remove the cover...

View
Page 151
1 2 1 memory module/coin-cell battery compartment 2 captive screw NOTICE: To prevent damage to the memory module connector, do not use tools to carefully spread apart the securing clips on each end of the memory module connector until the module pops up. 4 Remove the module from the connector. Adding and Replacing Parts 151 NOTICE: To avoid electrostatic discharge, ground yourself by using a wrist grounding strap or by periodically touching an unpainted metal surface (such as a connector on the back of the computer). 3 Use your fingertips to spread the memory module securing clips.
1 2 1 memory module/coin-cell battery compartment 2 captive screw NOTICE: To prevent damage to the memory module connector, do not use tools to carefully spread apart the securing clips on each end of the memory module connector until the module pops up. 4 Remove the module from the connector. Adding and Replacing Parts 151 NOTICE: To avoid electrostatic discharge, ground yourself by using a wrist grounding strap or by periodically touching an unpainted metal surface (such as a connector on the back of the computer). 3 Use your fingertips to spread the memory module securing clips.
View
Page 153
...this section, follow the safety instructions in the computer, click Start →Help and Support→Dell System Information. Verizon, Sprint, and Telus do not use SIMs. Adding and Replacing Parts 153 As the computer boots, it . Forcing the cover to close may damage your ... and Vodafone need a SIM. 1 2 1 tab 2 notch NOTICE: If the cover is difficult to your computer. 3 Replace the memory module cover. 4 Insert the battery into the battery bay, or connect the AC adapter to close, remove the module and reinstall it detects the additional memory and automatically updates...
...this section, follow the safety instructions in the computer, click Start →Help and Support→Dell System Information. Verizon, Sprint, and Telus do not use SIMs. Adding and Replacing Parts 153 As the computer boots, it . Forcing the cover to close may damage your ... and Vodafone need a SIM. 1 2 1 tab 2 notch NOTICE: If the cover is difficult to your computer. 3 Replace the memory module cover. 4 Insert the battery into the battery bay, or connect the AC adapter to close, remove the module and reinstall it detects the additional memory and automatically updates...

View
Page 154
..., the card is already installed. If you ordered a wireless Mini Card with the cut-off corner of the SIM facing away from the battery bay before you begin any of wireless Mini Cards: • Wireless Local Area Network (WLAN) • Mobile Broadband or Wireless Wide Area... Network (WWAN) • Wireless Personal Area Network (WPAN) 154 Adding and Replacing Parts NOTICE: To help prevent damage to the system board, you must remove the battery from the compartment. 2 1 1 battery bay 2 SIM Wireless Mini Cards CAUTION: Before you begin working inside the computer. 1 ...
..., the card is already installed. If you ordered a wireless Mini Card with the cut-off corner of the SIM facing away from the battery bay before you begin any of wireless Mini Cards: • Wireless Local Area Network (WLAN) • Mobile Broadband or Wireless Wide Area... Network (WWAN) • Wireless Personal Area Network (WPAN) 154 Adding and Replacing Parts NOTICE: To help prevent damage to the system board, you must remove the battery from the compartment. 2 1 1 battery bay 2 SIM Wireless Mini Cards CAUTION: Before you begin working inside the computer. 1 ...

View
Page 164
If you ordered a card with Bluetooth wireless technology with your computer, it out from the battery bay before you begin any of the procedures in this section, follow the safety instructions in "Before You Begin" on page 137. 2 Remove the hinge ... prevent damage to the system board, you begin working inside the computer. Internal Card With Bluetooth® Wireless Technology CAUTION: Before you must remove the battery from under the securing tabs. 164 Adding and Replacing Parts
If you ordered a card with Bluetooth wireless technology with your computer, it out from the battery bay before you begin any of the procedures in this section, follow the safety instructions in "Before You Begin" on page 137. 2 Remove the hinge ... prevent damage to the system board, you begin working inside the computer. Internal Card With Bluetooth® Wireless Technology CAUTION: Before you must remove the battery from under the securing tabs. 164 Adding and Replacing Parts

View
Page 165
...the card compartment. 2 Connect the cable to the card. Adding and Replacing Parts 165 Coin-Cell Battery CAUTION: Before you begin any of the computer). 1 3 2 1 securing tabs (2) 3 card 2 cable Replacing the Card 1 Replace the card at an angle to slide it under the securing tabs in ...the Product Information Guide. NOTICE: To help prevent damage to the system board, you must remove the battery from the battery bay before you begin working inside the computer....
...the card compartment. 2 Connect the cable to the card. Adding and Replacing Parts 165 Coin-Cell Battery CAUTION: Before you begin any of the computer). 1 3 2 1 securing tabs (2) 3 card 2 cable Replacing the Card 1 Replace the card at an angle to slide it under the securing tabs in ...the Product Information Guide. NOTICE: To help prevent damage to the system board, you must remove the battery from the battery bay before you begin working inside the computer....

View
Page 213
... gauge, 49 charging, 51 checking the charge, 48 performance, 47 power meter, 49 removing, 52 replacing coin-cell battery, 165 storing, 53 BD. See Blu-ray Disc blanks ExpressCards, 79, 83 removing, 81, 84 Bluetooth wireless technology card device status light, 25 ...-RW drive problems, 107 drive problems, 107 Check Disk, 108 cleaning display, 190 keyboard, 190 media, 192 mouse, 191 touch pad, 191 coin-cell battery replacing, 165 computer crashes, 118-119 restore to previous operating state, 134 slow performance, 110, 120 specifications, 179 stops responding, 118 Index 213 Index Numerics ...
... gauge, 49 charging, 51 checking the charge, 48 performance, 47 power meter, 49 removing, 52 replacing coin-cell battery, 165 storing, 53 BD. See Blu-ray Disc blanks ExpressCards, 79, 83 removing, 81, 84 Bluetooth wireless technology card device status light, 25 ...-RW drive problems, 107 drive problems, 107 Check Disk, 108 cleaning display, 190 keyboard, 190 media, 192 mouse, 191 touch pad, 191 coin-cell battery replacing, 165 computer crashes, 118-119 restore to previous operating state, 134 slow performance, 110, 120 specifications, 179 stops responding, 118 Index 213 Index Numerics ...
Service Manual
Page 17
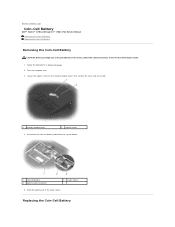
... Information Guide. 1. Replacing the Coin-Cell Battery Turn the computer over. 3. Slide the battery out of the procedures in this section, follow the safety instructions in Before You Begin. 2. Back to Contents Page Coin-Cell Battery Dell™ Vostro™ 1700 and Inspiron™ 1720/1721 Service Manual Removing the Coin-Cell Battery Replacing the Coin-Cell Battery Removing the...
... Information Guide. 1. Replacing the Coin-Cell Battery Turn the computer over. 3. Slide the battery out of the procedures in this section, follow the safety instructions in Before You Begin. 2. Back to Contents Page Coin-Cell Battery Dell™ Vostro™ 1700 and Inspiron™ 1720/1721 Service Manual Removing the Coin-Cell Battery Replacing the Coin-Cell Battery Removing the...


