
Owners Manual
Page 3
... Replacing the Battery 13 5 Keyboard 15 Removing the Keyboard 15 Replacing the Keyboard 16 6 Base Cover 17 Removing the Base Cover 17 Replacing the Base Cover 18 7 Memory Module(s 19 Removing the Memory Module(s 19 Replacing the Memory Module(s 20 8 Hard Drive 21 Removing the Hard Drive 21 Replacing the Hard Drive 23 9 Optical Drive 25 Removing the Optical Drive 25 Replacing the Optical Drive...
... Replacing the Battery 13 5 Keyboard 15 Removing the Keyboard 15 Replacing the Keyboard 16 6 Base Cover 17 Removing the Base Cover 17 Replacing the Base Cover 18 7 Memory Module(s 19 Removing the Memory Module(s 19 Replacing the Memory Module(s 20 8 Hard Drive 21 Removing the Hard Drive 21 Replacing the Hard Drive 23 9 Optical Drive 25 Removing the Optical Drive 25 Replacing the Optical Drive...

Owners Manual
Page 23
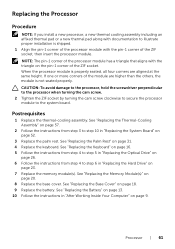
... hard-drive assembly to the hard drive. 5 Lift the hard drive off the hard-drive bracket. 3 2 1 1 screws (4) 3 hard-drive bracket 2 hard drive Replacing the Hard Drive Procedure 1 Remove the new hard drive from its packaging. Save the original packaging for storing or shipping the hard drive. 2 Align the screw holes on the hard drive-bracket with the screw holes on the hard drive. 3 Replace the screws that secure the hard-drive bracket to the hard drive. 4 Place the hard-drive...
... hard-drive assembly to the hard drive. 5 Lift the hard drive off the hard-drive bracket. 3 2 1 1 screws (4) 3 hard-drive bracket 2 hard drive Replacing the Hard Drive Procedure 1 Remove the new hard drive from its packaging. Save the original packaging for storing or shipping the hard drive. 2 Align the screw holes on the hard drive-bracket with the screw holes on the hard drive. 3 Replace the screws that secure the hard-drive bracket to the hard drive. 4 Place the hard-drive...
Owners Manual
Page 24
See "Replacing the Base Cover" on page 9. 24 | Hard Drive See "Replacing the Battery" on page 13. 3 Follow the instructions in "After Working Inside Your Computer" on page 18. 2 Replace the battery. Postrequisites 1 Replace the base cover.
See "Replacing the Base Cover" on page 9. 24 | Hard Drive See "Replacing the Battery" on page 13. 3 Follow the instructions in "After Working Inside Your Computer" on page 18. 2 Replace the battery. Postrequisites 1 Replace the base cover.
Owners Manual
Page 53
... that secure the power-adapter port bracket to the computer base. See "Replacing the Keyboard" on page 16. 3 Follow the instructions from step 4 to step 5 in "Replacing the Optical Drive" on page 26. 4 Follow the instructions from step 4 to step 6 in "Replacing the Hard Drive" on the computer. 2 Press during POST to enter the system setup...
... that secure the power-adapter port bracket to the computer base. See "Replacing the Keyboard" on page 16. 3 Follow the instructions from step 4 to step 5 in "Replacing the Optical Drive" on page 26. 4 Follow the instructions from step 4 to step 6 in "Replacing the Hard Drive" on the computer. 2 Press during POST to enter the system setup...

Owners Manual
Page 57
... Battery" on page 13. 9 Follow the instructions in "Replacing the System Board" on page 52. 2 Replace the palm rest. See "Replacing the Palm Rest" on page 9. Postrequisites 1 Follow the instructions from step 4 to step 6 in "Replacing the Hard Drive" on the thermal-cooling assembly), replace screws that secure the thermal-cooling assembly to step 10 in "After...
... Battery" on page 13. 9 Follow the instructions in "Replacing the System Board" on page 52. 2 Replace the palm rest. See "Replacing the Palm Rest" on page 9. Postrequisites 1 Follow the instructions from step 4 to step 6 in "Replacing the Hard Drive" on the thermal-cooling assembly), replace screws that secure the thermal-cooling assembly to step 10 in "After...
Owners Manual
Page 61
... ZIF socket by turning the cam screw clockwise to secure the processor module to the system board. See "Replacing the Battery" on page 13. 10 Follow the instructions in "Replacing the Hard Drive" on page 9. See "Replacing the Thermal-Cooling Assembly" on page 57. 2 Follow the instructions from step 4 to step 6 in "After Working Inside...
... ZIF socket by turning the cam screw clockwise to secure the processor module to the system board. See "Replacing the Battery" on page 13. 10 Follow the instructions in "Replacing the Hard Drive" on page 9. See "Replacing the Thermal-Cooling Assembly" on page 57. 2 Follow the instructions from step 4 to step 6 in "After Working Inside...
Owners Manual
Page 63
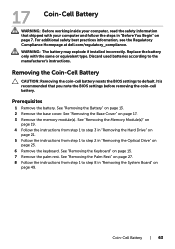
...| 63 Removing the Coin-Cell Battery CAUTION: Removing the coin-cell battery resets the BIOS settings to the manufacturer's instructions. Replace the battery only with your computer, read the safety information that you note the BIOS settings before removing the coin-cell battery...7. For additional safety best practices information, see the Regulatory Compliance Homepage at dell.com/regulatory_compliance. See "Removing the Memory Module(s)" on page 19. 4 Follow the instructions from step 1 to step 3 in "Removing the Hard Drive" on page 21. 5 Follow the instructions from step 1 to step 2...
...| 63 Removing the Coin-Cell Battery CAUTION: Removing the coin-cell battery resets the BIOS settings to the manufacturer's instructions. Replace the battery only with your computer, read the safety information that you note the BIOS settings before removing the coin-cell battery...7. For additional safety best practices information, see the Regulatory Compliance Homepage at dell.com/regulatory_compliance. See "Removing the Memory Module(s)" on page 19. 4 Follow the instructions from step 1 to step 3 in "Removing the Hard Drive" on page 21. 5 Follow the instructions from step 1 to step 2...
Owners Manual
Page 65
... 16. 4 Follow the instructions from step 4 to step 5 in "Replacing the Optical Drive" on page 26. 5 Follow the instructions from step 3 to step 6 in "Replacing the Hard Drive" on page 9. See "Replacing the Battery" on page 13. 9 Follow the instructions in "Replacing the System Board" on page 52. 2 Replace the palm rest. Postrequisites 1 Follow the instructions from step...
... 16. 4 Follow the instructions from step 4 to step 5 in "Replacing the Optical Drive" on page 26. 5 Follow the instructions from step 3 to step 6 in "Replacing the Hard Drive" on page 9. See "Replacing the Battery" on page 13. 9 Follow the instructions in "Replacing the System Board" on page 52. 2 Replace the palm rest. Postrequisites 1 Follow the instructions from step...

Owners Manual
Page 69
... 13. 9 Follow the instructions in "Replacing the Hard Drive" on page 23. 6 Replace the memory module(s). See "Replacing the Keyboard" on page 16. 4 Follow the instructions from step 4 to step 5 in "Replacing the Optical Drive" on page 26. 5 Follow the instructions from step 3 to step 10 in "Replacing the System Board" on page 9. Replacing the Speakers Procedure 1 Align the...
... 13. 9 Follow the instructions in "Replacing the Hard Drive" on page 23. 6 Replace the memory module(s). See "Replacing the Keyboard" on page 16. 4 Follow the instructions from step 4 to step 5 in "Replacing the Optical Drive" on page 26. 5 Follow the instructions from step 3 to step 10 in "Replacing the System Board" on page 9. Replacing the Speakers Procedure 1 Align the...
Owners Manual
Page 73
... page 26. 5 Follow the instructions from step 3 to step 10 in "Replacing the System Board" on page 52. 2 Replace the palm rest. See "Replacing the Battery" on page 13. 9 Follow the instructions in "Replacing the Hard Drive" on page 23. 6 Replace the memory module(s). Replacing the Media Card Reader Procedure 1 Align the screw holes on the Media Card...
... page 26. 5 Follow the instructions from step 3 to step 10 in "Replacing the System Board" on page 52. 2 Replace the palm rest. See "Replacing the Battery" on page 13. 9 Follow the instructions in "Replacing the Hard Drive" on page 23. 6 Replace the memory module(s). Replacing the Media Card Reader Procedure 1 Align the screw holes on the Media Card...

Owners Manual
Page 77
... Assembly" on page 37. 2 Follow the instructions from step 4 to step 6 in "Replacing the Hard Drive" on page 52. 3 Replace the Mini-Card. Postrequisites 1 Replace the display assembly. See "Replacing the Mini-Card" on page 18. 10 Replace the battery. See "Replacing the Palm Rest" on page 9. See "Replacing the Battery" on page 13. 11 Follow the instructions in...
... Assembly" on page 37. 2 Follow the instructions from step 4 to step 6 in "Replacing the Hard Drive" on page 52. 3 Replace the Mini-Card. Postrequisites 1 Replace the display assembly. See "Replacing the Mini-Card" on page 18. 10 Replace the battery. See "Replacing the Palm Rest" on page 9. See "Replacing the Battery" on page 13. 11 Follow the instructions in...


