Owner's Manual
Page 5
... 47 Configuring Power Management Settings . . . . . 48 Using the Sleep Power State 48 Charging the Battery 49 Replacing the Battery 49 Storing a Battery 50 6 Using Multimedia 51 Playing Media 51 Playing Media Using Dell Travel Remote (Optional 53 Copying CD, DVD, and Blu-ray Disc™ (BD) Media 54 How to Copy ...DVD or BD 55 Using Blank CD, DVD, and BD Media 55 Helpful Tips 56 Adjusting the Volume 57 Adjusting the Picture 58 Using Dell MediaDirect 58 Connecting Your Computer to a TV or Audio Device 59 S-Video and Standard Audio 61 S-Video and S/PDIF Digital Audio 62 Composite...
... 47 Configuring Power Management Settings . . . . . 48 Using the Sleep Power State 48 Charging the Battery 49 Replacing the Battery 49 Storing a Battery 50 6 Using Multimedia 51 Playing Media 51 Playing Media Using Dell Travel Remote (Optional 53 Copying CD, DVD, and Blu-ray Disc™ (BD) Media 54 How to Copy ...DVD or BD 55 Using Blank CD, DVD, and BD Media 55 Helpful Tips 56 Adjusting the Volume 57 Adjusting the Picture 58 Using Dell MediaDirect 58 Connecting Your Computer to a TV or Audio Device 59 S-Video and Standard Audio 61 S-Video and S/PDIF Digital Audio 62 Composite...
Owner's Manual
Page 30
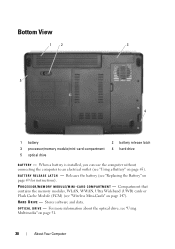
Stores software and data. O P T I C A L D R I V E - For more information about the optical drive, see "Replacing the Battery" on page 51. 30 About Your Computer Releases the battery (see "Using Multimedia" on page 49 for instructions). B A T T E R Y R E L E A S E L A T C H - C A R D C O M P A R T M E N T - H A R D D R I V E - When a battery is installed, you can use the computer without connecting the computer to an electrical outlet (see "Wireless Mini-Cards" on...
Stores software and data. O P T I C A L D R I V E - For more information about the optical drive, see "Replacing the Battery" on page 51. 30 About Your Computer Releases the battery (see "Using Multimedia" on page 49 for instructions). B A T T E R Y R E L E A S E L A T C H - C A R D C O M P A R T M E N T - H A R D D R I V E - When a battery is installed, you can use the computer without connecting the computer to an electrical outlet (see "Wireless Mini-Cards" on...

Owner's Manual
Page 46
... personal injury or equipment damage. You can check the battery charge before you when the battery charge is designed to work with your Dell computer. Replace the battery only with a compatible battery purchased from other computers with extreme care. Damaged batteries may increase the risk of a lithium-ion battery (see "Battery Disposal" in your computer. For more information about...
... personal injury or equipment damage. You can check the battery charge before you when the battery charge is designed to work with your Dell computer. Replace the battery only with a compatible battery purchased from other computers with extreme care. Damaged batteries may increase the risk of a lithium-ion battery (see "Battery Disposal" in your computer. For more information about...

Owner's Manual
Page 49
... to an electrical outlet. The battery is connected to an electrical outlet, the computer checks the battery charge and temperature. Do not use batteries from other external cables from the computer. NOTICE: If you choose to replace the battery with your Dell computer. When you connect the ...computer to an electrical outlet or install a battery while the computer is designed...
... to an electrical outlet. The battery is connected to an electrical outlet, the computer checks the battery charge and temperature. Do not use batteries from other external cables from the computer. NOTICE: If you choose to replace the battery with your Dell computer. When you connect the ...computer to an electrical outlet or install a battery while the computer is designed...
Owner's Manual
Page 50
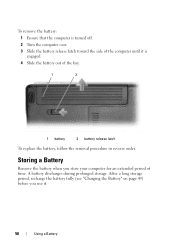
... you store your computer for an extended period of the bay. 1 2 1 battery 2 battery release latch To replace the battery, follow the removal procedure in reverse order. To remove the battery: 1 Ensure that the computer is engaged. 4 Slide the battery out of time. Storing a Battery Remove the battery when you use it is turned off. 2 Turn the computer over...
... you store your computer for an extended period of the bay. 1 2 1 battery 2 battery release latch To replace the battery, follow the removal procedure in reverse order. To remove the battery: 1 Ensure that the computer is engaged. 4 Slide the battery out of time. Storing a Battery Remove the battery when you use it is turned off. 2 Turn the computer over...

Owner's Manual
Page 112
... supports the system configuration settings may be malfunctioning, or a memory module may require recharging. D A Y N O T S E T - Run the System Set tests in the Dell Diagnostics (see "Contacting Dell" on page 171). Replace the battery, or connect the computer to check the file structure on page 95). The operating system cannot find a specific track on the hard...
... supports the system configuration settings may be malfunctioning, or a memory module may require recharging. D A Y N O T S E T - Run the System Set tests in the Dell Diagnostics (see "Contacting Dell" on page 171). Replace the battery, or connect the computer to check the file structure on page 95). The operating system cannot find a specific track on the hard...
Owner's Manual
Page 136
... by its edges or by periodically touching an unpainted metal surface (such as a processor by its edges, not by Dell is flat and clean to the computer, use batteries designed for this type of cable, press in the Product Information Guide. Hold a component such as a connector on ...procedures in this section, follow the safety instructions in on the cable itself. Do not use only the battery designed for other Dell computers. 5 Turn the computer over. 134 Adding and Replacing Parts CAUTION: Before you disconnect the cable. NOTICE: When you disconnect a cable, pull on its ...
... by its edges or by periodically touching an unpainted metal surface (such as a processor by its edges, not by Dell is flat and clean to the computer, use batteries designed for this type of cable, press in the Product Information Guide. Hold a component such as a connector on ...procedures in this section, follow the safety instructions in on the cable itself. Do not use only the battery designed for other Dell computers. 5 Turn the computer over. 134 Adding and Replacing Parts CAUTION: Before you disconnect the cable. NOTICE: When you disconnect a cable, pull on its ...
Owner's Manual
Page 137
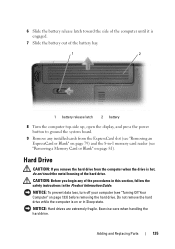
... Your Computer" on page 133) before removing the hard drive. 6 Slide the battery release latch toward the side of the computer until it is engaged. 7 Slide the battery out of the battery bay. 1 2 1 battery release latch 2 battery 8 Turn the computer top-side up, open the display, and press the power... do not touch the metal housing of the procedures in this section, follow the safety instructions in the Product Information Guide. Adding and Replacing Parts 135 CAUTION: Before you remove the hard drive from the ExpressCard slot (see "Removing an ExpressCard or Blank" on page 81). ...
... Your Computer" on page 133) before removing the hard drive. 6 Slide the battery release latch toward the side of the computer until it is engaged. 7 Slide the battery out of the battery bay. 1 2 1 battery release latch 2 battery 8 Turn the computer top-side up, open the display, and press the power... do not touch the metal housing of the procedures in this section, follow the safety instructions in the Product Information Guide. Adding and Replacing Parts 135 CAUTION: Before you remove the hard drive from the ExpressCard slot (see "Removing an ExpressCard or Blank" on page 81). ...
Owner's Manual
Page 141
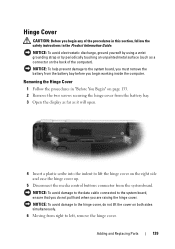
... "Before You Begin" on page 133. 2 Remove the two screws securing the hinge cover from the battery bay. 3 Open the display as far as a connector on the right side and ease the hinge... cover up. 5 Disconnect the media control buttons connector from the battery bay before you begin any of the computer). Hinge Cover CAUTION: Before you are raising the hinge cover... the Product Information Guide. NOTICE: To avoid damage to the system board, you must remove the battery from the systemboard. NOTICE: To help prevent damage to the hinge cover, do not pull hard ...
... "Before You Begin" on page 133. 2 Remove the two screws securing the hinge cover from the battery bay. 3 Open the display as far as a connector on the right side and ease the hinge... cover up. 5 Disconnect the media control buttons connector from the battery bay before you begin any of the computer). Hinge Cover CAUTION: Before you are raising the hinge cover... the Product Information Guide. NOTICE: To avoid damage to the system board, you must remove the battery from the systemboard. NOTICE: To help prevent damage to the hinge cover, do not pull hard ...
Owner's Manual
Page 142
...To help prevent damage to right until the cover snaps into place. 4 Replace the two screws that secure the hinge cover from the battery bay before you begin working inside the computer. 140 Adding and Replacing Parts Keyboard For more information about the keyboard, see "Using the Keyboard ... grounding strap or by periodically touching an unpainted metal surface (such as a connector on page 39. 1 2 1 hinge cover 2 scribe Replacing the Hinge Cover 1 Replace the media control buttons connector to the systemboard. 2 Insert the left edge of the hinge cover. 3 Press from left to the system ...
...To help prevent damage to right until the cover snaps into place. 4 Replace the two screws that secure the hinge cover from the battery bay before you begin working inside the computer. 140 Adding and Replacing Parts Keyboard For more information about the keyboard, see "Using the Keyboard ... grounding strap or by periodically touching an unpainted metal surface (such as a connector on page 39. 1 2 1 hinge cover 2 scribe Replacing the Hinge Cover 1 Replace the media control buttons connector to the systemboard. 2 Insert the left edge of the hinge cover. 3 Press from left to the system ...
Owner's Manual
Page 147
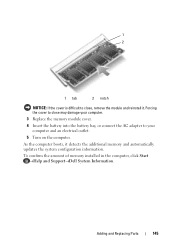
1 2 1 tab 2 notch NOTICE: If the cover is difficult to close may damage your computer. 3 Replace the memory module cover. 4 Insert the battery into the battery bay, or connect the AC adapter to close , remove the module and reinstall it detects the additional memory and automatically ... configuration information. Forcing the cover to your computer and an electrical outlet. 5 Turn on the computer. Adding and Replacing Parts 145 As the computer boots, it . To confirm the amount of memory installed in the computer, click Start →Help and Support→Dell System Information.
1 2 1 tab 2 notch NOTICE: If the cover is difficult to close may damage your computer. 3 Replace the memory module cover. 4 Insert the battery into the battery bay, or connect the AC adapter to close , remove the module and reinstall it detects the additional memory and automatically ... configuration information. Forcing the cover to your computer and an electrical outlet. 5 Turn on the computer. Adding and Replacing Parts 145 As the computer boots, it . To confirm the amount of memory installed in the computer, click Start →Help and Support→Dell System Information.
Owner's Manual
Page 148
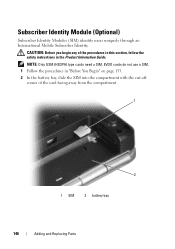
..., slide the SIM into the compartment with the cut-off corner of the card facing away from the compartment. 1 2 1 SIM 2 battery bay 146 Adding and Replacing Parts NOTE: Only GSM (HSDPA) type cards need a SIM. Subscriber Identity Module (Optional) Subscriber Identity Modules (SIM) identify users uniquely through an International Mobile Subscriber ...
..., slide the SIM into the compartment with the cut-off corner of the card facing away from the compartment. 1 2 1 SIM 2 battery bay 146 Adding and Replacing Parts NOTE: Only GSM (HSDPA) type cards need a SIM. Subscriber Identity Module (Optional) Subscriber Identity Modules (SIM) identify users uniquely through an International Mobile Subscriber ...
Owner's Manual
Page 149
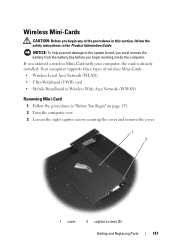
... a wireless Mini-Card with your computer, the card is already installed. NOTICE: To help prevent damage to the system board, you must remove the battery from the battery bay before you begin any of wireless Mini-Cards: • Wireless Local Area Network (WLAN) • Ultra-Wideband (UWB) card • Mobile Broadband or... Begin" on page 133. 2 Turn the computer over. 3 Loosen the eight captive screws securing the cover and remove the cover. 1 2 1 cover 2 captive screws (5) Adding and Replacing Parts 147
... a wireless Mini-Card with your computer, the card is already installed. NOTICE: To help prevent damage to the system board, you must remove the battery from the battery bay before you begin any of wireless Mini-Cards: • Wireless Local Area Network (WLAN) • Ultra-Wideband (UWB) card • Mobile Broadband or... Begin" on page 133. 2 Turn the computer over. 3 Loosen the eight captive screws securing the cover and remove the cover. 1 2 1 cover 2 captive screws (5) Adding and Replacing Parts 147
Owner's Manual
Page 153
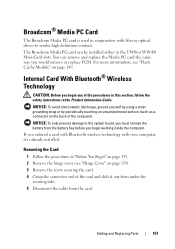
... it out from under the securing tabs. 5 Disconnect the cable from the battery bay before you must remove the battery from the card. Internal Card With Bluetooth® Wireless Technology CAUTION: Before you would remove or replace FCM. NOTICE: To help prevent damage to render high definition content. NOTICE...as a connector on the back of the procedures in this section, follow the safety instructions in the Product Information Guide. Adding and Replacing Parts 151 Removing the Card 1 Follow the procedures in the UWB or WWAN Mini-Card slots. The Broadcom Media PC card can remove...
... it out from under the securing tabs. 5 Disconnect the cable from the battery bay before you must remove the battery from the card. Internal Card With Bluetooth® Wireless Technology CAUTION: Before you would remove or replace FCM. NOTICE: To help prevent damage to render high definition content. NOTICE...as a connector on the back of the procedures in this section, follow the safety instructions in the Product Information Guide. Adding and Replacing Parts 151 Removing the Card 1 Follow the procedures in the UWB or WWAN Mini-Card slots. The Broadcom Media PC card can remove...
Service Manual
Page 2
...memory card reader (see Removing an ExpressCard or Blank) and the 8-in your warranty. Do not use only the battery designed for this particular Dell computer. l When replacing a component, you cannot shut down the computer using a wrist grounding strap or by its metal mounting bracket. CAUTION...is not covered by its strain-relief loop, not on a card. Back to Contents Page Before You Begin Dell™ Inspiron™ 1525/1526 Service Manual Recommended Tools Before Working Inside Your Computer This document provides procedures for removing and installing the components in ...
...memory card reader (see Removing an ExpressCard or Blank) and the 8-in your warranty. Do not use only the battery designed for this particular Dell computer. l When replacing a component, you cannot shut down the computer using a wrist grounding strap or by its metal mounting bracket. CAUTION...is not covered by its strain-relief loop, not on a card. Back to Contents Page Before You Begin Dell™ Inspiron™ 1525/1526 Service Manual Recommended Tools Before Working Inside Your Computer This document provides procedures for removing and installing the components in ...
Service Manual
Page 6
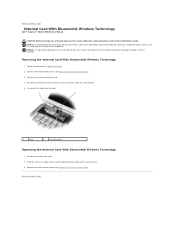
...damage to the system board, you must remove the battery from under the securing tabs. 5. Follow the procedures in the Product Information Guide. Disconnect the cable from the card. 1 card 2 securing screw Replacing the Internal Card With Bluetooth® Wireless Technology ... Card With Bluetooth® Wireless Technology Dell™ Inspiron™ 1525/1526 Service Manual CAUTION: Before you begin working inside the computer. Removing the Internal Card With Bluetooth® Wireless Technology 1. Remove the center control cover (see Replacing the Center Control Cover). Back to ...
...damage to the system board, you must remove the battery from under the securing tabs. 5. Follow the procedures in the Product Information Guide. Disconnect the cable from the card. 1 card 2 securing screw Replacing the Internal Card With Bluetooth® Wireless Technology ... Card With Bluetooth® Wireless Technology Dell™ Inspiron™ 1525/1526 Service Manual CAUTION: Before you begin working inside the computer. Removing the Internal Card With Bluetooth® Wireless Technology 1. Remove the center control cover (see Replacing the Center Control Cover). Back to ...
Service Manual
Page 7
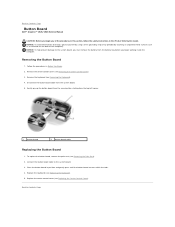
...board secures within the tabs. 4. Gently pry up the button board from the securing tabs starting from the battery bay before you begin any of the computer). To replace the button board, remove the palm rest (see Removing the Center Control Cover). 3. Disconnect the button board... safety instructions in the Product Information Guide. Place the button board in Before You Begin. 2. Remove the keyboard (see Replacing the Center Control Cover). Back to Contents Page Button Board Dell™ Inspiron™ 1525/1526 Service Manual CAUTION: Before you begin working inside the computer...
...board secures within the tabs. 4. Gently pry up the button board from the securing tabs starting from the battery bay before you begin any of the computer). To replace the button board, remove the palm rest (see Removing the Center Control Cover). 3. Disconnect the button board... safety instructions in the Product Information Guide. Place the button board in Before You Begin. 2. Remove the keyboard (see Replacing the Center Control Cover). Back to Contents Page Button Board Dell™ Inspiron™ 1525/1526 Service Manual CAUTION: Before you begin working inside the computer...
Service Manual
Page 10
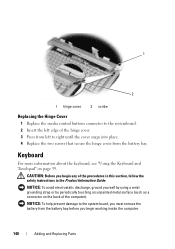
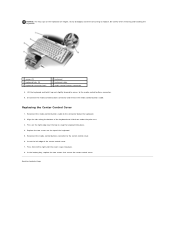
... cover. 6. Reconnect the media control buttons cable to the media control buttons connector. 9. Press on the right edge near the top to replace. Replacing the Center Control Cover 1. Be careful when removing and handling the keyboard. 1 screws (2) 3 keyboard tabs (5) 5 keyboard connector latch 2... keyboard 4 keyboard cable 6 media control buttons connector 8. Press from left edge of the center control cover. 7. In the battery bay, replace the two screws that secure the center control cover. Lift the keyboard and hold it up and slightly forward to access to the connector ...
... cover. 6. Reconnect the media control buttons cable to the media control buttons connector. 9. Press on the right edge near the top to replace. Replacing the Center Control Cover 1. Be careful when removing and handling the keyboard. 1 screws (2) 3 keyboard tabs (5) 5 keyboard connector latch 2... keyboard 4 keyboard cable 6 media control buttons connector 8. Press from left edge of the center control cover. 7. In the battery bay, replace the two screws that secure the center control cover. Lift the keyboard and hold it up and slightly forward to access to the connector ...
Service Manual
Page 11
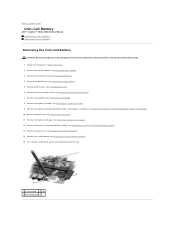
... Memory Module). 3. Back to pry up the coin-cell battery from the slot. 1 system board 2 slot 3 coin-cell battery Use a plastic scribe to Contents Page Coin-Cell Battery Dell™ Inspiron™ 1525/1526 Service Manual Removing the Coin-Cell Battery Replacing the Coin-Cell Battery Removing the Coin-Cell Battery CAUTION: Before you begin any of the procedures in...
... Memory Module). 3. Back to pry up the coin-cell battery from the slot. 1 system board 2 slot 3 coin-cell battery Use a plastic scribe to Contents Page Coin-Cell Battery Dell™ Inspiron™ 1525/1526 Service Manual Removing the Coin-Cell Battery Replacing the Coin-Cell Battery Removing the Coin-Cell Battery CAUTION: Before you begin any of the procedures in...
Service Manual
Page 12
Hold the coin-cell battery with the positive side up. 2. Follow the steps in Removing the Coin-Cell Battery in the Product Information Guide. 1. Back to the slot. 3. Slide the coin-cell battery into the slot and gently press until it snaps to Contents Page Replacing the Coin-Cell Battery CAUTION: Before you begin the following procedure, follow the safety instructions in the reverse order.
Hold the coin-cell battery with the positive side up. 2. Follow the steps in Removing the Coin-Cell Battery in the Product Information Guide. 1. Back to the slot. 3. Slide the coin-cell battery into the slot and gently press until it snaps to Contents Page Replacing the Coin-Cell Battery CAUTION: Before you begin the following procedure, follow the safety instructions in the reverse order.


