Dell™ Technology Guide
Page 4
... and Deleting Program Shortcuts on the Desktop 37 Shortcut Menus 38 Changing the Desktop Appearance 39 Windows Vista 39 Windows® XP 40 Setting up a Screen Saver 41 Windows Vista 41 Windows XP 41 Start Button (Menu 42 Overview 42 Customizing the Start Menu 43 Control Panel 44 Accessing and Using... the Control Panel 45 Customizing Your Computer Settings 45 Managing Your Computer Performance 45 3 Monitors and Displays 47 Cleaning Your Computer's Display Screen 47 Adjusting the Resolution of Your Display 48 Windows Vista 49 4 Contents
... and Deleting Program Shortcuts on the Desktop 37 Shortcut Menus 38 Changing the Desktop Appearance 39 Windows Vista 39 Windows® XP 40 Setting up a Screen Saver 41 Windows Vista 41 Windows XP 41 Start Button (Menu 42 Overview 42 Customizing the Start Menu 43 Control Panel 44 Accessing and Using... the Control Panel 45 Customizing Your Computer Settings 45 Managing Your Computer Performance 45 3 Monitors and Displays 47 Cleaning Your Computer's Display Screen 47 Adjusting the Resolution of Your Display 48 Windows Vista 49 4 Contents
Dell™ Technology Guide
Page 8
... Ending a Process That is not Responding . . . . 103 Docking and Undocking Your Laptop Computer. . . . 104 Undocking Your Computer While it Stops Responding and Displays a Solid Blue Screen 106 Starting Your Computer in Safe Mode 107 Restarting Your Computer After a Power Loss . . . . 108 8 Files and Folders 109 Navigating to Shut Down Normally 105...
... Ending a Process That is not Responding . . . . 103 Docking and Undocking Your Laptop Computer. . . . 104 Undocking Your Computer While it Stops Responding and Displays a Solid Blue Screen 106 Starting Your Computer in Safe Mode 107 Restarting Your Computer After a Power Loss . . . . 108 8 Files and Folders 109 Navigating to Shut Down Normally 105...
Dell™ Technology Guide
Page 20
Dell Support Center 285 Solving Problems 287 Battery Problems 287 Drive Problems 287 Optical Drive Problems 288 E-Mail, Modem, and Internet Problems . . . . . 289 Error Messages 290 ... Scanner Problems 299 Sound and Speaker Problems 299 Touch Pad or Mouse Problems for Laptop Computers 301 Video and Monitor Problems 302 Power Lights 304 Dell Technical Update Service 305 21 System Setup 307 Viewing System Settings With the System Setup Program 307 Entering the System Setup Program 308 Working With...
Dell Support Center 285 Solving Problems 287 Battery Problems 287 Drive Problems 287 Optical Drive Problems 288 E-Mail, Modem, and Internet Problems . . . . . 289 Error Messages 290 ... Scanner Problems 299 Sound and Speaker Problems 299 Touch Pad or Mouse Problems for Laptop Computers 301 Video and Monitor Problems 302 Power Lights 304 Dell Technical Update Service 305 21 System Setup 307 Viewing System Settings With the System Setup Program 307 Entering the System Setup Program 308 Working With...
Dell™ Technology Guide
Page 24
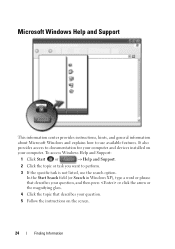
... topic that describes your computer. It also provides access to documentation for your computer and devices installed on your question. 5 Follow the instructions on the screen. 24 Finding Information Microsoft Windows Help and Support This information center provides instructions, hints, and general information about Microsoft Windows and explains how to use...
... topic that describes your computer. It also provides access to documentation for your computer and devices installed on your question. 5 Follow the instructions on the screen. 24 Finding Information Microsoft Windows Help and Support This information center provides instructions, hints, and general information about Microsoft Windows and explains how to use...
Dell™ Technology Guide
Page 33
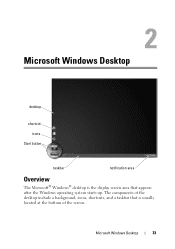
Microsoft Windows Desktop 33 The components of the screen. Microsoft Windows Desktop desktop shortcut icons Start button taskbar notification area Overview The Microsoft® Windows® desktop is usually located at the bottom of the desktop include a background, icons, shortcuts, and a taskbar that is the display screen area that appears after the Windows operating system starts up.
Microsoft Windows Desktop 33 The components of the screen. Microsoft Windows Desktop desktop shortcut icons Start button taskbar notification area Overview The Microsoft® Windows® desktop is usually located at the bottom of the desktop include a background, icons, shortcuts, and a taskbar that is the display screen area that appears after the Windows operating system starts up.
Dell™ Technology Guide
Page 35
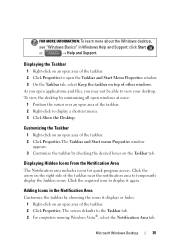
... the Notification Area tab. Displaying Hidden Icons From the Notification Area The Notification area includes icons for quick program access. Microsoft Windows Desktop 35 The screen defaults to open area of the taskbar near the notification area to view your desktop. FOR MORE INFORMATION: To learn more about the Windows desktop...
... the Notification Area tab. Displaying Hidden Icons From the Notification Area The Notification area includes icons for quick program access. Microsoft Windows Desktop 35 The screen defaults to open area of the taskbar near the notification area to view your desktop. FOR MORE INFORMATION: To learn more about the Windows desktop...
Dell™ Technology Guide
Page 39
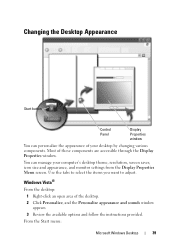
.... From the Start menu: Microsoft Windows Desktop 39 You can personalize the appearance of your computer's desktop theme, resolution, screen saver, icon size and appearance, and monitor settings from the Display Properties Menu screen. Windows Vista® From the desktop: 1 Right-click an open area of these components are accessible through the...
.... From the Start menu: Microsoft Windows Desktop 39 You can personalize the appearance of your computer's desktop theme, resolution, screen saver, icon size and appearance, and monitor settings from the Display Properties Menu screen. Windows Vista® From the desktop: 1 Right-click an open area of these components are accessible through the...
Dell™ Technology Guide
Page 41
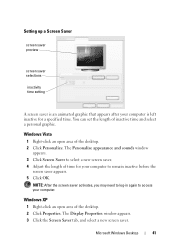
... Desktop 41 Windows Vista 1 Right-click an open area of inactive time and select a personal graphic. The Display Properties window appears. 3 Click the Screen Saver tab, and select a new screen saver. NOTE: After the screen saver activates, you may need to log-in again to access your computer to remain inactive before the...
... Desktop 41 Windows Vista 1 Right-click an open area of inactive time and select a personal graphic. The Display Properties window appears. 3 Click the Screen Saver tab, and select a new screen saver. NOTE: After the screen saver activates, you may need to log-in again to access your computer to remain inactive before the...
Dell™ Technology Guide
Page 42
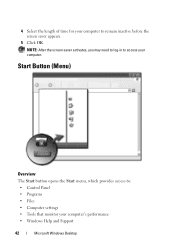
4 Select the length of time for your computer to : • Control Panel • Programs • Files • Computer settings • Tools that monitor your computer. Start Button (Menu) Overview The Start button opens the Start menu, which provides access to remain inactive before the screen saver appears. 5 Click OK. NOTE: After the screen saver activates, you may need to log-in to access your computer's performance • Windows Help and Support 42 Microsoft Windows Desktop
4 Select the length of time for your computer to : • Control Panel • Programs • Files • Computer settings • Tools that monitor your computer. Start Button (Menu) Overview The Start button opens the Start menu, which provides access to remain inactive before the screen saver appears. 5 Click OK. NOTE: After the screen saver activates, you may need to log-in to access your computer's performance • Windows Help and Support 42 Microsoft Windows Desktop
Dell™ Technology Guide
Page 44
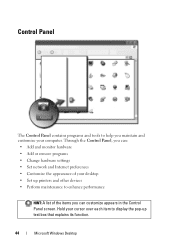
... the pop-up text box that explains its function. 44 Microsoft Windows Desktop Through the Control Panel, you can customize appears in the Control Panel screen. Hold your cursor over each item to enhance performance HINT: A list of your computer.
... the pop-up text box that explains its function. 44 Microsoft Windows Desktop Through the Control Panel, you can customize appears in the Control Panel screen. Hold your cursor over each item to enhance performance HINT: A list of your computer.
Dell™ Technology Guide
Page 47
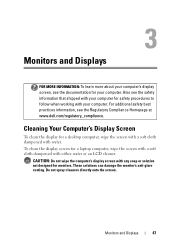
... safety best practices information, see the safety information that shipped with your computer. Also see the Regulatory Compliance Homepage at www.dell.com/regulatory_compliance. CAUTION: Do not wipe the computer's display screen with any soap or solution not designed for safety procedures to follow when working with water. Cleaning Your Computer's Display...
... safety best practices information, see the safety information that shipped with your computer. Also see the Regulatory Compliance Homepage at www.dell.com/regulatory_compliance. CAUTION: Do not wipe the computer's display screen with any soap or solution not designed for safety procedures to follow when working with water. Cleaning Your Computer's Display...
Dell™ Technology Guide
Page 48
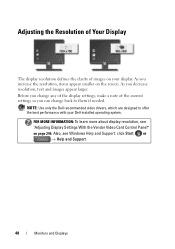
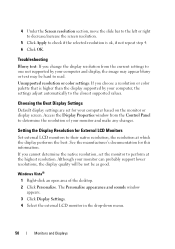
Before you change any of the display settings, make a note of images on your Dell-installed operating system. As you can change back to offer the best performance with your display. FOR MORE INFORMATION: To learn more about display resolution, ... of Your Display The display resolution defines the clarity of the current settings so you increase the resolution, items appear smaller on the screen. NOTE: Use only the Dell recommended video drivers, which are designed to them if needed. Also, see "Adjusting Display Settings With the Vendor Video Card Control Panel" on...
Before you change any of the display settings, make a note of images on your Dell-installed operating system. As you can change back to offer the best performance with your display. FOR MORE INFORMATION: To learn more about display resolution, ... of Your Display The display resolution defines the clarity of the current settings so you increase the resolution, items appear smaller on the screen. NOTE: Use only the Dell recommended video drivers, which are designed to them if needed. Also, see "Adjusting Display Settings With the Vendor Video Card Control Panel" on...

Dell™ Technology Guide
Page 49
... window appears. 3 Click Display Settings. 4 In the Display Settings window under Resolution, move the slide bar to the left or right to decrease/increase the screen resolution. 5 Click Apply to set resolution HINT: To display a program at a specific resolution, both the video card and the display must support the resolution, and...
... window appears. 3 Click Display Settings. 4 In the Display Settings window under Resolution, move the slide bar to the left or right to decrease/increase the screen resolution. 5 Click Apply to set resolution HINT: To display a program at a specific resolution, both the video card and the display must support the resolution, and...
Dell™ Technology Guide
Page 50
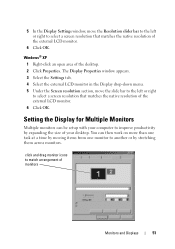
... you choose a resolution or color palette that is ok, if not repeat step 4. 6 Click OK. 4 Under the Screen resolution section, move the slide bar to the left or right to decrease/increase the screen resolution. 5 Click Apply to check if the selected resolution is higher than the display supported by your computer...
... you choose a resolution or color palette that is ok, if not repeat step 4. 6 Click OK. 4 Under the Screen resolution section, move the slide bar to the left or right to decrease/increase the screen resolution. 5 Click Apply to check if the selected resolution is higher than the display supported by your computer...
Dell™ Technology Guide
Page 51
...3 Select the Settings tab. 4 Select the external LCD monitor in the Display drop-down menu. 5 Under the Screen resolution section, move the Resolution slider bar to the left or right to select a screen resolution that matches the native resolution of the external LCD monitor. 6 Click OK. Windows® XP 1 Right-click...arrangement of monitors Monitors and Displays 51 5 In the Display Settings window, move the slide bar to the left or right to select a screen resolution that matches the native resolution of the external LCD monitor. 6 Click OK. You can be setup with your desktop.
...3 Select the Settings tab. 4 Select the external LCD monitor in the Display drop-down menu. 5 Under the Screen resolution section, move the Resolution slider bar to the left or right to select a screen resolution that matches the native resolution of the external LCD monitor. 6 Click OK. Windows® XP 1 Right-click...arrangement of monitors Monitors and Displays 51 5 In the Display Settings window, move the slide bar to the left or right to select a screen resolution that matches the native resolution of the external LCD monitor. 6 Click OK. You can be setup with your desktop.
Dell™ Technology Guide
Page 52
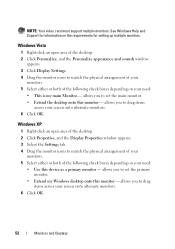
allows you to match the physical arrangement of your monitors. 5 Select either or both of the following check boxes depending on your screen onto alternate monitors. 6 Click OK. 52 Monitors and Displays Windows XP 1 Right-click an open area of the desktop. 2 Click Personalize, and the Personalize appearance ... to match the physical arrangement of your monitors. 5 Select either or both of the following check boxes depending on the requirements for information on your screen onto alternate monitors. 6 Click OK. NOTE: Your video card must support multiple monitors.
allows you to match the physical arrangement of your monitors. 5 Select either or both of the following check boxes depending on your screen onto alternate monitors. 6 Click OK. 52 Monitors and Displays Windows XP 1 Right-click an open area of the desktop. 2 Click Personalize, and the Personalize appearance ... to match the physical arrangement of your monitors. 5 Select either or both of the following check boxes depending on the requirements for information on your screen onto alternate monitors. 6 Click OK. NOTE: Your video card must support multiple monitors.
Dell™ Technology Guide
Page 58
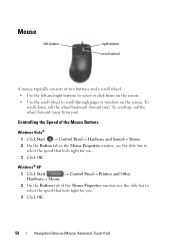
... forward (away from you ). To scroll down, roll the wheel backward (toward you ). Mouse left and right buttons to select or click items on the screen. • Use the scroll wheel to scroll through pages or windows on the...
... forward (away from you ). To scroll down, roll the wheel backward (toward you ). Mouse left and right buttons to select or click items on the screen. • Use the scroll wheel to scroll through pages or windows on the...
Dell™ Technology Guide
Page 59
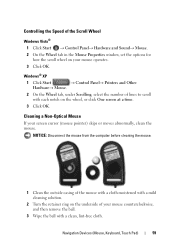
... Hardware→ Mouse. 2 On the Wheel tab, under Scrolling, select the number of lines to scroll with each notch on the wheel, or click One screen at a time. 3 Click OK. Cleaning a Non-Optical Mouse If your screen cursor (mouse pointer) skips or moves abnormally, clean the mouse.
... Hardware→ Mouse. 2 On the Wheel tab, under Scrolling, select the number of lines to scroll with each notch on the wheel, or click One screen at a time. 3 Click OK. Cleaning a Non-Optical Mouse If your screen cursor (mouse pointer) skips or moves abnormally, clean the mouse.
Dell™ Technology Guide
Page 62
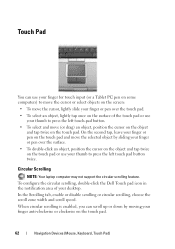
... the touch pad. • To select an object, lightly tap once on the surface of your desktop. To configure the circular scrolling, double-click the Dell Touch pad icon in the notification area of the touch pad or use your finger for touch input (or a Tablet PC pen on some computers...) to move the cursor or select objects on the screen: • To move (or drag) an object, position the cursor on the object and tap twice on the touch pad. 62 Navigation Devices (Mouse, Keyboard...
... the touch pad. • To select an object, lightly tap once on the surface of your desktop. To configure the circular scrolling, double-click the Dell Touch pad icon in the notification area of the touch pad or use your finger for touch input (or a Tablet PC pen on some computers...) to move the cursor or select objects on the screen: • To move (or drag) an object, position the cursor on the object and tap twice on the touch pad. 62 Navigation Devices (Mouse, Keyboard...
Dell™ Technology Guide
Page 63
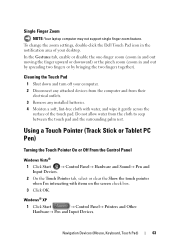
...174; XP 1 Click Start → Control Panel→ Printers and Other Hardware→ Pen and Input Devices. To change the zoom settings, double-click the Dell Touch Pad icon in and out by spreading two fingers or by bringing the two fingers together). Do not allow water from their electrical outlets.... 3 Remove any installed batteries. 4 Moisten a soft, lint-free cloth with items on the screen check box. 3 Click OK. Single Finger Zoom NOTE: Your laptop computer may not support single finger zoom feature.
...174; XP 1 Click Start → Control Panel→ Printers and Other Hardware→ Pen and Input Devices. To change the zoom settings, double-click the Dell Touch Pad icon in and out by spreading two fingers or by bringing the two fingers together). Do not allow water from their electrical outlets.... 3 Remove any installed batteries. 4 Moisten a soft, lint-free cloth with items on the screen check box. 3 Click OK. Single Finger Zoom NOTE: Your laptop computer may not support single finger zoom feature.


