
Dell XPS L501X Support Question
Dell XPS L501X Support Question
Find answers below for this question about Dell XPS L501X.Need a Dell XPS L501X manual? We have 4 online manuals for this item!
Current Answers
Answer #1: Posted by smcclurken on October 31st, 2011 6:29 AM
smcclurken

Member since:
October 28th, 2011 Points: 49,700

Member since:
October 28th, 2011 Points: 49,700
Steps are:
1) remove battery
2) remove palm rest
Under the palm rest are two cables. flip the black tabs up and the ribbons should slide out.
3) remove keyboard
If you have a backlit keyboard, there is a second ribbon cable you will need to remove.
5) remove bezel
To do this. Start at the top on either the left or right side of the webcam. Using your fingers pull the inside of the bezel a bit away from the screen and pull outward. Once it bezel is out enough, use your (thumb) nail and separate the bezel by putting it between the bezel and the back cover.
Then you should remove the webcam cable
6) remove the ribbon cable
There is a black plastic piece you can pull up on, this will detach the cable.
There is also a ground screw that you will need to remove. The new ribbon cable should come with its own screw for the ground.
7) Swap LCD
Unscrew the the 4 screws on each side of the screen that is attached to the bezel. 3 on bottom, 1 on top for the left and right side. There are then 2 screws that hold the bracket to the screen on each side. Remove those and install the brackets on your new screen.
8) Now reverse the instructions to put it back together!
Answer #2: Posted by pchelper on October 30th, 2011 10:03 PM
pchelper

Member since:
October 20th, 2011 Points: 206,890
Member since:
October 20th, 2011 Points: 206,890
Related Dell XPS L501X Manual Pages
Setup Guide - Page 5
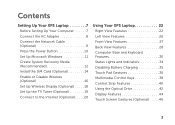
... Up Wireless Display (Optional 18 Set Up the TV Tuner (Optional 19 Connect to the Internet (Optional 20
Using Your XPS Laptop 22 Right View Features 22 Left View Features 26 Front View Features 27 Back View Features 28 Computer Base and Keyboard Features... Control Keys 38 Control Strip Features 40 Using the Optical Drive 42 Display Features 44 Touch Screen Gestures (Optional 46
3
Setup Guide - Page 13
...To set up an Internet connection.
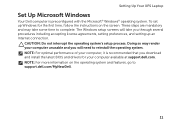
NOTE: For more information on the screen. Doing so may take you download and install the latest BIOS and drivers... computer, it is preconfigured with the Microsoft® Windows® operating system. Setting Up Your XPS Laptop
Set Up Microsoft Windows
Your Dell computer is recommended that you through several procedures including accepting license ...
Setup Guide - Page 14
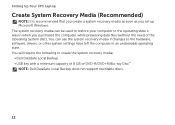
... operating state. The system recovery media can use the system recovery media if changes to create the system recovery media: • Dell DataSafe Local Backup • USB key with a minimum capacity of the Operating System disc). Setting Up Your XPS Laptop
Create System Recovery Media (Recommended)
NOTE: It is recommended that you create...
Setup Guide - Page 15
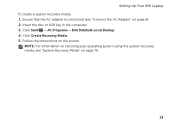
... Create Recovery Media. 5. NOTE: For information on restoring your operating system using the system recovery media, see "Connect the AC Adapter" on the screen. Click Start → All Programs→ Dell DataSafe Local Backup. 4. Setting Up Your XPS Laptop To create a system recovery media: 1. Insert the disc or USB key in the computer. 3.
Setup Guide - Page 19
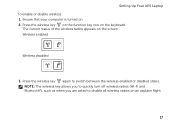
... appears on . 2. Ensure that your computer is turned on the screen. Press the wireless key on the function key row on an airplane flight.
17 Press the wireless key again to disable all wireless radios on the keyboard. Setting Up Your XPS Laptop To enable or disable wireless: 1.
Wireless enabled
Wireless disabled
3. NOTE...
Setup Guide - Page 21
...the Intel® Wireless Display icon on wireless display, see the documentation that appears on the screen.
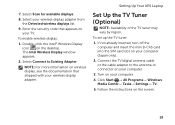
19 Enter the security code that shipped with your TV.
Follow the instructions on your ...
Connect the TV/digital antenna cable or the cable adapter to Existing Adapter. Setting Up Your XPS Laptop
Set Up the TV Tuner (Optional)
NOTE: Availability of the TV tuner may vary by ...
Setup Guide - Page 22
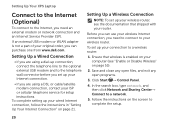
... line to the optional external USB modem and to your wireless router.
Setting Up Your XPS Laptop
Connect to the Internet (Optional)
To connect to a network.
5. In the search ... DSL or cable/satellite modem connection, contact your computer (see "Enable or Disable Wireless" on the screen to a wireless router:
1.
Follow the instructions on page 16).
2. To set up your wired ...
Setup Guide - Page 23
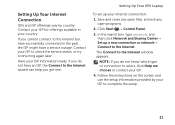
...wizard can help you cannot connect to the Internet but have a service outage. Setting Up Your XPS Laptop
To set up a new connection or network→ Connect to check the service status, or... information ready. The Connect to the Internet window appears. Follow the instructions on the screen and use the setup information provided by country.
Setting Up Your Internet Connection
ISPs and...
Setup Guide - Page 35
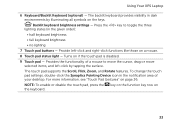
...-click functions like those on a mouse.
8 Touch pad status light -
To change the touch pad settings, double-click the Synaptics Pointing Device icon in the notification ...keyboard brightness
• no lighting
7 Touch pad buttons - Backlit keyboard brightness settings -
Using Your XPS Laptop
6 Keyboard/Backlit Keyboard (optional) - NOTE: To enable or disable the touch pad, press ...
Setup Guide - Page 39

...in or zoom-out by moving two fingers apart or bringing them closer together on the screen.
To zoom in an arced direction right or left to rotate the active content on...view of the active window.
37 Allows you to increase or decrease the magnification of the screen content. Using Your XPS Laptop
Zoom
Allows you to rotate the active content using two fingers where one finger is anchored and...
Setup Guide - Page 43
You can
also change the audio settings such as volume, external speaker setup, and microphone
setup.
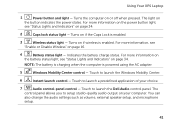
41... Touch to launch the Dell Audio control panel. Touch to launch the Windows Mobility Center.
6
Instant launch control - Using Your XPS Laptop
1
Power button and light - Turns the computer on your choice.
7
Audio control-panel control - For more information on
the...
Setup Guide - Page 47

... you made when purchasing your computer. For information on the touch screen gestures, see "Touch Screen Gestures (Optional)" on or off. 3 Camera - Your display can vary based on selections you selected the option at low data transmission rates. 4 Display - Using Your XPS Laptop 1 Microphone - Provides high quality sound for video capture, conferencing, and chat...
Setup Guide - Page 48
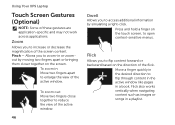
...together to access additional information by moving two fingers apart or bringing them closer together on the screen.
To zoom in a playlist. Flick
Allows you to enlarge the view of these gestures are... songs in : Move two fingers apart to zoom-in a book.
Using Your XPS Laptop
Touch Screen Gestures (Optional)
NOTE: Some of the active window. Pinch -
Allows you to flip content forward...
Setup Guide - Page 49

...finger in a circular motion.
47
Keeping a finger or thumb in place, move the focus on the active window. Using Your XPS Laptop
Scroll
Allows you to activate horizontal scrolling.
Move a finger to the right or left to scroll through content. Move two fingers ...- Allows you to activate vertical scrolling. Scroll Horizontal - Allows you to scroll up or down on the screen.
Setup Guide - Page 53
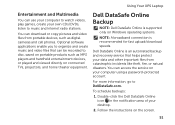
...such as MP3 players and handheld entertainment devices, or played and viewed directly on the screen.
51 Dell DataSafe Online Backup
NOTE: Dell DataSafe Online is supported only on Windows ... backups:
1. You can be recorded to music and Internet radio stations. Using Your XPS Laptop
Entertainment and Multimedia
You can access the service on your computer using a password‑protected...
Setup Guide - Page 54
Using Your XPS Laptop
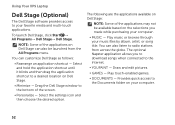
Dell Stage (Optional)
The Dell Stage software provides access to your music files by album, artist,... the applications on the selections you to download songs when connected to radio stations from the All Programs menu. NOTE: Some of the screen.
• Personalize -
Draw and edit pictures.
• Games - Drag the Dell Stage window to the Documents folder on Dell ...
Setup Guide - Page 55
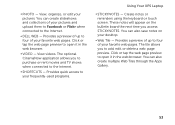
... preview of up to four of your frequently-used programs.
Using Your XPS Laptop
• StickyNotes - The optional CinemaNow application allows you to purchase or... page preview to add, edit, or delete a web page preview. Create notes or reminders using the keyboard or touch screen. • Photo - The tile allows you access STICKYNOTES. View, organize, or edit your desktop.
• Web ...
Setup Guide - Page 57
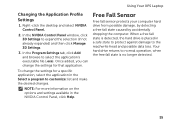
...placed in a safe state to protect against damage to customize: list and make the desired changes. Right-click the desktop and select NVIDIA Control Panel.
2.
Free Fall Sensor
Free fall sensor... When a free fall state is detected, the hard drive is no longer detected.
55
To change the settings for a specific application, select the application in the NVIDIA Control Panel, click Help....
Setup Guide - Page 58
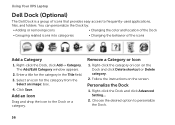
... the screen. Choose the desired option to the Dock or a category.
Follow the instructions on the Dock and click Delete shortcut or Delete category.
2. Using Your XPS Laptop
Dell ...
• Adding or removing icons
• Changing the color and location of the Dock
• Grouping related icons into categories
• Changing the behavior of icons that provides easy access ...
Setup Guide - Page 92
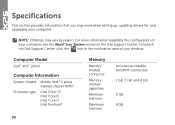
Computer Model
Dell™ XPS™ L501X
Computer Information
System chipset Mobile Intel® 5 series express chipset HM57
Processor type
Intel Core™ i3 Intel Core i5 Intel Core i7 Intel Pentium&#...
Similar Questions


