
Dell™ Technology Guide
Page 83
...; RAID level 5 is a disk storage configuration that increases performance or data redundancy. For information about these levels, see support.dell.com. Drives and Media 83 Windows Vista® 1 Click Start → Computer. otherwise, contact your administrator to continue the desired action....RAID Level 0 NOTICE: RAID level 0 provides no redundancy. NOTE: RAID requires multiple hard drives. The number of independent disks (RAID) is recommended for and attempt recovery of all data. Therefore, a failure of data integrity. • RAID level 0+1 is recommended for users who need ...
...; RAID level 5 is a disk storage configuration that increases performance or data redundancy. For information about these levels, see support.dell.com. Drives and Media 83 Windows Vista® 1 Click Start → Computer. otherwise, contact your administrator to continue the desired action....RAID Level 0 NOTICE: RAID level 0 provides no redundancy. NOTE: RAID requires multiple hard drives. The number of independent disks (RAID) is recommended for and attempt recovery of all data. Therefore, a failure of data integrity. • RAID level 0+1 is recommended for users who need ...
Dell™ Technology Guide
Page 87
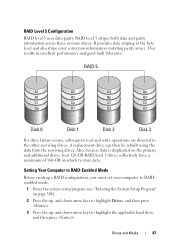
This results in excellent performance and good fault tolerance. Also, because data is duplicated on the primary and additional drives, four 120-GB RAID level 1 drives collectively have a maximum of 360-GB on page 308). 2 Press the up - Setting Your Computer to RAID-Enabled... and also stripe error correction information (rotating parity array). Drives and Media 87 RAID Level 5 Configuration RAID level 5 uses data parity. If a drive failure occurs, subsequent read and write operations are directed to highlight the applicable hard drive, and then press . RAID level 5 stripes both data...
This results in excellent performance and good fault tolerance. Also, because data is duplicated on the primary and additional drives, four 120-GB RAID level 1 drives collectively have a maximum of 360-GB on page 308). 2 Press the up - Setting Your Computer to RAID-Enabled... and also stripe error correction information (rotating parity array). Drives and Media 87 RAID Level 5 Configuration RAID level 5 uses data parity. If a drive failure occurs, subsequent read and write operations are directed to highlight the applicable hard drive, and then press . RAID level 5 stripes both data...
Dell™ Technology Guide
Page 93
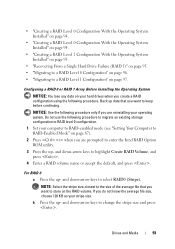
... System Installed" on page 94. • "Creating a RAID Level 1 Configuration With the Operating System Installed" on page 95. • "Recovering From a Single Hard Drive Failure (RAID 1)" on page 95. • "Migrating to a RAID Level 0 Configuration" on page 96. • "Migrating to a RAID Level 1 Configuration" on...RAID level 0 configuration. 1 Set your computer to RAID-enabled mode (see "Setting Your Computer to RAID-Enabled Mode" on your hard drives when you create a RAID configuration using the following procedure only if you want to change the stripe size and press . If you...
... System Installed" on page 94. • "Creating a RAID Level 1 Configuration With the Operating System Installed" on page 95. • "Recovering From a Single Hard Drive Failure (RAID 1)" on page 95. • "Migrating to a RAID Level 0 Configuration" on page 96. • "Migrating to a RAID Level 1 Configuration" on...RAID level 0 configuration. 1 Set your computer to RAID-enabled mode (see "Setting Your Computer to RAID-Enabled Mode" on your hard drives when you create a RAID configuration using the following procedure only if you want to change the stripe size and press . If you...

Dell™ Technology Guide
Page 95
Recovering From a Single Hard Drive Failure (RAID 1) NOTE: Perform the following steps only after you have not yet set your computer to RAID-enabled mode. 3 On the Actions menu, select Create ... the RAID level, and then click Next to continue. 6 On the Select Volume Location screen, click the first hard drive you want to use, and then click the right arrow. 7 Click a second hard drive until two drives appear in the Selected window, and then click Next. 8 In the Specify Volume Size window, select the Volume...
Recovering From a Single Hard Drive Failure (RAID 1) NOTE: Perform the following steps only after you have not yet set your computer to RAID-enabled mode. 3 On the Actions menu, select Create ... the RAID level, and then click Next to continue. 6 On the Select Volume Location screen, click the first hard drive you want to use, and then click the right arrow. 7 Click a second hard drive until two drives appear in the Selected window, and then click Next. 8 In the Specify Volume Size window, select the Volume...
Dell™ Technology Guide
Page 276
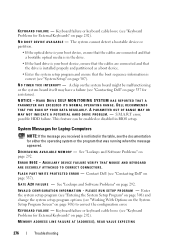
...that the cables are connected and that the drive is correct (see "System Setup" on page 292). HARD DRIVE SELF MONITORING SYSTEM HAS REPORTED THAT A PARAMETER HAS EXCEEDED ITS NORMAL OPERATING RANGE. See "Lockups and Software Problems" on page 292. ERROR 8602 - P L E A S E R U N S E T U P P R O G R A M - MEMORY ADDRESS LINE FAILURE AT (ADDRESS), READ VALUE EXPECTING 276 ...Messages for assistance). Contact Dell (see "Contacting Dell" on page 337). This feature can be malfunctioning or the system board itself may have a failure (see "Contacting Dell" on page 337 for...
...that the cables are connected and that the drive is correct (see "System Setup" on page 292). HARD DRIVE SELF MONITORING SYSTEM HAS REPORTED THAT A PARAMETER HAS EXCEEDED ITS NORMAL OPERATING RANGE. See "Lockups and Software Problems" on page 292. ERROR 8602 - P L E A S E R U N S E T U P P R O G R A M - MEMORY ADDRESS LINE FAILURE AT (ADDRESS), READ VALUE EXPECTING 276 ...Messages for assistance). Contact Dell (see "Contacting Dell" on page 337). This feature can be malfunctioning or the system board itself may have a failure (see "Contacting Dell" on page 337 for...
Dell™ Technology Guide
Page 277
...). Run the Dell Diagnostics (see "Entering the System Setup Program" on page 281). See "Drive Problems" on page 292. MEMORY WRITE/READ FAILURE AT (ADDRESS), READ VALUE EXPECTING ( V A L U E) - See "Lockups and Software Problems" on page 287. R E A D F A I L U R E O N S E C O N D I N T E R N A L H A R D D R I M E A N D D A T E M A Y B E W R O N G - T I V E - ( V A L U E) - POWER WARNING MESSAGES HAVE BEEN DISABLED. R E A D F A I L U R E O N I N T E R N A L H A R D D R I C S - This message applies to notebook computers that support multiple hard drives. If the...
...). Run the Dell Diagnostics (see "Entering the System Setup Program" on page 281). See "Drive Problems" on page 292. MEMORY WRITE/READ FAILURE AT (ADDRESS), READ VALUE EXPECTING ( V A L U E) - See "Lockups and Software Problems" on page 287. R E A D F A I L U R E O N S E C O N D I N T E R N A L H A R D D R I M E A N D D A T E M A Y B E W R O N G - T I V E - ( V A L U E) - POWER WARNING MESSAGES HAVE BEEN DISABLED. R E A D F A I L U R E O N I N T E R N A L H A R D D R I C S - This message applies to notebook computers that support multiple hard drives. If the...

Dell™ Technology Guide
Page 279
...ATTACHED DOCKING STATION. PLEASE CONNECT A DELL XXX-W AC ADAPTER OR GREATER FOR BEST PERFORMANCE. PRESS F1 TO SHUTDOWN THE S YS T E M . WARNING! WARNING: DELL'S DISK MONITORING SYSTEM HAS DETECTED THAT DRIVE [0/1] ON THE [PRIMARY/SECONDARY] ... BE UNABLE TO CHARGE THIS BATTERY. - BATTERY IS CRITICALLY LOW. System board failure may be defective. Contact Dell for assistance (see "Contacting Dell" on page 307. See "System Setup" on page 337). IT IS ADVISABLE TO IMMEDIATELY BACK UP YOUR DATA AND REPLACE YOUR HARD DRIVE BY CALLING YOUR SUPPORT DESK OR D E L L. - STRIKE T H ...
...ATTACHED DOCKING STATION. PLEASE CONNECT A DELL XXX-W AC ADAPTER OR GREATER FOR BEST PERFORMANCE. PRESS F1 TO SHUTDOWN THE S YS T E M . WARNING! WARNING: DELL'S DISK MONITORING SYSTEM HAS DETECTED THAT DRIVE [0/1] ON THE [PRIMARY/SECONDARY] ... BE UNABLE TO CHARGE THIS BATTERY. - BATTERY IS CRITICALLY LOW. System board failure may be defective. Contact Dell for assistance (see "Contacting Dell" on page 307. See "System Setup" on page 337). IT IS ADVISABLE TO IMMEDIATELY BACK UP YOUR DATA AND REPLACE YOUR HARD DRIVE BY CALLING YOUR SUPPORT DESK OR D E L L. - STRIKE T H ...
Dell™ Technology Guide
Page 282
... display, memory, hard drive, and so on. • Answer any key to run the Dell Diagnostics from the diagnostics utility partition on your hard drive. 5 When the Dell Diagnostics Main Menu appears, select the test you see "Contacting Dell" on page 284. Starting the Dell Diagnostics on Desktop .... Select Diagnostics from the boot menu and press . 282 Troubleshooting NOTE: If you see a message stating that appear. • If failures are detected, write down completely, press and hold the key while powering the computer on (or restart) your computer cannot display a screen...
... display, memory, hard drive, and so on. • Answer any key to run the Dell Diagnostics from the diagnostics utility partition on your hard drive. 5 When the Dell Diagnostics Main Menu appears, select the test you see "Contacting Dell" on page 284. Starting the Dell Diagnostics on Desktop .... Select Diagnostics from the boot menu and press . 282 Troubleshooting NOTE: If you see a message stating that appear. • If failures are detected, write down completely, press and hold the key while powering the computer on (or restart) your computer cannot display a screen...
Setup Guide
Page 40
.... The computer failed to resolve the issue. Replace the battery. Hard-disk (HDD) drive failure - No bootable partition on page 53 for the same error. See "Contacting Dell" on page 53 for assistance. Possible hard disk drive failure during HDD POST. Keyboard failure or loose cable. See "Contacting Dell" on page 53 for assistance. 38 CMOS checksum error - See...
.... The computer failed to resolve the issue. Replace the battery. Hard-disk (HDD) drive failure - No bootable partition on page 53 for the same error. See "Contacting Dell" on page 53 for assistance. Possible hard disk drive failure during HDD POST. Keyboard failure or loose cable. See "Contacting Dell" on page 53 for assistance. 38 CMOS checksum error - See...

Setup Guide
Page 41
... enabled or disabled in the search field and press to resolve the incompatibility. A chip on the Dell Support website at support.dell.com). Disconnect the USB device. A parameter out of them. This feature can use the Hardware Troubleshooter...the search. 3. No timer tick interrupt - Hard Drive SELF MONITORING SYSTEM has reported that you can be malfunctioning or motherboard failure (see "Contacting Dell" on the Dell Support website at support.dell.com). S.M.A.R.T error, possible hard disk drive failure. Dell recommends that a parameter has exceeded its normal...
... enabled or disabled in the search field and press to resolve the incompatibility. A chip on the Dell Support website at support.dell.com). Disconnect the USB device. A parameter out of them. This feature can use the Hardware Troubleshooter...the search. 3. No timer tick interrupt - Hard Drive SELF MONITORING SYSTEM has reported that you can be malfunctioning or motherboard failure (see "Contacting Dell" on the Dell Support website at support.dell.com). S.M.A.R.T error, possible hard disk drive failure. Dell recommends that a parameter has exceeded its normal...


