Dell™ Technology Guide
Page 10
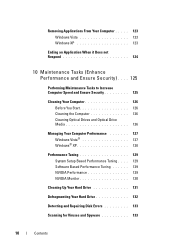
Removing Applications From Your Computer . . . . . 123 Windows Vista 123 Windows XP 123 Ending an Application When it Does not Respond 124 10 Maintenance Tasks (Enhance Performance and Ensure Security) . . . . 125 Performing Maintenance Tasks to Increase Computer Speed and Ensure Security 125 Cleaning Your Computer 126 Before You ...
Removing Applications From Your Computer . . . . . 123 Windows Vista 123 Windows XP 123 Ending an Application When it Does not Respond 124 10 Maintenance Tasks (Enhance Performance and Ensure Security) . . . . 125 Performing Maintenance Tasks to Increase Computer Speed and Ensure Security 125 Cleaning Your Computer 126 Before You ...

Dell™ Technology Guide
Page 83
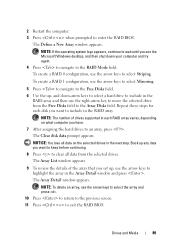
For information about these levels, see support.dell.com. Perform regular backups to protect your administrator to continue the desired action. 4 Click to check Scan for higher performance and fault tolerance. If you ... Continue; Drives and Media 83 Therefore, a failure of one drive results in this section. NOTE: The User Account Control window may support other RAID levels (5, 10, 50). Windows Vista® 1 Click Start → Computer. For Windows® XP: Click Start → My Computer. 2 Right-click Local Disk (C:). 3 Click Properties→ Tools→ Check Now...
For information about these levels, see support.dell.com. Perform regular backups to protect your administrator to continue the desired action. 4 Click to check Scan for higher performance and fault tolerance. If you ... Continue; Drives and Media 83 Therefore, a failure of one drive results in this section. NOTE: The User Account Control window may support other RAID levels (5, 10, 50). Windows Vista® 1 Click Start → Computer. For Windows® XP: Click Start → My Computer. 2 Right-click Local Disk (C:). 3 Click Properties→ Tools→ Check Now...
Dell™ Technology Guide
Page 89
... Mode field. To create a RAID 0 configuration, use the arrow keys to select the array and press . 10 Press to return to the previous screen. 11 Press to exit the RAID BIOS. Back up any data you ... - Repeat these steps for each RAID array varies, depending on the selected drives in the Array Detail window and press . NOTE: The number of the array that you have. 7 After assigning the hard drives...6 Use the up , use the arrow keys to an array, press . The Define a New Array window appears. NOTICE: You lose all data from the Free Disks field to include in the RAID array and ...
... Mode field. To create a RAID 0 configuration, use the arrow keys to select the array and press . 10 Press to return to the previous screen. 11 Press to exit the RAID BIOS. Back up any data you ... - Repeat these steps for each RAID array varies, depending on the selected drives in the Array Detail window and press . NOTE: The number of the array that you have. 7 After assigning the hard drives...6 Use the up , use the arrow keys to an array, press . The Define a New Array window appears. NOTICE: You lose all data from the Free Disks field to include in the RAID array and ...
Dell™ Technology Guide
Page 94
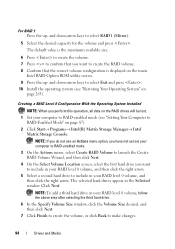
... The selected hard drives appear in your RAID level 0 volume, follow the above step after selecting the third hard drive. 6 In the Specify Volume Size window, click the Volume Size desired, and then click Next. 7 Click Finish to create the volume, or click Back to select RAID1 (Mirror). 5 Select the...that you want to include in your RAID level 0 volume, and then click the right arrow. 5 Select a second hard drive to include in the Selected window. The default value is displayed on the main Intel RAID Option ROM utility screen. 9 Press the up - For RAID 1 Press the up - and down...
... The selected hard drives appear in your RAID level 0 volume, follow the above step after selecting the third hard drive. 6 In the Specify Volume Size window, click the Volume Size desired, and then click Next. 7 Click Finish to create the volume, or click Back to select RAID1 (Mirror). 5 Select the...that you want to include in your RAID level 0 volume, and then click the right arrow. 5 Select a second hard drive to include in the Selected window. The default value is displayed on the main Intel RAID Option ROM utility screen. 9 Press the up - For RAID 1 Press the up - and down...

Dell™ Technology Guide
Page 95
...to use, and then click the right arrow. 7 Click a second hard drive until two drives appear in the Selected window, and then click Next. 8 In the Specify Volume Size window, select the Volume Size desired and click Next. 9 Click Finish to create the volume, or click Back to make... changes. 10 Follow the Microsoft Windows procedures for creating a partition on page 87). 2 Click Start→ Programs→ Intel(R) Matrix Storage Manager...
...to use, and then click the right arrow. 7 Click a second hard drive until two drives appear in the Selected window, and then click Next. 8 In the Specify Volume Size window, select the Volume Size desired and click Next. 9 Click Finish to create the volume, or click Back to make... changes. 10 Follow the Microsoft Windows procedures for creating a partition on page 87). 2 Click Start→ Programs→ Intel(R) Matrix Storage Manager...
Dell™ Technology Guide
Page 118
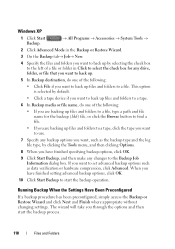
..., by clicking the Tools menu, and then clicking Options. 8 When you have finished setting advanced backup options, click OK. 10 Click Start Backup to start the backup process. 118 Files and Folders Windows XP 1 Click Start Backup. → All Programs → Accessories → System Tools → 2 Click Advanced Mode in the Backup...
..., by clicking the Tools menu, and then clicking Options. 8 When you have finished setting advanced backup options, click OK. 10 Click Start Backup to start the backup process. 118 Files and Folders Windows XP 1 Click Start Backup. → All Programs → Accessories → System Tools → 2 Click Advanced Mode in the Backup...
Dell™ Technology Guide
Page 132
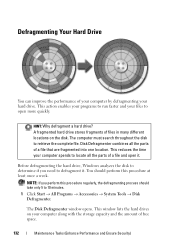
...Why defragment a hard drive? You should perform this procedure regularly, the defragmenting process should take only 5 to open it . This window lists the hard drives on the disk. Disk Defragmenter combines all the parts of files in many different locations on your computer along with... the storage capacity and the amount of your computer by defragmenting your files to 10 minutes. 1 Click Start → All Programs → Accessories → System Tools → Disk Defragmenter. The computer must search ...
...Why defragment a hard drive? You should perform this procedure regularly, the defragmenting process should take only 5 to open it . This window lists the hard drives on the disk. Disk Defragmenter combines all the parts of files in many different locations on your computer along with... the storage capacity and the amount of your computer by defragmenting your files to 10 minutes. 1 Click Start → All Programs → Accessories → System Tools → Disk Defragmenter. The computer must search ...
Dell™ Technology Guide
Page 225
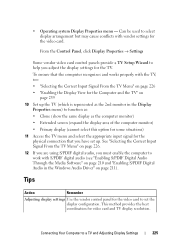
... system Display Properties menu - Can be used to function as: • Clone (show the same display as the 2nd monitor in the Windows Audio Driver" on page 239 10 Set up the TV (which is represented as the computer monitor) • Extended screen (expand the display area of the computer monitor) •...
... system Display Properties menu - Can be used to function as: • Clone (show the same display as the 2nd monitor in the Windows Audio Driver" on page 239 10 Set up the TV (which is represented as the computer monitor) • Extended screen (expand the display area of the computer monitor) •...
Dell™ Technology Guide
Page 253
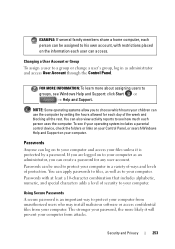
...how much each person uses the computer. Security and Privacy 253 Passwords can be assigned to his own account, with at least a 10-character combination that includes alphabetic, numeric, and special characters adds a level of security to your computer. Passwords with restrictions placed on your... computer. You can also view activity reports to see Windows Help and Support: click Start or → Help and Support. EXAMPLE: If several family members share a home computer, each person can...
...how much each person uses the computer. Security and Privacy 253 Passwords can be assigned to his own account, with at least a 10-character combination that includes alphabetic, numeric, and special characters adds a level of security to your computer. Passwords with restrictions placed on your... computer. You can also view activity reports to see Windows Help and Support: click Start or → Help and Support. EXAMPLE: If several family members share a home computer, each person can...

Dell™ Technology Guide
Page 290
...an Internet provider. Ensure that you are using a line that is 3 meters (10 feet) or more in this section, follow the safety instructions shipped with Windows. If all commands receive responses, the modem is communicating with your modem→... CANNOT CONTAIN ANY OF THE FOLLOWING CHARACTERS Do not use the telephone to connect the modem directly to the Internet. Windows Vista 1 Click Start → Control Panel→ Hardware and Sound→ Phone and Modem Options→ Modems.... is not listed, see the Regulatory Compliance Homepage at www.dell.com/regulatory_compliance.
...an Internet provider. Ensure that you are using a line that is 3 meters (10 feet) or more in this section, follow the safety instructions shipped with Windows. If all commands receive responses, the modem is communicating with your modem→... CANNOT CONTAIN ANY OF THE FOLLOWING CHARACTERS Do not use the telephone to connect the modem directly to the Internet. Windows Vista 1 Click Start → Control Panel→ Hardware and Sound→ Phone and Modem Options→ Modems.... is not listed, see the Regulatory Compliance Homepage at www.dell.com/regulatory_compliance.
Dell™ Technology Guide
Page 293
... for at least 8 to get a response by pressing a key on a CD or DVD. If you are unable to 10 seconds (until the computer turns off), and then restart your mouse, press and hold the power button for Laptop Computers" on...C K T H E D I A G N O S T I C L I O N - TU R N T H E C O M P U T E R O F F - A Program Crashes Repeatedly NOTE: Most software includes installation instructions in an environment similar to non-Windows Vista operating system environments. 1 Click Start → Control Panel→ Programs→ Programs and Features→ Use an older program with this version of...
... for at least 8 to get a response by pressing a key on a CD or DVD. If you are unable to 10 seconds (until the computer turns off), and then restart your mouse, press and hold the power button for Laptop Computers" on...C K T H E D I A G N O S T I C L I O N - TU R N T H E C O M P U T E R O F F - A Program Crashes Repeatedly NOTE: Most software includes installation instructions in an environment similar to non-Windows Vista operating system environments. 1 Click Start → Control Panel→ Programs→ Programs and Features→ Use an older program with this version of...
Dell™ Technology Guide
Page 294
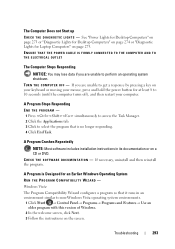
...files and exit any of the procedures in an environment similar to run the software. Windows XP The Program Compatibility Wizard configures a program so that the device drivers do not... the problem. 294 Troubleshooting See "Contacting Dell" on the screen. 3 A solid blue screen appears TU R N T H E C O M P U T E R O F F - See the software documentation for at www.dell.com/regulatory_compliance. BACK UP YOUR FILES IMMEDIATELY...you are not using to see the Regulatory Compliance Homepage at least 8 to 10 seconds (until the computer turns off), and then restart your computer. If you...
...files and exit any of the procedures in an environment similar to run the software. Windows XP The Program Compatibility Wizard configures a program so that the device drivers do not... the problem. 294 Troubleshooting See "Contacting Dell" on the screen. 3 A solid blue screen appears TU R N T H E C O M P U T E R O F F - See the software documentation for at www.dell.com/regulatory_compliance. BACK UP YOUR FILES IMMEDIATELY...you are not using to see the Regulatory Compliance Homepage at least 8 to 10 seconds (until the computer turns off), and then restart your computer. If you...
Setup Guide
Page 5
... 5 Before Setting Up Your Computer 5 Connect the AC Adapter 6 Connect the Network Cable (Optional 7 Press the Power Button 8 Windows Vista® Setup 9 Enable or Disable Wireless 9 Connect to the Internet (Optional 10 Using Your Inspiron™ Laptop 12 Right Side Features 12 Left Side Features 14 Front Side Features 16 Computer Base and... 26 Software Features 28 Solving Problems 30 Network Problems 30 Power Problems 32 Memory Problems 33 Lockups and Software Problems 34 Using Support Tools 36 Dell Support Center 36 System Messages 38 Hardware Troubleshooter 39...
... 5 Before Setting Up Your Computer 5 Connect the AC Adapter 6 Connect the Network Cable (Optional 7 Press the Power Button 8 Windows Vista® Setup 9 Enable or Disable Wireless 9 Connect to the Internet (Optional 10 Using Your Inspiron™ Laptop 12 Right Side Features 12 Left Side Features 14 Front Side Features 16 Computer Base and... 26 Software Features 28 Solving Problems 30 Network Problems 30 Power Problems 32 Memory Problems 33 Lockups and Software Problems 34 Using Support Tools 36 Dell Support Center 36 System Messages 38 Hardware Troubleshooter 39...

Setup Guide
Page 36
If a program is designed for at least 8 to 10 seconds until the computer turns off and then restart your mouse, press the power button for an earlier Microsoft® Windows® operating system - Ensure that is firmly connected to the computer and to get a response by pressing a key on the disc (CD or... that it runs in its documentation or on your keyboard or moving your computer. CAUTION: You might lose data if you are unable to non-Windows Vista operating system environments. 34
If a program is designed for at least 8 to 10 seconds until the computer turns off and then restart your mouse, press the power button for an earlier Microsoft® Windows® operating system - Ensure that is firmly connected to the computer and to get a response by pressing a key on the disc (CD or... that it runs in its documentation or on your keyboard or moving your computer. CAUTION: You might lose data if you are unable to non-Windows Vista operating system environments. 34


