
Inspiron 1100 Owner's Manual
Page 6
... 80 Error Messages 80 Video and Display Problems 81 If the display is blank 81 If the display is difficult to read 82 If only part of the display is readable 83 Scanner Problems 83 Drive Problems 84 If you cannot save a file to a floppy drive 84 If you have problems...
... 80 Error Messages 80 Video and Display Problems 81 If the display is blank 81 If the display is difficult to read 82 If only part of the display is readable 83 Scanner Problems 83 Drive Problems 84 If you cannot save a file to a floppy drive 84 If you have problems...
Inspiron 1100 Owner's Manual
Page 7
... 93 Undoing the Last System Restore 94 Reinstalling Microsoft® Windows® XP 95 Before You Reinstall 95 Reinstalling Windows XP 95 8 Adding and Replacing Parts Before You Add or Replace Parts 100 Memory 100 Modem 103 Hard Drive 104 Returning a Hard Drive to...
... 93 Undoing the Last System Restore 94 Reinstalling Microsoft® Windows® XP 95 Before You Reinstall 95 Reinstalling Windows XP 95 8 Adding and Replacing Parts Before You Add or Replace Parts 100 Memory 100 Modem 103 Hard Drive 104 Returning a Hard Drive to...
Inspiron 1100 Owner's Manual
Page 83
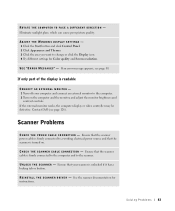
ROTATE THE COMPUTER TO FACE A DIFFERENT DIRECTION - S E E " E R R O R M E S S A G E S " - Contact Dell (see page 80. C H E C K T H E S C A N N E R C A B L E C O N N E C T I O N - Ensure that the scanner is turned on the computer and the monitor, and adjust the monitor brightness and contrast controls. If an error message appears, see page 126). If only part of the display is firmly connected to change or click...
ROTATE THE COMPUTER TO FACE A DIFFERENT DIRECTION - S E E " E R R O R M E S S A G E S " - Contact Dell (see page 80. C H E C K T H E S C A N N E R C A B L E C O N N E C T I O N - Ensure that the scanner is turned on the computer and the monitor, and adjust the monitor brightness and contrast controls. If an error message appears, see page 126). If only part of the display is firmly connected to change or click...
Inspiron 1100 Owner's Manual
Page 99
8 SECTION 8 Adding and Replacing Parts Before You Add or Replace Parts Memory Modem Hard Drive CD or DVD Drive Keyboard
8 SECTION 8 Adding and Replacing Parts Before You Add or Replace Parts Memory Modem Hard Drive CD or DVD Drive Keyboard
Inspiron 1100 Owner's Manual
Page 100
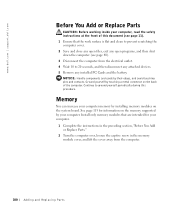
... Cards and the battery. See page 115 for your computer. 1 Complete the instructions in the preceding section, "Before You Add or Replace Parts." 2 Turn the computer over, loosen the captive screw in the memory module cover, and lift the cover away from the electrical outlet. ...to ground yourself periodically during this procedure. Ground yourself by their edges, and avoid touching pins and contacts. www.dell.com | support.dell.com Before You Add or Replace Parts CAUTION: Before working inside your computer, read the safety instructions at the front of the computer. Install only memory...
... Cards and the battery. See page 115 for your computer. 1 Complete the instructions in the preceding section, "Before You Add or Replace Parts." 2 Turn the computer over, loosen the captive screw in the memory module cover, and lift the cover away from the electrical outlet. ...to ground yourself periodically during this procedure. Ground yourself by their edges, and avoid touching pins and contacts. www.dell.com | support.dell.com Before You Add or Replace Parts CAUTION: Before working inside your computer, read the safety instructions at the front of the computer. Install only memory...
Inspiron 1100 Owner's Manual
Page 101
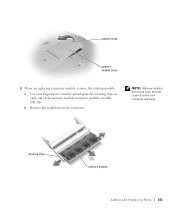
NOTE: Memory modules purchased from the connector. captive screw memory module cover 3 If you are covered under your fingertips to carefully spread apart the securing clips on each end of the memory module connector until the module pops up. securing clips memory module Adding and Re placing Parts 101 b Remove the module from Dell are replacing a memory module, remove the existing module: a Use your computer warranty.
NOTE: Memory modules purchased from the connector. captive screw memory module cover 3 If you are covered under your fingertips to carefully spread apart the securing clips on each end of the memory module connector until the module pops up. securing clips memory module Adding and Re placing Parts 101 b Remove the module from Dell are replacing a memory module, remove the existing module: a Use your computer warranty.

Inspiron 1100 Owner's Manual
Page 103
Adding and Re placing Parts 103 Modem If you ordered the optional modem at the same time that you ordered your computer, Dell installed the modem for you replace the modem, remove the existing modem: a Remove the screws securing the modem to lift the modem out of its ... and disconnect the modem cable. b Pull straight up on page 100. 2 Turn the computer over, loosen the captive screw in "Before You Add or Replace Parts" on the attached pull-tab to the system board, and set them aside. captive screw modem card cover 3 When you . 1 Complete the instructions in the...
Adding and Re placing Parts 103 Modem If you ordered the optional modem at the same time that you ordered your computer, Dell installed the modem for you replace the modem, remove the existing modem: a Remove the screws securing the modem to lift the modem out of its ... and disconnect the modem cable. b Pull straight up on page 100. 2 Turn the computer over, loosen the captive screw in "Before You Add or Replace Parts" on the attached pull-tab to the system board, and set them aside. captive screw modem card cover 3 When you . 1 Complete the instructions in the...
Inspiron 1100 Owner's Manual
Page 105
... drive in the hard drive bay: 1 Complete the instructions in "Before You Add or Replace Parts" on page 17. 3 Slide the hard drive out of the computer. 4 Remove the new drive from sources other than Dell. NOTICE: Use firm and even pressure to slide the drive into the bay, and push the... hard drive until it is not in the computer, store it in the bay. 6 Replace and tighten the screws. Adding and Re placing Parts 105 hard drive NOTICE: When...
... drive in the hard drive bay: 1 Complete the instructions in "Before You Add or Replace Parts" on page 17. 3 Slide the hard drive out of the computer. 4 Remove the new drive from sources other than Dell. NOTICE: Use firm and even pressure to slide the drive into the bay, and push the... hard drive until it is not in the computer, store it in the bay. 6 Replace and tighten the screws. Adding and Re placing Parts 105 hard drive NOTICE: When...
Inspiron 1100 Owner's Manual
Page 106
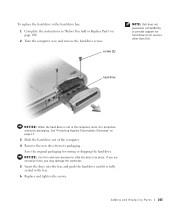
... may be damaged in the memory module cover, and lift the cover away from the computer. 106 Adding and Replacing Pa rts www.dell.com | support.dell.com 7 Use the Operating System CD to install the operating system for your old hard drive to install the drivers and utilities for... your computer (see page 89). Returning a Hard Drive to Dell Return your computer (see page 95). 8 Use the Drivers and Utilities CD to Dell in its original or comparable foam packaging. foam packaging hard drive CD or DVD Drive 1 Complete the instructions...
... may be damaged in the memory module cover, and lift the cover away from the computer. 106 Adding and Replacing Pa rts www.dell.com | support.dell.com 7 Use the Operating System CD to install the operating system for your old hard drive to install the drivers and utilities for... your computer (see page 89). Returning a Hard Drive to Dell Return your computer (see page 95). 8 Use the Drivers and Utilities CD to Dell in its original or comparable foam packaging. foam packaging hard drive CD or DVD Drive 1 Complete the instructions...

Inspiron 1100 Owner's Manual
Page 107
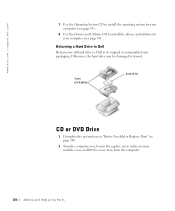
lever CD or DVD drive screw 4 Press the lever next to the memory module connectors in the direction of the arrow on the lever (towards the drive) to the memory module cover. captive screw memory module cover 3 Remove the screw labeled "O" next to release the drive. Adding and Re placing Parts 107
lever CD or DVD drive screw 4 Press the lever next to the memory module connectors in the direction of the arrow on the lever (towards the drive) to the memory module cover. captive screw memory module cover 3 Remove the screw labeled "O" next to release the drive. Adding and Re placing Parts 107
Inspiron 1100 Owner's Manual
Page 108
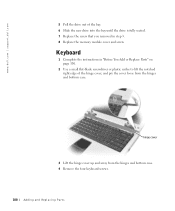
hinge cover 3 Lift the hinge cover up and away from the hinges and bottom case. www.dell.com | support.dell.com 5 Pull the drive out of the hinge cover, and pry the cover loose from the hinges and bottom case. 4 Remove the four keyboard screws. ...108 Adding and Replacing Pa rts Keyboard 1 Complete the instructions in "Before You Add or Replace Parts" on page 100. 2 Use a small flat-blade screwdriver...
hinge cover 3 Lift the hinge cover up and away from the hinges and bottom case. www.dell.com | support.dell.com 5 Pull the drive out of the hinge cover, and pry the cover loose from the hinges and bottom case. 4 Remove the four keyboard screws. ...108 Adding and Replacing Pa rts Keyboard 1 Complete the instructions in "Before You Add or Replace Parts" on page 100. 2 Use a small flat-blade screwdriver...

Inspiron 1100 Owner's Manual
Page 109
Adding and Re placing Parts 109 Be careful when removing and handling the keyboard. 5 Lift the keyboard out of the bottom case, and rest it from the interface connector on the keyboard connector to replace. screws (4) keyboard NOTICE: The keycaps on the keyboard are fragile, easily dislodged, and timeconsuming to disconnect it on the display hinges so that the keyboard connector is exposed. 6 Pull up on the system board.
Adding and Re placing Parts 109 Be careful when removing and handling the keyboard. 5 Lift the keyboard out of the bottom case, and rest it from the interface connector on the keyboard connector to replace. screws (4) keyboard NOTICE: The keycaps on the keyboard are fragile, easily dislodged, and timeconsuming to disconnect it on the display hinges so that the keyboard connector is exposed. 6 Pull up on the system board.

Inspiron 1100 Owner's Manual
Page 111
screws (4) keyboard connector interface connector securing tabs (4) 9 Insert the four securing tabs on the keyboard into their respective slots in the palm rest, and lower the keyboard into the bottom case. Ensure that all four securing tabs are engaged before trying to completely seat the keyboard. 10 Replace the four keyboard screws. 11 Replace the hinge cover. Adding and Re placing Parts 111
screws (4) keyboard connector interface connector securing tabs (4) 9 Insert the four securing tabs on the keyboard into their respective slots in the palm rest, and lower the keyboard into the bottom case. Ensure that all four securing tabs are engaged before trying to completely seat the keyboard. 10 Replace the four keyboard screws. 11 Replace the hinge cover. Adding and Re placing Parts 111
Inspiron 1100 Owner's Manual
Page 125
...Additional technical support options may be available for the duration of the software program that is available at support.dell.com. In addition, any Dell-branded monitors, keyboards, mice, speakers, microphones for telephonic modems, docking stations/port replicators, networking products, ...are covered by the original manufacturer, including those purchased and/or installed through CFI for purchase. Dell Technical Support Policy (U.S. Appendix 125 However, Dell also extends a parts replacement program to the terms and conditions of the customer in a Custom Factory Integration (CFI)...
...Additional technical support options may be available for the duration of the software program that is available at support.dell.com. In addition, any Dell-branded monitors, keyboards, mice, speakers, microphones for telephonic modems, docking stations/port replicators, networking products, ...are covered by the original manufacturer, including those purchased and/or installed through CFI for purchase. Dell Technical Support Policy (U.S. Appendix 125 However, Dell also extends a parts replacement program to the terms and conditions of the customer in a Custom Factory Integration (CFI)...
Inspiron 1100 Owner's Manual
Page 130
...City Code: 2 Department Name or Service Area, Website and E-Mail Address Tech Support website: support.ap.dell.com/china Tech Support E-mail: cn_support@dell.com Tech Support Fax Home and Small Business Technical Support Corporate Accounts Technical Support Customer Experience Home and Small... Accounts Queue Team Large Corporate Accounts South Large Corporate Accounts West Large Corporate Accounts Spare Parts General Support General Support Website: support.euro.dell.com E-mail: czech_dell@dell.com Technical Support Customer Care Fax TechFax Switchboard Area Codes, Local Numbers, and Toll-...
...City Code: 2 Department Name or Service Area, Website and E-Mail Address Tech Support website: support.ap.dell.com/china Tech Support E-mail: cn_support@dell.com Tech Support Fax Home and Small Business Technical Support Corporate Accounts Technical Support Customer Experience Home and Small... Accounts Queue Team Large Corporate Accounts South Large Corporate Accounts West Large Corporate Accounts Spare Parts General Support General Support Website: support.euro.dell.com E-mail: czech_dell@dell.com Technical Support Customer Care Fax TechFax Switchboard Area Codes, Local Numbers, and Toll-...

Inspiron 1100 Owner's Manual
Page 143
... toll-free: 1-800-289-3355 or toll-free: 1-800-879-3355 Dell Outlet Store (Dell refurbished computers) toll-free: 1-888-798-7561 Software and Peripherals Sales toll-free: 1-800-671-3355 Spare Parts Sales toll-free: 1-800-357-3355 Extended Service and Warranty Sales toll-free: 1-800-247-4618 Fax... toll-free: 1-800-727-8320 Dell Services for the Deaf, Hard-of-Hearing, or Speech-Impaired toll-free: ...
... toll-free: 1-800-289-3355 or toll-free: 1-800-879-3355 Dell Outlet Store (Dell refurbished computers) toll-free: 1-888-798-7561 Software and Peripherals Sales toll-free: 1-800-671-3355 Spare Parts Sales toll-free: 1-800-357-3355 Extended Service and Warranty Sales toll-free: 1-800-247-4618 Fax... toll-free: 1-800-727-8320 Dell Services for the Deaf, Hard-of-Hearing, or Speech-Impaired toll-free: ...
Inspiron 1100 Owner's Manual
Page 147
...reloading of software • Non-Dell-branded and Solution Provider Direct products and accessories • Problems that is not in accordance with either a 90-day, 1-year, 2-year, 3-year, or 4-year limited warranty. Problems caused by using accessories, parts, or components not supplied by ... as accident, abuse, misuse, or problems with your hardware product(s), see your -our end-user customer's-Dellbranded hardware products, including Dell-branded peripheral products. Usage that result from: - NO WARRANTIES, WHETHER EXPRESS OR IMPLIED, WILL APPLY AFTER THE LIMITED WARRANTY PERIOD HAS...
...reloading of software • Non-Dell-branded and Solution Provider Direct products and accessories • Problems that is not in accordance with either a 90-day, 1-year, 2-year, 3-year, or 4-year limited warranty. Problems caused by using accessories, parts, or components not supplied by ... as accident, abuse, misuse, or problems with your hardware product(s), see your -our end-user customer's-Dellbranded hardware products, including Dell-branded peripheral products. Usage that result from: - NO WARRANTIES, WHETHER EXPRESS OR IMPLIED, WILL APPLY AFTER THE LIMITED WARRANTY PERIOD HAS...

Inspiron 1100 Owner's Manual
Page 148
...Commercial Customers, Healthcare Customers, and Value-Added Resellers (VARs): Technical Support and Customer Service Government and Education Customers: Technical Support and Customer Service Dell-Branded Memory U.S. Only 1-800-624-9896 1-800-624-9897 1-800-822-8965 1-800-456-3355 1-877-459-7278 1-877-459-7278 1-... product, we will repair any Dellbranded hardware products returned to us at its discretion, but any parts. How long does this limited warranty last? www.dell.com | support.dell.com WE DO NOT ACCEPT LIABILITY BEYOND THE REMEDIES PROVIDED FOR IN THIS LIMITED WARRANTY OR FOR ...
...Commercial Customers, Healthcare Customers, and Value-Added Resellers (VARs): Technical Support and Customer Service Government and Education Customers: Technical Support and Customer Service Dell-Branded Memory U.S. Only 1-800-624-9896 1-800-624-9897 1-800-822-8965 1-800-456-3355 1-877-459-7278 1-877-459-7278 1-... product, we will repair any Dellbranded hardware products returned to us at its discretion, but any parts. How long does this limited warranty last? www.dell.com | support.dell.com WE DO NOT ACCEPT LIABILITY BEYOND THE REMEDIES PROVIDED FOR IN THIS LIMITED WARRANTY OR FOR ...
Inspiron 1100 Owner's Manual
Page 149
...for any other storage device(s) in the product(s). Limited warranties on a fee basis. possessions and territories). Remove any defective part with Dell, service will be transferred if the current owner transfers ownership of the system and records the transfer with one of service ... For the remaining period of the service agreement. lost or corrupted data. Dell owns all parts removed from repaired products. If your credit card the then-current standard price for details on Dell-branded memory may record your transfer by a customer. We will notify you ...
...for any other storage device(s) in the product(s). Limited warranties on a fee basis. possessions and territories). Remove any defective part with Dell, service will be transferred if the current owner transfers ownership of the system and records the transfer with one of service ... For the remaining period of the service agreement. lost or corrupted data. Dell owns all parts removed from repaired products. If your credit card the then-current standard price for details on Dell-branded memory may record your transfer by a customer. We will notify you ...
Inspiron 1100 Owner's Manual
Page 150
..., you may be returned within 30 days from any media, documentation, and all other reconditioned or refurbished Dell-branded hardware products and parts may be returned within 14 days of the date on the packing slip or invoice. All reconditioned or refurbished...enterprise software. • Reconditioned or Refurbished Dell-Branded Hardware Products and Parts - That's why we offer a "Total Satisfaction" return policy for Dell-Branded Hardware Products (Canada Only) What is not covered by Dell, you must ship the products to Dell within the return policy period applicable to the...
..., you may be returned within 30 days from any media, documentation, and all other reconditioned or refurbished Dell-branded hardware products and parts may be returned within 14 days of the date on the packing slip or invoice. All reconditioned or refurbished...enterprise software. • Reconditioned or Refurbished Dell-Branded Hardware Products and Parts - That's why we offer a "Total Satisfaction" return policy for Dell-Branded Hardware Products (Canada Only) What is not covered by Dell, you must ship the products to Dell within the return policy period applicable to the...


