Quick Reference Guide
Page 36
... disk or use these characters in the Dell Diagnostics (see "Contacting Dell" on the disk, or the disk is full. The hard drive cannot read the data. Reinstall the memory modules and, if necessary, replace them . If the error appears again, contact Dell (see "Dell Diagnostics" on page 42). H A R D - Run the hard drive tests in the computer. C D D R I V E C O N T R O L L E R F A I O N - See your...
... disk or use these characters in the Dell Diagnostics (see "Contacting Dell" on the disk, or the disk is full. The hard drive cannot read the data. Reinstall the memory modules and, if necessary, replace them . If the error appears again, contact Dell (see "Dell Diagnostics" on page 42). H A R D - Run the hard drive tests in the computer. C D D R I V E C O N T R O L L E R F A I O N - See your...

Quick Reference Guide
Page 38
... VALUE - Reinstall the memory modules and, if necessary, replace them . Reinstall the memory modules and, if necessary, replace them . See your boot device, ensure that the drive is conflicting with the operating system, another program, or a utility. If the hard drive is your Service Manual at support.dell.com for more information. Reinstall the memory modules...
... VALUE - Reinstall the memory modules and, if necessary, replace them . Reinstall the memory modules and, if necessary, replace them . See your boot device, ensure that the drive is conflicting with the operating system, another program, or a utility. If the hard drive is your Service Manual at support.dell.com for more information. Reinstall the memory modules...
Quick Reference Guide
Page 40
... supports the system configuration settings may be malfunctioning. Replace the battery, or connect the computer to charge the...Dell Diagnostics" on page 65). OF -D A Y CLOCK STOPPED - TI M E R C H I P C O U N T E R 2 F A I C A L L Y L O W - Connect your computer to an electrical outlet to an electrical outlet; If the message reappears, contact Dell (see "Contacting Dell" on page 42). D A Y C L O C K L O S T P O W E R - Run the System Set tests in the system setup program does not match the system clock. T H E D E V I C E I S N O T R E A D Y - A chip on the hard drive...
... supports the system configuration settings may be malfunctioning. Replace the battery, or connect the computer to charge the...Dell Diagnostics" on page 65). OF -D A Y CLOCK STOPPED - TI M E R C H I P C O U N T E R 2 F A I C A L L Y L O W - Connect your computer to an electrical outlet to an electrical outlet; If the message reappears, contact Dell (see "Contacting Dell" on page 42). D A Y C L O C K L O S T P O W E R - Run the System Set tests in the system setup program does not match the system clock. T H E D E V I C E I S N O T R E A D Y - A chip on the hard drive...
Quick Reference Guide
Page 41
... AT BOOTING THIS SYSTEM HAVE FAILED AT CHECKPOINT [NNNN]. Replace battery. Processor fan failure. Replace processor fan. Possible hard drive failure during harddrive start routine three consecutive times for the same error (see "Contacting Dell" on page 65 for assistance. No bootable partition on hard drive, or the hard drive cable is loose, or no bootable device exists. •...
... AT BOOTING THIS SYSTEM HAVE FAILED AT CHECKPOINT [NNNN]. Replace battery. Processor fan failure. Replace processor fan. Possible hard drive failure during harddrive start routine three consecutive times for the same error (see "Contacting Dell" on page 65 for assistance. No bootable partition on hard drive, or the hard drive cable is loose, or no bootable device exists. •...
Quick Reference Guide
Page 68
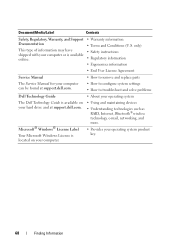
... your computer can be found at support.dell.com. • How to remove and replace parts • How to configure system settings • How to troubleshoot and solve problems Dell Technology Guide • About your operating system The Dell Technology Guide is located on your hard drive and at support.dell.com. Microsoft® Windows® License...
... your computer can be found at support.dell.com. • How to remove and replace parts • How to configure system settings • How to troubleshoot and solve problems Dell Technology Guide • About your operating system The Dell Technology Guide is located on your hard drive and at support.dell.com. Microsoft® Windows® License...
Service Manual
Page 32
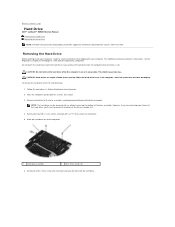
... 'll have to Contents Page Hard Drive Dell™ Latitude™ E6500 Service Manual Removing the Hard Drive Replacing the Hard Drive NOTE: Dell does not guarantee compatibility or provide support for hard drives obtained from the computer while the drive is on Your Computer. 2. CAUTION: Hard drives are removing more than just the hard drive, you remove the hard drive from sources other than Dell. Back to remove the bottom...
... 'll have to Contents Page Hard Drive Dell™ Latitude™ E6500 Service Manual Removing the Hard Drive Replacing the Hard Drive NOTE: Dell does not guarantee compatibility or provide support for hard drives obtained from the computer while the drive is on Your Computer. 2. CAUTION: Hard drives are removing more than just the hard drive, you remove the hard drive from sources other than Dell. Back to remove the bottom...

Service Manual
Page 33
... your computer. 8. l Use the Drivers and Utilities media to install the drivers and utilities for information). 1 hard drive bezel 3 hard drive 2 M3 x 3mm screw Replacing the Hard Drive 1. Slide the hard drive into place. Back to slide the drive into the bay until it . Replace the battery. 7. If you may damage the connector. 4. If it doesn't boot: l Use your operating system...
... your computer. 8. l Use the Drivers and Utilities media to install the drivers and utilities for information). 1 hard drive bezel 3 hard drive 2 M3 x 3mm screw Replacing the Hard Drive 1. Slide the hard drive into place. Back to slide the drive into the bay until it . Replace the battery. 7. If you may damage the connector. 4. If it doesn't boot: l Use your operating system...
Service Manual
Page 43
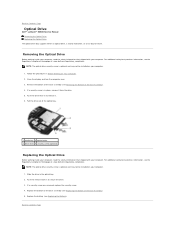
... procedures in Before Working on Your Computer. 2. Close the display and turn the computer over. 3. Pull the drive out of the Base Assembly). 5. Back to Contents Page Optical Drive Dell™ Latitude™ E6500 Service Manual Removing the Optical Drive Replacing the Optical Drive The optical drive bay supports either an optical drive, a second hard drive, or an air bay for travel.
... procedures in Before Working on Your Computer. 2. Close the display and turn the computer over. 3. Pull the drive out of the Base Assembly). 5. Back to Contents Page Optical Drive Dell™ Latitude™ E6500 Service Manual Removing the Optical Drive Replacing the Optical Drive The optical drive bay supports either an optical drive, a second hard drive, or an air bay for travel.

Service Manual
Page 45
... Removing the Processor Thermal-Cooling Assembly). 7. Back to Contents Page Palm Rest Assembly Dell™ Latitude™ E6500 Service Manual Removing the Palm Rest Assembly Replacing the Palm Rest Assembly Removing the Palm Rest Assembly Before working inside your computer. Remove the hard drive (see Removing the Keyboard). 9. For additional safety best practices information, see Removing...
... Removing the Processor Thermal-Cooling Assembly). 7. Back to Contents Page Palm Rest Assembly Dell™ Latitude™ E6500 Service Manual Removing the Palm Rest Assembly Replacing the Palm Rest Assembly Removing the Palm Rest Assembly Before working inside your computer. Remove the hard drive (see Removing the Keyboard). 9. For additional safety best practices information, see Removing...
Service Manual
Page 48
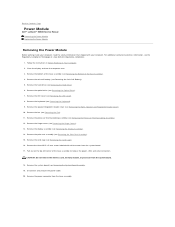
...the base assembly (see Removing the Bottom of the base assembly to Contents Page Power Module Dell™ Latitude™ E6500 Service Manual Removing the Power Module Replacing the Power Module Removing the Power Module Before working inside your computer. Remove the LED ..., USB, and serial connectors. Remove the hard drive (see Removing the Right- Remove the speaker/fingerprint reader cover (see Removing the Hard Drive). 6. Remove the processor thermal-cooling assembly (see the Regulatory Compliance Homepage at: www.dell.com/regulatory_compliance. 1. For additional safety best ...
...the base assembly (see Removing the Bottom of the base assembly to Contents Page Power Module Dell™ Latitude™ E6500 Service Manual Removing the Power Module Replacing the Power Module Removing the Power Module Before working inside your computer. Remove the LED ..., USB, and serial connectors. Remove the hard drive (see Removing the Right- Remove the speaker/fingerprint reader cover (see Removing the Hard Drive). 6. Remove the processor thermal-cooling assembly (see the Regulatory Compliance Homepage at: www.dell.com/regulatory_compliance. 1. For additional safety best ...

Service Manual
Page 49
... right-speaker/fingerprint reader cover (see Replacing the Hard Drive). 14. For additional safety best practices information, see Replacing the System Board Assembly). 4. Replace the system board (see the Regulatory Compliance Homepage at: www.dell.com/regulatory_compliance. 1. Replace the display assembly (see Replacing the Hinge Covers). 12. Replace the hinge covers (see Replacing the Display Assembly). 11. 1 DC power connector...
... right-speaker/fingerprint reader cover (see Replacing the Hard Drive). 14. For additional safety best practices information, see Replacing the System Board Assembly). 4. Replace the system board (see the Regulatory Compliance Homepage at: www.dell.com/regulatory_compliance. 1. Replace the display assembly (see Replacing the Hinge Covers). 12. Replace the hinge covers (see Replacing the Display Assembly). 11. 1 DC power connector...
Service Manual
Page 50
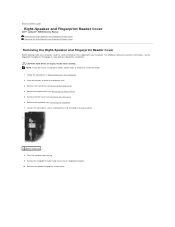
... and Fingerprint Reader Cover Dell™ Latitude™ E6500 Service Manual Removing the Right-Speaker and Fingerprint Reader Cover Replacing the Right-Speaker and Fingerprint Reader Cover Removing the Right-Speaker and Fingerprint Reader Cover Before working inside your computer, read the safety information that shipped with your computer. Remove the hard drive (see Removing the...
... and Fingerprint Reader Cover Dell™ Latitude™ E6500 Service Manual Removing the Right-Speaker and Fingerprint Reader Cover Replacing the Right-Speaker and Fingerprint Reader Cover Removing the Right-Speaker and Fingerprint Reader Cover Before working inside your computer, read the safety information that shipped with your computer. Remove the hard drive (see Removing the...

Service Manual
Page 51
... 3. Press along the cable to Contents Page Replace the hard drive (see Replacing the LED Cover). 6. Replacing the Right-Speaker and Fingerprint Reader Cover Before working inside your computer, read the safety information that shipped with your computer. Replace the keyboard (see the Regulatory Compliance Homepage at: www.dell.com/regulatory_compliance. For additional safety best practices information...
... 3. Press along the cable to Contents Page Replace the hard drive (see Replacing the LED Cover). 6. Replacing the Right-Speaker and Fingerprint Reader Cover Before working inside your computer, read the safety information that shipped with your computer. Replace the keyboard (see the Regulatory Compliance Homepage at: www.dell.com/regulatory_compliance. For additional safety best practices information...
Service Manual
Page 52
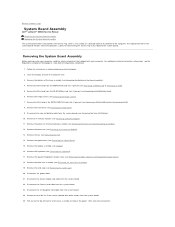
...12. Disconnect the coin-cell battery cable from the system board. 22. Remove the processor thermal-cooling assembly (see Removing the Hard Drive). 9. Remove the optical drive (see Removing a WPAN/UWB Card or Removing an FCM). 8. Remove the Mini-Card in Before Working on Your Computer.... WLAN/WiMax card slot, if present (see Display). 16. Back to Contents Page System Board Assembly Dell™ Latitude™ E6500 Service Manual Removing the System Board Assembly Replacing the System Board Assembly The system board's BIOS chip contains the Service Tag, which is also visible ...
...12. Disconnect the coin-cell battery cable from the system board. 22. Remove the processor thermal-cooling assembly (see Removing the Hard Drive). 9. Remove the optical drive (see Removing a WPAN/UWB Card or Removing an FCM). 8. Remove the Mini-Card in Before Working on Your Computer.... WLAN/WiMax card slot, if present (see Display). 16. Back to Contents Page System Board Assembly Dell™ Latitude™ E6500 Service Manual Removing the System Board Assembly Replacing the System Board Assembly The system board's BIOS chip contains the Service Tag, which is also visible ...
Service Manual
Page 54
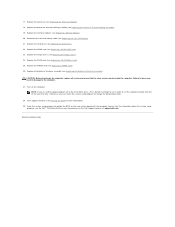
... boot from the CD for more information). 29. For information about the system setup program, see Replacing the Hard Drive). 22. Back to update the BIOS on the Dell Support website at support.dell.com. Replace the hard drive (see the Dell™ Technology Guide on your computer or on the new system board with the computer Service Tag...
... boot from the CD for more information). 29. For information about the system setup program, see Replacing the Hard Drive). 22. Back to update the BIOS on the Dell Support website at support.dell.com. Replace the hard drive (see the Dell™ Technology Guide on your computer or on the new system board with the computer Service Tag...

Service Manual
Page 64
....dell.com. l Ensure you receive an insufficient memory message l Save and close any open programs you experience other memory problems l Reseat the memory modules to ensure that shipped with your computer meets the minimum hardware requirements needed to check the hard drive,... software problems Check the software documentation or contact the software manufacturer for your computer. For additional safety best practices information, see Replacing a Memory Module). l Reseat the memory modules (see the Setup and Quick Reference Guide for troubleshooting information l Ensure that ...
....dell.com. l Ensure you receive an insufficient memory message l Save and close any open programs you experience other memory problems l Reseat the memory modules to ensure that shipped with your computer meets the minimum hardware requirements needed to check the hard drive,... software problems Check the software documentation or contact the software manufacturer for your computer. For additional safety best practices information, see Replacing a Memory Module). l Reseat the memory modules (see the Setup and Quick Reference Guide for troubleshooting information l Ensure that ...


