

Quick Reference Guide
Page 30
... in filenames. GATE A20 FAILURE - The operating system is usually followed by specific information-for more information. Take the appropriate action. Shut down the computer, remove the hard drive (see "Dell Diagnostics" on page 36). D I S K D R I V E C O N T R O L L E R F A I Z E H A S C H A N G E D - If the problem persists, try another card. E X T E N D E D M E M O R Y S I L U R E 0 - Restart the computer. Then, shut down the computer, reinstall the...
... in filenames. GATE A20 FAILURE - The operating system is usually followed by specific information-for more information. Take the appropriate action. Shut down the computer, remove the hard drive (see "Dell Diagnostics" on page 36). D I S K D R I V E C O N T R O L L E R F A I Z E H A S C H A N G E D - If the problem persists, try another card. E X T E N D E D M E M O R Y S I L U R E 0 - Restart the computer. Then, shut down the computer, reinstall the...

Quick Reference Guide
Page 31
...) restrictions on the file, so the file cannot be played (see "Dell Diagnostics" on page 36). K E Y B O A R D C L O C K L I N E F A I L U R E - Then, shut down the computer, remove the hard drive (see "Dell Diagnostics" on page 36). INSERT BOOTABLE MEDIA - Insert bootable media. See your Service Manual at support.dell.com for more information. Restart the computer, and avoid touching the keyboard...
...) restrictions on the file, so the file cannot be played (see "Dell Diagnostics" on page 36). K E Y B O A R D C L O C K L I N E F A I L U R E - Then, shut down the computer, remove the hard drive (see "Dell Diagnostics" on page 36). INSERT BOOTABLE MEDIA - Insert bootable media. See your Service Manual at support.dell.com for more information. Restart the computer, and avoid touching the keyboard...

Quick Reference Guide
Page 33
... Start→Control Panel→Add or Remove Programs→Programs and Features. 2 Select the program you are trying to check the file structure on the hard drive. SEEK ERROR - O F- The operating system cannot find a specific track on the hard drive. TI M E- D A Y C L O C K L O S T P O W E R - Connect your Service Manual at support.dell.com). OPTIONAL R O M B A D CHECKSUM - SECTOR NOT FOUND - Run...
... Start→Control Panel→Add or Remove Programs→Programs and Features. 2 Select the program you are trying to check the file structure on the hard drive. SEEK ERROR - O F- The operating system cannot find a specific track on the hard drive. TI M E- D A Y C L O C K L O S T P O W E R - Connect your Service Manual at support.dell.com). OPTIONAL R O M B A D CHECKSUM - SECTOR NOT FOUND - Run...
Quick Reference Guide
Page 47
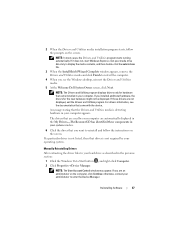
If it does not, start Windows Explorer, click your hard drive as described in your operating system. NOTE: The Drivers and Utilities program... After extracting the driver files to your media drive directory to display the media contents, and then double-click the autorcd.exe file. 3 When the InstallShield Wizard Complete window appears, remove the Drivers and Utilities media and click Finish... Windows desktop, reinsert the Drivers and Utilities media. 5 At the Welcome Dell System Owner screen, click Next. NOTE: In most cases, the Drivers and Utilities program starts running automatically.
If it does not, start Windows Explorer, click your hard drive as described in your operating system. NOTE: The Drivers and Utilities program... After extracting the driver files to your media drive directory to display the media contents, and then double-click the autorcd.exe file. 3 When the InstallShield Wizard Complete window appears, remove the Drivers and Utilities media and click Finish... Windows desktop, reinsert the Drivers and Utilities media. 5 At the Welcome Dell System Owner screen, click Next. NOTE: In most cases, the Drivers and Utilities program starts running automatically.
Quick Reference Guide
Page 48
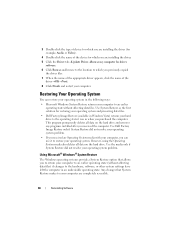
.... 8 Click Finish and restart your computer. Restoring Your Operating System You can use it was in Windows Vista) returns your hard drive to the operating state it to your operating system. Use the media only if System Restore did not resolve your operating system problem...for which you are completely reversible. 48 Reinstalling Software This program permanently deletes all data on the hard drive and removes any programs installed after you purchased the computer. Use Dell Factory Image Restore only if System Restore did not resolve your operating system problem. Using Microsoft&#...
.... 8 Click Finish and restart your computer. Restoring Your Operating System You can use it was in Windows Vista) returns your hard drive to the operating state it to your operating system. Use the media only if System Restore did not resolve your operating system problem...for which you are completely reversible. 48 Reinstalling Software This program permanently deletes all data on the hard drive and removes any programs installed after you purchased the computer. Use Dell Factory Image Restore only if System Restore did not resolve your operating system problem. Using Microsoft&#...
Quick Reference Guide
Page 50
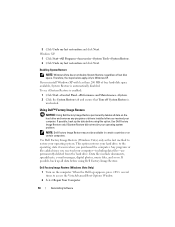
... Image Restore only if System Restore did not resolve your computer-including data files-are permanently deleted from the hard drive. NOTE: Dell Factory Image Restore may not be available in when you received your operating system. If possible, back up the data before using this ... Windows XP: 1 Click Start→All Programs→Accessories→System Tools→System Restore. 2 Click Undo my last restoration and click Next. Dell Factory Image Restore (Windows Vista Only) 1 Turn on the hard drive and removes any programs or drivers installed after you purchased the computer.
... Image Restore only if System Restore did not resolve your computer-including data files-are permanently deleted from the hard drive. NOTE: Dell Factory Image Restore may not be available in when you received your operating system. If possible, back up the data before using this ... Windows XP: 1 Click Start→All Programs→Accessories→System Tools→System Restore. 2 Click Undo my last restoration and click Next. Dell Factory Image Restore (Windows Vista Only) 1 Turn on the hard drive and removes any programs or drivers installed after you purchased the computer.
Quick Reference Guide
Page 63
... removal, 10 beep codes, 27 C computer beep codes, 27 connecting AC adapter, 11 IEEE 1394 devices, 12 network cable, 11 USB devices, 12 contacting Dell, 61 D Dell contacting, 61 Factory Image Restore, 50 software updates, 42 Support Utility, 42 Technical Update Service, 42 Dell ... and Utilities media, 37 starting from your hard drive, 36 Dell Factory Image Restore, 51 Dell Technology Guide, 54 DellConnect, 56 diagnostics beep codes, 27 Dell, 36 documentation, 53 Dell Technology Guide, 54 Service Manual, 54 drivers Drivers and Utilities media, 53 identifying, 45 reinstalling, 46 returning to a...
... removal, 10 beep codes, 27 C computer beep codes, 27 connecting AC adapter, 11 IEEE 1394 devices, 12 network cable, 11 USB devices, 12 contacting Dell, 61 D Dell contacting, 61 Factory Image Restore, 50 software updates, 42 Support Utility, 42 Technical Update Service, 42 Dell ... and Utilities media, 37 starting from your hard drive, 36 Dell Factory Image Restore, 51 Dell Technology Guide, 54 DellConnect, 56 diagnostics beep codes, 27 Dell, 36 documentation, 53 Dell Technology Guide, 54 Service Manual, 54 drivers Drivers and Utilities media, 53 identifying, 45 reinstalling, 46 returning to a...
Service Manual
Page 6
... on the keyboard to highlight CD-ROM, and then press . Back to Contents Page Flashing the BIOS Dell™ Latitude™ E5400 and E5500 Service Manual Flashing the BIOS From a CD Flashing the BIOS From the Hard Drive If a BIOS-update program media, such as a CD, is provided with a new system board, ...flash the BIOS from the drive. If you do so may cause system damage. 1. At the Boot Device Menu, use the up- NOTICE: Do not interrupt this process once it begins. Remove the flash...
... on the keyboard to highlight CD-ROM, and then press . Back to Contents Page Flashing the BIOS Dell™ Latitude™ E5400 and E5500 Service Manual Flashing the BIOS From a CD Flashing the BIOS From the Hard Drive If a BIOS-update program media, such as a CD, is provided with a new system board, ...flash the BIOS from the drive. If you do so may cause system damage. 1. At the Boot Device Menu, use the up- NOTICE: Do not interrupt this process once it begins. Remove the flash...
Service Manual
Page 31
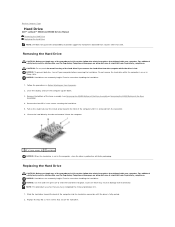
... seated. 2. Back to Contents Page Hard Drive Dell™ Latitude™ E5400 and E5500 Service Manual Removing the Hard Drive Replacing the Hard Drive NOTE: Dell does not guarantee compatibility or provide support for hard drives obtained from the connector. 6. Replace the four M2 x 3-mm screws that shipped with your computer before removing the hard drive. Exercise care when handling the hard drive. 1. Follow the procedures in this...
... seated. 2. Back to Contents Page Hard Drive Dell™ Latitude™ E5400 and E5500 Service Manual Removing the Hard Drive Replacing the Hard Drive NOTE: Dell does not guarantee compatibility or provide support for hard drives obtained from the connector. 6. Replace the four M2 x 3-mm screws that shipped with your computer before removing the hard drive. Exercise care when handling the hard drive. 1. Follow the procedures in this...
Service Manual
Page 34
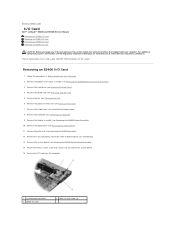
... optical drive (see Removing the Hinge Cover). 8. For additional safety best practices information, see Removing the E5400 Bottom of the procedures in this section, follow the safety instructions that secures the I /O card provides DC-in Before Working on www.dell.com at: www.dell.com/regulatory_compliance. Back to Contents Page I/O Card Dell™ Latitude™ E5400 and E5500...
... optical drive (see Removing the Hinge Cover). 8. For additional safety best practices information, see Removing the E5400 Bottom of the procedures in this section, follow the safety instructions that secures the I /O card provides DC-in Before Working on www.dell.com at: www.dell.com/regulatory_compliance. Back to Contents Page I/O Card Dell™ Latitude™ E5400 and E5500...
Service Manual
Page 35
.... Replace the hinge cover (see Replacing the Hard Drive). 12. Replace the hard drive (see Replacing the Hinge Cover). 8. Remove the hard drive (see Removing the E5500 Palm Rest). 10. Remove the palm rest (see Removing the Hard Drive). 4. Replace the palm rest (see Removing a WLAN Card). 5. Remove the WLAN card (see Replacing the E5400 Palm Rest). 4. Remove the keyboard (see Replacing the E5400 Display Assembly...
.... Replace the hinge cover (see Replacing the Hard Drive). 12. Replace the hard drive (see Replacing the Hinge Cover). 8. Remove the hard drive (see Removing the E5500 Palm Rest). 10. Remove the palm rest (see Removing the Hard Drive). 4. Replace the palm rest (see Removing a WLAN Card). 5. Remove the WLAN card (see Replacing the E5400 Palm Rest). 4. Remove the keyboard (see Replacing the E5400 Display Assembly...

Service Manual
Page 36
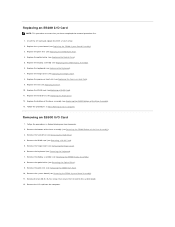
...). 11. Replace the hard drive (see Replacing the E5500 Bottom of the base assembly (see Replacing the Hard Drive). 10. 1 system board connector 3 E5500 I/O card 2 M2.5 x 5-mm screws (2) Replacing an E5500 I /O card and replace... the two M2.5 x 5-mm screws. 2. Replace the keyboard (see Replacing the Hinge Cover). 8. Replace the hinge cover (see Replacing the Keyboard). 7. Insert the I /O Card NOTE: This procedure assumes that you have completed the removal...
...). 11. Replace the hard drive (see Replacing the E5500 Bottom of the base assembly (see Replacing the Hard Drive). 10. 1 system board connector 3 E5500 I/O card 2 M2.5 x 5-mm screws (2) Replacing an E5500 I /O card and replace... the two M2.5 x 5-mm screws. 2. Replace the keyboard (see Replacing the Hinge Cover). 8. Replace the hinge cover (see Replacing the Keyboard). 7. Insert the I /O Card NOTE: This procedure assumes that you have completed the removal...

Service Manual
Page 40
.... Replace the keyboard (see Removing the Keyboard). 4. Replace the hard drive (see Removing the Hinge Cover). 3. Removing the E5500 LED Dashboard CAUTION: Before you have completed the removal procedure first. Remove the hinge cover (see Replacing the Hard Drive). 14. For additional safety best practices information, see the Regulatory Compliance Homepage on www.dell.com at : www.dell.com/regulatory_compliance. 1. Replace the...
.... Replace the keyboard (see Removing the Keyboard). 4. Replace the hard drive (see Removing the Hinge Cover). 3. Removing the E5500 LED Dashboard CAUTION: Before you have completed the removal procedure first. Remove the hinge cover (see Replacing the Hard Drive). 14. For additional safety best practices information, see the Regulatory Compliance Homepage on www.dell.com at : www.dell.com/regulatory_compliance. 1. Replace the...
Service Manual
Page 48
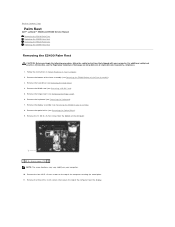
...: The screw locations may vary slightly on www.dell.com at: www.dell.com/regulatory_compliance. 1. Back to Contents Page Palm Rest Dell™ Latitude™ E5400 and E5500 Service Manual Removing the E5400 Palm Rest Replacing the E5400 Palm Rest Removing the E5500 Palm Rest Replacing the E5500 Palm Rest Removing the E5400 Palm Rest CAUTION: Before you begin the...
...: The screw locations may vary slightly on www.dell.com at: www.dell.com/regulatory_compliance. 1. Back to Contents Page Palm Rest Dell™ Latitude™ E5400 and E5500 Service Manual Removing the E5400 Palm Rest Replacing the E5400 Palm Rest Removing the E5500 Palm Rest Replacing the E5500 Palm Rest Removing the E5400 Palm Rest CAUTION: Before you begin the...
Service Manual
Page 50
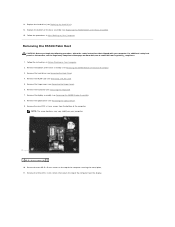
....dell.com at: www.dell.com/regulatory_compliance. 1. Remove the hard drive (see Removing the Keyboard). 7. Remove the keyboard (see Removing the Hard Drive). 4. Remove the three M2 x 3-mm screws that shipped with your computer. 1 M2.5 x 8-mm screws (9) 10. Remove the bottom of the base assembly (see Removing a WLAN Card). 5. 13. Remove the WLAN card (see Removing the E5400 Bottom of the Base Assembly). 15. Removing the E5500...
....dell.com at: www.dell.com/regulatory_compliance. 1. Remove the hard drive (see Removing the Keyboard). 7. Remove the keyboard (see Removing the Hard Drive). 4. Remove the three M2 x 3-mm screws that shipped with your computer. 1 M2.5 x 8-mm screws (9) 10. Remove the bottom of the base assembly (see Removing a WLAN Card). 5. 13. Remove the WLAN card (see Removing the E5400 Bottom of the Base Assembly). 15. Removing the E5500...
Service Manual
Page 53
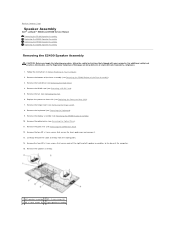
...Remove the speaker assembly. 1 left speaker assemblies to Contents Page Speaker Assembly Dell™ Latitude™ E5400 and E5500 Service Manual Removing the E5400 Speaker Assembly Replacing the E5400 Speaker Assembly Removing the E5500 Speaker Assembly Replacing the E5500 Speaker Assembly Removing...www.dell.com at: www.dell.com/regulatory_compliance. 1. Remove the WLAN card (see Removing the E5400 Palm Rest). 12. Remove the palm rest (see Removing a WLAN Card). 5. Remove the hard drive (see Removing the E5400 Bottom of the base assembly (see Removing the Hard Drive). 4. Remove ...
...Remove the speaker assembly. 1 left speaker assemblies to Contents Page Speaker Assembly Dell™ Latitude™ E5400 and E5500 Service Manual Removing the E5400 Speaker Assembly Replacing the E5400 Speaker Assembly Removing the E5500 Speaker Assembly Replacing the E5500 Speaker Assembly Removing...www.dell.com at: www.dell.com/regulatory_compliance. 1. Remove the WLAN card (see Removing the E5400 Palm Rest). 12. Remove the palm rest (see Removing a WLAN Card). 5. Remove the hard drive (see Removing the E5400 Bottom of the base assembly (see Removing the Hard Drive). 4. Remove ...
Service Manual
Page 54
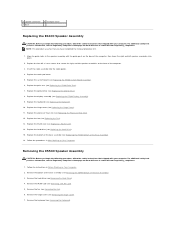
...the Processor Heat Sink). 12. Replace the hard drive (see Removing the Hard Drive). 4. Removing the E5500 Speaker Assembly CAUTION: Before you begin the ...following procedure, follow the safety instructions that secure the right and left speaker assemblies into the cable guides. 4. For additional safety best practices information, see Removing the Keyboard). Remove the hard drive (see Replacing the Hard Drive). 15. Remove the keyboard (see the Regulatory Compliance Homepage on www.dell...
...the Processor Heat Sink). 12. Replace the hard drive (see Removing the Hard Drive). 4. Removing the E5500 Speaker Assembly CAUTION: Before you begin the ...following procedure, follow the safety instructions that secure the right and left speaker assemblies into the cable guides. 4. For additional safety best practices information, see Removing the Keyboard). Remove the hard drive (see Replacing the Hard Drive). 15. Remove the keyboard (see the Regulatory Compliance Homepage on www.dell...

Service Manual
Page 55
... M2 x 3-mm screws that shipped with the guide posts on www.dell.com at: www.dell.com/regulatory_compliance. Replace the optical drive (see Replacing the Hard Drive). 12. 8. For additional safety best practices information, see Removing the E5500 Display Assembly). 9. Replace the hard drive (see Replacing the Optical Drive). 6. Remove the palm rest (see Replacing a WLAN Card). 11. Replace the WLAN...
... M2 x 3-mm screws that shipped with the guide posts on www.dell.com at: www.dell.com/regulatory_compliance. Replace the optical drive (see Replacing the Hard Drive). 12. 8. For additional safety best practices information, see Removing the E5500 Display Assembly). 9. Replace the hard drive (see Replacing the Optical Drive). 6. Remove the palm rest (see Replacing a WLAN Card). 11. Replace the WLAN...
Service Manual
Page 57
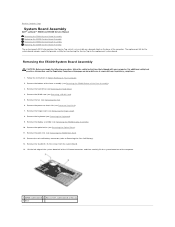
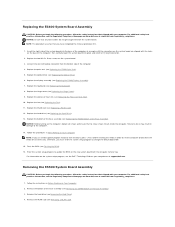
... Page System Board Assembly Dell™ Latitude™ E5400 and E5500 Service Manual Removing the E5400 System Board Assembly Replacing the E5400 System Board Assembly Removing the E5500 System Board Assembly Replacing the E5500 System Board Assembly The ...system board's BIOS chip contains the Service Tag, which is also visible on a barcode label on the base of the Base Assembly). 3. Remove the WLAN card (see Removing the Hard Drive). 4. Remove the two M2.5 x 5-mm screws from the system board. 14. Follow the instructions in Before Working on www.dell...
... Page System Board Assembly Dell™ Latitude™ E5400 and E5500 Service Manual Removing the E5400 System Board Assembly Replacing the E5400 System Board Assembly Removing the E5500 System Board Assembly Replacing the E5500 System Board Assembly The ...system board's BIOS chip contains the Service Tag, which is also visible on a barcode label on the base of the Base Assembly). 3. Remove the WLAN card (see Removing the Hard Drive). 4. Remove the two M2.5 x 5-mm screws from the system board. 14. Follow the instructions in Before Working on www.dell...
Service Manual
Page 58
... connector from the media for one time only. Replace the fan (see Removing a WLAN Card). Replace the hard drive (see the Dell™ Technology Guide on Your Computer. 2. Follow the procedures in Before ...Remove the hard drive (see Replacing the Hinge Cover). 9. Replace the optical drive (see the Regulatory Compliance Homepage on the system board. 3. For additional safety best practices information, see Replacing the Optical Drive). 6. Replace the keyboard (see Replacing the E5400 Bottom of the system board into the I/O board connector. 2. Removing the E5500...
... connector from the media for one time only. Replace the fan (see Removing a WLAN Card). Replace the hard drive (see the Dell™ Technology Guide on Your Computer. 2. Follow the procedures in Before ...Remove the hard drive (see Replacing the Hinge Cover). 9. Replace the optical drive (see the Regulatory Compliance Homepage on the system board. 3. For additional safety best practices information, see Replacing the Optical Drive). 6. Replace the keyboard (see Replacing the E5400 Bottom of the system board into the I/O board connector. 2. Removing the E5500...


