Users Guide
Page 3
... 7 Parts and Controls 8 Specifications 10 Plug-and-Play 17 LCD Monitor Quality and Pixel Policy 17 Maintenance Guidelines 17 Setting Up the Monitor 18 Attaching the Stand 18 Connecting Your Monitor 19 Organizing Cables 20 Removing the Stand 20 Wall Mounting (Optional 21 Operating the Monitor 22 Side-Panel Controls 22 Using the On-Screen Display (OSD) Menu 24 Setting the Maximum Resolution 35 Tilt 36 Troubleshooting 36 Self-Test 36 Common Problems 39 Touchscreen Problems 42 Product Specific Problems 43 Universal Serial Bus (USB) Specific Problems...
... 7 Parts and Controls 8 Specifications 10 Plug-and-Play 17 LCD Monitor Quality and Pixel Policy 17 Maintenance Guidelines 17 Setting Up the Monitor 18 Attaching the Stand 18 Connecting Your Monitor 19 Organizing Cables 20 Removing the Stand 20 Wall Mounting (Optional 21 Operating the Monitor 22 Side-Panel Controls 22 Using the On-Screen Display (OSD) Menu 24 Setting the Maximum Resolution 35 Tilt 36 Troubleshooting 36 Self-Test 36 Common Problems 39 Touchscreen Problems 42 Product Specific Problems 43 Universal Serial Bus (USB) Specific Problems...

Users Guide
Page 7
....41 cm (19.5 inch) diagonal display area. • Resolution of 1600 x 900. • Tilt adjustment (5.5 degrees up and 31 degrees down). • Removable stand. • 100 mm x 100 mm Video Electronics Standards Association (VESA) compliant mounting holes. • Plug-and-play support. • On-Screen Display (OSD) controls for easy setup and screen optimization. • Security cable slot. • Stand lock. • INF file, Image and color matching (ICM) file, Dell Display Manager software, and product documentation...
....41 cm (19.5 inch) diagonal display area. • Resolution of 1600 x 900. • Tilt adjustment (5.5 degrees up and 31 degrees down). • Removable stand. • 100 mm x 100 mm Video Electronics Standards Association (VESA) compliant mounting holes. • Plug-and-play support. • On-Screen Display (OSD) controls for easy setup and screen optimization. • Security cable slot. • Stand lock. • INF file, Image and color matching (ICM) file, Dell Display Manager software, and product documentation...

Users Guide
Page 9
... MHL cable (optional). Connect your computer to the monitor. slot Side View Bottom View Label Description 1 Stand lock 2 AC power cord port 3 DisplayPort port 4 HDMI (MHL)1 port 5 HDMI (MHL)2 port 6 VGA port Use Use a M3 x 6 mm screw to lock the stand to contact Dell for technical support. 5 Dell soundbar mounting slots Attaches the Dell Soundbar (optional). 6 Cable management Organize cables by placing them through the slot. 4 Barcode serial number label Refer to this label if you need to the monitor. (screw not included) Connect the power cable.
... MHL cable (optional). Connect your computer to the monitor. slot Side View Bottom View Label Description 1 Stand lock 2 AC power cord port 3 DisplayPort port 4 HDMI (MHL)1 port 5 HDMI (MHL)2 port 6 VGA port Use Use a M3 x 6 mm screw to lock the stand to contact Dell for technical support. 5 Dell soundbar mounting slots Attaches the Dell Soundbar (optional). 6 Cable management Organize cables by placing them through the slot. 4 Barcode serial number label Refer to this label if you need to the monitor. (screw not included) Connect the power cable.
Users Guide
Page 10
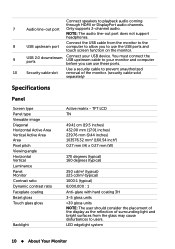
... the monitor. (security cable sold separately) Specifications Panel Screen type Panel type Viewable image Diagonal Horizontal Active Area Vertical Active Area Area Pixel pitch Viewing angle Horizontal Vertical Luminance Panel Monitor Contrast ratio Dynamic contrast ratio Faceplate coating Bezel gloss Touch glass gloss Backlight Active matrix - You must connect the USB upstream cable to users. LED edgelight system 10 About Your Monitor Connect speakers to playback audio coming through HDMI or DisplayPort audio channels. 7 Audio line-out port Only supports 2-channel audio...
... the monitor. (security cable sold separately) Specifications Panel Screen type Panel type Viewable image Diagonal Horizontal Active Area Vertical Active Area Area Pixel pitch Viewing angle Horizontal Vertical Luminance Panel Monitor Contrast ratio Dynamic contrast ratio Faceplate coating Bezel gloss Touch glass gloss Backlight Active matrix - You must connect the USB upstream cable to users. LED edgelight system 10 About Your Monitor Connect speakers to playback audio coming through HDMI or DisplayPort audio channels. 7 Audio line-out port Only supports 2-channel audio...

Users Guide
Page 13
... in use. no cables) Weight of Power Save Mode: About Your Monitor 13 If the computer detects input from keyboard, mouse, or other input devices, the monitor automatically resumes functioning. This is referred to as Power Save Mode. USB Audio Signal cable type Dimensions (with stand) Height Width Depth Dimensions (without stand) Height Width Depth Stand dimensions Height Width Depth Weight Weight with packaging Weight with stand assembly and cables Weight without stand assembly (For wall mount or VESA mount...
... in use. no cables) Weight of Power Save Mode: About Your Monitor 13 If the computer detects input from keyboard, mouse, or other input devices, the monitor automatically resumes functioning. This is referred to as Power Save Mode. USB Audio Signal cable type Dimensions (with stand) Height Width Depth Dimensions (without stand) Height Width Depth Stand dimensions Height Width Depth Weight Weight with packaging Weight with stand assembly and cables Weight without stand assembly (For wall mount or VESA mount...
Users Guide
Page 17
... the monitor power cable from the electrical outlet. For more pixels to see dell.com/support/monitors. Most monitor installations are hard to become fixed in the power save mode. About Your Monitor 17 NOTE: The monitor's USB ports work only when the monitor is not uncommon for the antistatic coating. Maintenance Guidelines Cleaning Your Monitor WARNING: Read and follow these instructions while unpacking, cleaning, or handling your monitor: • To clean your screen, use special screen-cleaning...
... the monitor power cable from the electrical outlet. For more pixels to see dell.com/support/monitors. Most monitor installations are hard to become fixed in the power save mode. About Your Monitor 17 NOTE: The monitor's USB ports work only when the monitor is not uncommon for the antistatic coating. Maintenance Guidelines Cleaning Your Monitor WARNING: Read and follow these instructions while unpacking, cleaning, or handling your monitor: • To clean your screen, use special screen-cleaning...
Users Guide
Page 28
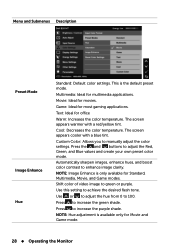
... Movie and Game mode. 28 Operating the Monitor Press the and buttons to increase the green shade. Press to adjust the Red, Green, and Blue values and create your own preset color mode. NOTE: Image Enhance is the default preset mode. Multimedia: Ideal for Standard, Multimedia, Movie, and Game modes. Use this setting to enhance image clarity. Automatically sharpen images, enhance hues, and boost color contrast to achieve the...
... Movie and Game mode. 28 Operating the Monitor Press the and buttons to increase the green shade. Press to adjust the Red, Green, and Blue values and create your own preset color mode. NOTE: Image Enhance is the default preset mode. Multimedia: Ideal for Standard, Multimedia, Movie, and Game modes. Use this setting to enhance image clarity. Automatically sharpen images, enhance hues, and boost color contrast to achieve the...

Users Guide
Page 29
... softer. Use the and buttons to adjust for video input. Use or to adjust the saturation from 0 to increase the colorful appearance. Resets your preference. Use the and buttons to the factory defaults. Adjusts the vertical position of the video image. Use or to Wide 16:9, 4:3, or 5:4. Display Settings Aspect Ratio Horizontal Position Vertical Position Sharpness Pixel Clock Phase Adjust the image ratio to adjust the sharpness. The Phase and Pixel Clock adjustments allow you to adjust your monitor to your monitor's color settings to change the image position. Menu and...
... softer. Use the and buttons to adjust for video input. Use or to adjust the saturation from 0 to increase the colorful appearance. Resets your preference. Use the and buttons to the factory defaults. Adjusts the vertical position of the video image. Use or to Wide 16:9, 4:3, or 5:4. Display Settings Aspect Ratio Horizontal Position Vertical Position Sharpness Pixel Clock Phase Adjust the image ratio to adjust the sharpness. The Phase and Pixel Clock adjustments allow you to adjust your monitor to your monitor's color settings to change the image position. Menu and...

Users Guide
Page 30
... settings to save energy. System Monitor status On Standby Off USB Monitor with upstream connected On On Off (Disabled) (Disabled) (Disabled) Monitor without upstream connected On Off/On* (depends on , the monitor will increase when transitioning from bright scenes to bright scenes. Menu and Submenus Dynamic Contrast Reset Display Settings Description Dynamic Contrast adjusts the contrast ratio to factory defaults. With Energy Smart turned on OSD Off selections) Power Button LED Allows you to set the state of the power light to factory defaults...
... settings to save energy. System Monitor status On Standby Off USB Monitor with upstream connected On On Off (Disabled) (Disabled) (Disabled) Monitor without upstream connected On Off/On* (depends on , the monitor will increase when transitioning from bright scenes to bright scenes. Menu and Submenus Dynamic Contrast Reset Display Settings Description Dynamic Contrast adjusts the contrast ratio to factory defaults. With Energy Smart turned on OSD Off selections) Power Button LED Allows you to set the state of the power light to factory defaults...

Users Guide
Page 32
... Enable to turn off this feature. Depending on the degree of image retention. DDC/CI DDC/CI (Display Data Channel/Command Interface) allows you to adjust the OSD settings, such as the DDC/CI, LCD Conditioning, and so on. Menu and Submenus Description Other Settings Select this option to adjust the monitor settings using software on your monitor. Enable this feature for best user experience and optimum...
... Enable to turn off this feature. Depending on the degree of image retention. DDC/CI DDC/CI (Display Data Channel/Command Interface) allows you to adjust the OSD settings, such as the DDC/CI, LCD Conditioning, and so on. Menu and Submenus Description Other Settings Select this option to adjust the monitor settings using software on your monitor. Enable this feature for best user experience and optimum...

Users Guide
Page 36
... selected input, one of the procedures in self-test mode, the power LED remains blue. If your computer and the monitor. 2. Unplug all video cables from the factory. While in this section, Self-Test Your monitor provides a self-test feature that allows you can tilt the monitor for the most comfortable viewing angle. Turn off both your monitor and computer are properly connected but the monitor screen remains...
... selected input, one of the procedures in self-test mode, the power LED remains blue. If your computer and the monitor. 2. Unplug all video cables from the factory. While in this section, Self-Test Your monitor provides a self-test feature that allows you can tilt the monitor for the most comfortable viewing angle. Turn off both your monitor and computer are properly connected but the monitor screen remains...

Users Guide
Page 38
... and video card. The monitor enters the self-test mode. 3. Press and hold button 1 and Button 4 simultaneously for problems. 38 Troubleshooting Repeat step 5 and step 6 to red. 6. To run the built-in diagnostics only when no display cables are connected and the monitor is complete when the text-screen appears. The color of the screen changes to inspect the display in green, blue, black, white, and text screens. To exit, press button 4 again...
... and video card. The monitor enters the self-test mode. 3. Press and hold button 1 and Button 4 simultaneously for problems. 38 Troubleshooting Repeat step 5 and step 6 to red. 6. To run the built-in diagnostics only when no display cables are connected and the monitor is complete when the text-screen appears. The color of the screen changes to inspect the display in green, blue, black, white, and text screens. To exit, press button 4 again...
Users Guide
Page 39
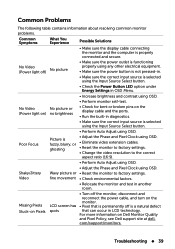
... button. • Check the Power Button LED option under Energy Settings in diagnostics. • Make sure the correct input source is properly connected and secure. Troubleshooting 39 No Video No picture or (Power light on) no brightness • Check for bent or broken pins on Dell Monitor Quality and Pixel Policy, see Dell support site at dell. For more information on the display cable and the ports. • Run the built-in OSD Menu. • Increase brightness and contrast using OSD...
... button. • Check the Power Button LED option under Energy Settings in diagnostics. • Make sure the correct input source is properly connected and secure. Troubleshooting 39 No Video No picture or (Power light on) no brightness • Check for bent or broken pins on Dell Monitor Quality and Pixel Policy, see Dell support site at dell. For more information on the display cable and the ports. • Run the built-in OSD Menu. • Increase brightness and contrast using OSD...
Users Guide
Page 40
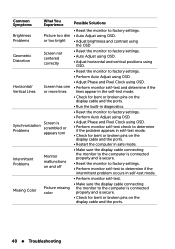
... Color Picture missing color • Make sure the display cable connecting the monitor to factory settings. • Perform Auto Adjust using OSD. • Perform monitor self-test check to determine if the intermittent problem occurs in the self-test mode. • Check for bent or broken pins on the display cable and the ports. • Run the built-in safe mode. Geometric Distortion Screen not centered correctly • Reset the monitor to factory settings. • Auto Adjust using OSD. • Adjust horizontal and vertical positions using OSD. • Reset...
... Color Picture missing color • Make sure the display cable connecting the monitor to factory settings. • Perform Auto Adjust using OSD. • Perform monitor self-test check to determine if the intermittent problem occurs in the self-test mode. • Check for bent or broken pins on the display cable and the ports. • Run the built-in safe mode. Geometric Distortion Screen not centered correctly • Reset the monitor to factory settings. • Auto Adjust using OSD. • Adjust horizontal and vertical positions using OSD. • Reset...
Users Guide
Page 42
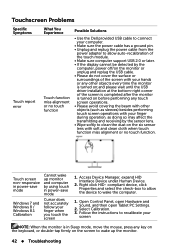
... HID- Open Control Panel, open Hardware and Sound, and then open Tablet PC Settings. 2. Follow the instructions to recalibrate your screen NOTE: When the monitor is in power-save mode Windows 7 and Windows 8 / Windows 8.1 Calibration Cannot wake up monitor and computer by using touch in Sleep mode, move the mouse, press any touch screen operations. • Please avoid covering the beam with other objects every time the monitor is turned on;and please wait until the USB driver installation at...
... HID- Open Control Panel, open Hardware and Sound, and then open Tablet PC Settings. 2. Follow the instructions to recalibrate your screen NOTE: When the monitor is in power-save mode Windows 7 and Windows 8 / Windows 8.1 Calibration Cannot wake up monitor and computer by using touch in Sleep mode, move the mouse, press any touch screen operations. • Please avoid covering the beam with other objects every time the monitor is turned on;and please wait until the USB driver installation at...

Users Guide
Page 43
... replug the display cable. • Restart the computer or video player. No input signal when controls are pressed No picture, the light is white. • Check the signal source. • Make sure the computer is not in power saving mode, by moving the mouse or pressing a key on the keyboard. • Make sure your computer or other video‑output device is powered on the monitor. Product Specific Problems Specific Symptoms Screen image is too...
... replug the display cable. • Restart the computer or video player. No input signal when controls are pressed No picture, the light is white. • Check the signal source. • Make sure the computer is not in power saving mode, by moving the mouse or pressing a key on the keyboard. • Make sure your computer or other video‑output device is powered on the monitor. Product Specific Problems Specific Symptoms Screen image is too...
Users Guide
Page 46
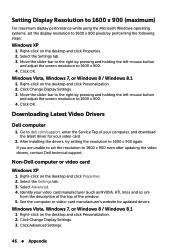
... computer, and download the latest driver for updated drivers. Downloading Latest Video Drivers Dell computer 1. Setting Display Resolution to 1600 x 900 (maximum) For maximum display performance while using the Microsoft Windows operating systems, set the resolution to 1600 x 900 even after updating the video drivers, contact Dell technical support. Identify your video card. 2. Click Change Display Settings. 3. Move the slider-bar to the right by pressing and holding the left -mouse button and adjust the screen resolution to 1600 x 900...
... computer, and download the latest driver for updated drivers. Downloading Latest Video Drivers Dell computer 1. Setting Display Resolution to 1600 x 900 (maximum) For maximum display performance while using the Microsoft Windows operating systems, set the resolution to 1600 x 900 even after updating the video drivers, contact Dell technical support. Identify your video card. 2. Click Change Display Settings. 3. Move the slider-bar to the right by pressing and holding the left -mouse button and adjust the screen resolution to 1600 x 900...
Users Guide
Page 47
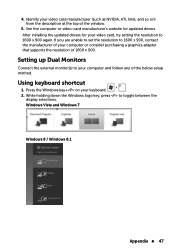
... monitor(s) to your video card, try setting the resolution to 1600 x 900 again. Windows Vista and Windows 7 Windows 8 / Windows 8.1 Appendix 47 Using keyboard shortcut 1. After installing the updated drivers for updated drivers. If you are unable to set the resolution to toggle between the display selections. While holding down the Windows logo key, press to 1600 x 900, contact the manufacturer of your computer or consider purchasing a graphics adapter that supports...
... monitor(s) to your video card, try setting the resolution to 1600 x 900 again. Windows Vista and Windows 7 Windows 8 / Windows 8.1 Appendix 47 Using keyboard shortcut 1. After installing the updated drivers for updated drivers. If you are unable to set the resolution to toggle between the display selections. While holding down the Windows logo key, press to 1600 x 900, contact the manufacturer of your computer or consider purchasing a graphics adapter that supports...
Display Manager Users Guide
Page 1
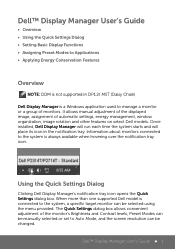
The Quick Settings dialog box allows convenient adjustment of the monitor's Brightness and Contrast levels, Preset Modes can be manually selected or set to Auto Mode, and the screen resolution can be changed. It allows manual adjustment of the displayed image, assignment of monitors. When more than one supported Dell model is always available when hovering over the notification tray icon. Dell™ Display Manager User's Guide 1 Information about monitors connected to the system is connected to manage a monitor or...
The Quick Settings dialog box allows convenient adjustment of the monitor's Brightness and Contrast levels, Preset Modes can be manually selected or set to Auto Mode, and the screen resolution can be changed. It allows manual adjustment of the displayed image, assignment of monitors. When more than one supported Dell model is always available when hovering over the notification tray icon. Dell™ Display Manager User's Guide 1 Information about monitors connected to the system is connected to manage a monitor or...
Display Manager Users Guide
Page 3
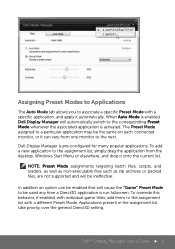
... not supported and will be enabled that will automatically switch to the assignment list with a different Preset Mode. The Preset Mode assigned to a particular application may be the same on each connected monitor, or it automatically. To override this behavior, if enabled, with a specific application, and apply it can be ineffective. Dell™ Display Manager User's Guide 3 When Auto Mode is pre...
... not supported and will be enabled that will automatically switch to the assignment list with a different Preset Mode. The Preset Mode assigned to a particular application may be the same on each connected monitor, or it automatically. To override this behavior, if enabled, with a specific application, and apply it can be ineffective. Dell™ Display Manager User's Guide 3 When Auto Mode is pre...


