

Owner's Manual
Page 2
...either trademarks or registered trademarks of your computer. Microsoft®, Windows®, and the Windows start button logo are either the entities claiming the marks and names or their products. Dell Inc. All rights reserved. and is strictly forbidden. A00 CAUTION...indicates potential damage to change without the written permission of data if instructions are trademarks or registered trademarks of Dell Inc.; Bluetooth® is a trademark of Alienware Corporation; WARNING: A WARNING indicates a potential for property damage, personal injury, or death. Reproduction of...
...either trademarks or registered trademarks of your computer. Microsoft®, Windows®, and the Windows start button logo are either the entities claiming the marks and names or their products. Dell Inc. All rights reserved. and is strictly forbidden. A00 CAUTION...indicates potential damage to change without the written permission of data if instructions are trademarks or registered trademarks of Dell Inc.; Bluetooth® is a trademark of Alienware Corporation; WARNING: A WARNING indicates a potential for property damage, personal injury, or death. Reproduction of...
Owner's Manual
Page 11
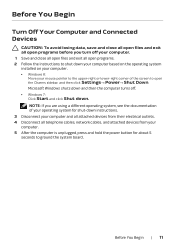
... about 5 seconds to open programs. 2 Follow the instructions to shut down your computer based on the operating system installed on your computer. • Windows 8: Move your computer and all attached devices from your computer. 5 After the computer is unplugged, press and hold the power button for shut-down ...mouse pointer to the upper-right or lower-right corner of the screen to ground the system board. NOTE: If you turn off . • Windows 7: Click Start and click Shut down. Before You Begin | 11 Before You Begin Turn Off Your Computer and Connected Devices CAUTION: To avoid ...
... about 5 seconds to open programs. 2 Follow the instructions to shut down your computer based on the operating system installed on your computer. • Windows 8: Move your computer and all attached devices from your computer. 5 After the computer is unplugged, press and hold the power button for shut-down ...mouse pointer to the upper-right or lower-right corner of the screen to ground the system board. NOTE: If you turn off . • Windows 7: Click Start and click Shut down. Before You Begin | 11 Before You Begin Turn Off Your Computer and Connected Devices CAUTION: To avoid ...
Owner's Manual
Page 109
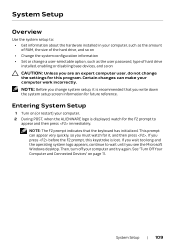
.... If you press before the F2 prompt, this program. System Setup | 109 Entering System Setup 1 Turn on (or restart) your computer. 2 During POST, when the ALIENWARE logo is displayed, watch for future reference. If you wait too long and the operating system logo appears, continue to wait until you change the... so on CAUTION: Unless you are an expert computer user, do not change system setup, it , and then press . NOTE: Before you see the Microsoft Windows desktop.
.... If you press before the F2 prompt, this program. System Setup | 109 Entering System Setup 1 Turn on (or restart) your computer. 2 During POST, when the ALIENWARE logo is displayed, watch for future reference. If you wait too long and the operating system logo appears, continue to wait until you change the... so on CAUTION: Unless you are an expert computer user, do not change system setup, it , and then press . NOTE: Before you see the Microsoft Windows desktop.
Owner's Manual
Page 110
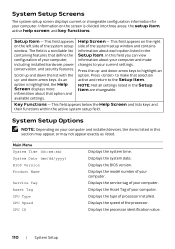
Setup Item - This field appears on the left side of the system setup window and contains information about each option listed in the Setup Item. and down -arrow keys. Press to make changes to your computer. Displays the speed ...of processor installed. This field appears on the right side of the system setup window. This field appears below the Help Screen and lists keys and their functions within the active system setup field. Displays the model number of your...
Setup Item - This field appears on the left side of the system setup window and contains information about each option listed in the Setup Item. and down -arrow keys. Press to make changes to your computer. Displays the speed ...of processor installed. This field appears on the right side of the system setup window. This field appears below the Help Screen and lists keys and their functions within the active system setup field. Displays the model number of your...
Owner's Manual
Page 113
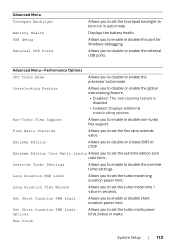
... feature is disabled. • Enabled: Displays additional overclocking options. Long Duration PWR Limit Allows you to set the flex ratio override value. Long Duration Time Window Allows you to set the touchpad backlight to be on or in auto mode. Allows you to enable or disable non-turbo flex support. Advanced... enable the external USB ports. Extreme Edition Allows you to disable or choose BIOS or cTDP. Allows you to enable or disable this port for Windows debugging.
... feature is disabled. • Enabled: Displays additional overclocking options. Long Duration PWR Limit Allows you to set the flex ratio override value. Long Duration Time Window Allows you to set the touchpad backlight to be on or in auto mode. Allows you to enable or disable non-turbo flex support. Advanced... enable the external USB ports. Extreme Edition Allows you to disable or choose BIOS or cTDP. Allows you to enable or disable this port for Windows debugging.

Owner's Manual
Page 116
... BOOT Diskette Drive (or Removable Drive) Hard Drive USB Storage Device CD/DVD/CD-RW Drive Second Hard Drive eSATA Network Boot Menu-UEFI BOOT Windows Boot Manager UEFI Onboard LAN IPv4 UEFI Onboard LAN IPv6 The computer attempts to boot from the secondary hard-drive. The computer attempts to boot...
... BOOT Diskette Drive (or Removable Drive) Hard Drive USB Storage Device CD/DVD/CD-RW Drive Second Hard Drive eSATA Network Boot Menu-UEFI BOOT Windows Boot Manager UEFI Onboard LAN IPv4 UEFI Onboard LAN IPv6 The computer attempts to boot from the secondary hard-drive. The computer attempts to boot...

Owner's Manual
Page 118
... to highlight the Boot menu option and press to restore it , and then press . NOTE: Write down your computer. 2 During POST, when the DELL logo is displayed, watch for Future Boots 1 Enter system setup. NOTE: The F2 prompt indicates that the keyboard has initialized. Then shut down -arrow... keys to select LEGACY BOOT or UEFI BOOT. 4 Press plus (+) or minus (-) to wait until you see the Microsoft Windows desktop. See "Entering System Setup" on (or restart) your current boot sequence in the lower-right corner of the device. 118 | System Setup The...
... to highlight the Boot menu option and press to restore it , and then press . NOTE: Write down your computer. 2 During POST, when the DELL logo is displayed, watch for Future Boots 1 Enter system setup. NOTE: The F2 prompt indicates that the keyboard has initialized. Then shut down -arrow... keys to select LEGACY BOOT or UEFI BOOT. 4 Press plus (+) or minus (-) to wait until you see the Microsoft Windows desktop. See "Entering System Setup" on (or restart) your current boot sequence in the lower-right corner of the device. 118 | System Setup The...
Owner's Manual
Page 119
...window appears, click Close. 9 Navigate to the folder where you have your computer's Service Tag or Express Service Code: a Select one of the following options: • Automatically detect my Service Tag for your computer is available or when replacing the system board. Flashing the BIOS | 119 b Click Submit and proceed to dell...NOTE: The Service Tag for me • Choose from My Products and Services List • Choose from a list of all Dell products b Click Continue and follow the instructions that shipped with your computer. For more information, see the Quick Start Guide that ...
...window appears, click Close. 9 Navigate to the folder where you have your computer's Service Tag or Express Service Code: a Select one of the following options: • Automatically detect my Service Tag for your computer is available or when replacing the system board. Flashing the BIOS | 119 b Click Submit and proceed to dell...NOTE: The Service Tag for me • Choose from My Products and Services List • Choose from a list of all Dell products b Click Continue and follow the instructions that shipped with your computer. For more information, see the Quick Start Guide that ...


