Dell Alienware Aurora R8 Support and Manuals
Get Help and Manuals for this Dell item
View All Support Options Below
Free Dell Alienware Aurora R8 manuals!
Problems with Dell Alienware Aurora R8?
Ask a Question
Free Dell Alienware Aurora R8 manuals!
Problems with Dell Alienware Aurora R8?
Ask a Question
Dell Alienware Aurora R8 Videos

Alienware Aurora R8 Gaming Rig First Impression And Ray-Tracing Benchmark
Duration: 6:34
Total Views: 8,780
Duration: 6:34
Total Views: 8,780
Alienware Aurora R8 Unboxing
Duration: 8:29
Total Views: 35
Duration: 8:29
Total Views: 35
Get an Alienware Aurora R8 gaming PC with a 256GB SSD for $680
Duration: 1:41
Total Views: 1,116
Duration: 1:41
Total Views: 1,116
Upgrading Ram Alienware Aurora R8!
Duration: 5:08
Total Views: 5,401
Duration: 5:08
Total Views: 5,401
Popular Dell Alienware Aurora R8 Manual Pages
Service Manual - Page 57

... the BIOS setup program's settings to step 4 in Before working inside your computer. Removing the coin-cell battery
WARNING: Before working inside your computer, read the safety information that you note the BIOS setup program's settings before removing the coin-cell battery. After working inside your computer, follow the steps in "Removing the power-supply unit".
Service Manual - Page 59

... Repeat step 2 to step 3 to remove any other memory modules installed in After working inside your computer.
Do not touch the components on...follow the steps in "Removing the power-supply unit". Removing the memory modules
WARNING: Before working inside your computer, read the safety information that shipped with your computer and follow the instructions in your computer. CAUTION: To ...
Service Manual - Page 62
...the screw (M2x2.5) that shipped with your computer and follow the instructions in After working inside your computer. For more information, see the Regulatory Compliance home page at www.dell.com/regulatory_compliance.
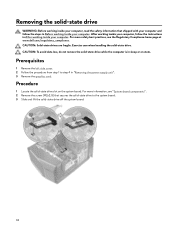
Procedure
1 Locate the solid-state drive slot on ... that secures the solid-state drive to step 4 in "Removing the power-supply unit". 3 Remove the graphics card.
Service Manual - Page 63

... computer, follow the steps in Before working inside your computer. Post-requisites
1 Replace the graphics card. 2 Follow the procedure from step 10 to the
system board. Exercise care ...end of the solid-state drive down and replace the screw (M2x2.5) that shipped with your computer and follow the instructions in "Replacing the power-supply unit". 3 Replace the left-side cover.
63 Procedure
1 ...
Service Manual - Page 64

Removing the graphics card
WARNING: Before working inside your computer, read the safety information that shipped with your computer and follow the instructions in "Removing the power-supply unit".
For more safety best practices, see the Regulatory Compliance home page at www.dell.com/regulatory_compliance. Procedure
1 Lift to step 4 in After working inside your computer, follow the...
Service Manual - Page 69

... power-supply unit". 2 Replace the left-side cover.
69
After working inside your computer, follow the steps in After working inside your computer. For more safety best practices, see the Regulatory Compliance home page at www.dell.com/regulatory_compliance. Post-requisites
1 Follow the procedure from step 10 to the system board. Procedure
1 Align and...
Service Manual - Page 70
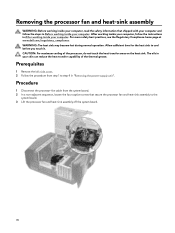
... four captive screws that shipped with your computer and follow the instructions in "Removing the power-supply unit". Procedure
1 Disconnect the processor-fan cable from step 1 to step 4 in After working inside ... sink to cool before you touch it.
CAUTION: For maximum cooling of the thermal grease. The oils in Before working inside your computer.
Removing the processor fan and heat-...
Service Manual - Page 71

... screws that shipped with the screw holes on the processor fan heat-sink assembly with your computer and follow the instructions in After working inside your computer. After working inside your... the procedure from step 10 to step 11 in "Replacing the power-supply unit". 2 Replace the left-side cover.
71 Replacing the processor fan and heat-sink assembly
WARNING: Before working inside your ...
Service Manual - Page 72

...Removing the power-supply unit". 3 Remove the processor fan and heat-sink assembly or processor-cooling assembly (...dell.com/regulatory_compliance. After working inside your computer, follow the steps in Before working inside your computer. Removing the processor
WARNING: Before working inside your computer, read the safety information that shipped with your computer and follow the instructions...
Service Manual - Page 73

...Replace the processor fan and heat-sink assembly or processor-cooling assembly (as applicable). 2 Follow the procedure from step 10 to ensure that thermal conductivity is fully open. CAUTION: If either the processor or the heat sink is replaced, use the thermal grease provided in the kit to step 11 in "Replacing the power-supply unit". 3 Replace...dell.com/regulatory_compliance.
Replacing ...
Service Manual - Page 104

... format. Table 3. Displays the service tag of hard drive installed, and enabling or disabling
base devices. Displays the processor L3 cache size.
104
If you wait too long and the operating system logo appears, continue to appear, and then press F2 immediately. Displays the current time in this keystroke is initialized. Default: Alienware Aurora R8.
Setup and Specifications - Page 1

Alienware Aurora R8 Setup and Specifications
Regulatory Model: D23M Regulatory Type: D23M002
Setup and Specifications - Page 3
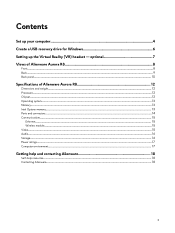
optional 7 Views of Alienware Aurora R8 8
Front...8 Back...9 Back panel...10
Specifications of Alienware Aurora R8 12
Dimensions and weight...12 Processors...12 Chipset...12 Operating system...13 Memory...13 Intel Optane memory...13 Ports and connectors...14 Communications...15
Ethernet...15 Wireless module...15 Video...15 Audio...16 Storage...16 Power ratings...17 Computer environment...17
...
Setup and Specifications - Page 8
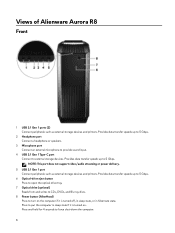
Views of Alienware Aurora R8
Front
1 USB 3.1 Gen 1 ports (2) Connect peripherals such as external storage devices and ... Reads from and writes to CDs, DVDs, and Blu‑ray discs.
8 Power button (AlienHead) Press to external storage devices. NOTE: This port does not support video/audio streaming or power delivery.
5 USB 3.1 Gen 1 port Connect peripherals such as external storage devices...
Setup and Specifications - Page 12

...
Not supported 16 MB PCIe Gen3 PCIe Gen3x4
12 Dimensions and weight Description Height:
Front Rear Width Depth Weight (maximum)
Values
422.8 mm (16.65 in.) 472.5 mm (18.60 in.) 212 mm (8.34 in.) 360.50 mm (14.19 in.) 14.82 kg (32.67 lb)
NOTE: The weight of Alienware Aurora R8...
Dell Alienware Aurora R8 Reviews
We have not received any reviews for Dell yet.