Owner's Manual
Page 12
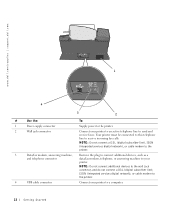
... a and telephone connector data/fax modem, telephone, or answering machine to your printer to an active telephone line to send and receive faxes. www.dell.com/supplies | support.dell.com 1 4 3 2 # Use the: To: 1 Power supply connector Supply power to the printer. 2 Wall jack connector Connect your printer. NOTE: Do not connect additional devices to the wall jack connector, and do...
... a and telephone connector data/fax modem, telephone, or answering machine to your printer to an active telephone line to send and receive faxes. www.dell.com/supplies | support.dell.com 1 4 3 2 # Use the: To: 1 Power supply connector Supply power to the printer. 2 Wall jack connector Connect your printer. NOTE: Do not connect additional devices to the wall jack connector, and do...

Owner's Manual
Page 70
..." on page 74. The Dell AIO Printer A960 supports Windows XP and Windows 2000. If your printer is attached to a computer, make sure: • You read and follow any scrolling text messages on the display. • The power supply is securely attached to your ...computer and to your printer. • Both your computer and your problem before contacting Dell by pushing the scanner lock down. "Date and Time on the Display Are Incorrect" on page 74. "Default Country Was Not Set" on page 74. • You only have one Dell AIO Printer A960...
..." on page 74. The Dell AIO Printer A960 supports Windows XP and Windows 2000. If your printer is attached to a computer, make sure: • You read and follow any scrolling text messages on the display. • The power supply is securely attached to your ...computer and to your printer. • Both your computer and your problem before contacting Dell by pushing the scanner lock down. "Date and Time on the Display Are Incorrect" on page 74. "Default Country Was Not Set" on page 74. • You only have one Dell AIO Printer A960...

Owner's Manual
Page 71
... test page: a Click Start → All Programs (or Programs) → Dell Printers → Dell AIO Printer A960 → Dell Printer Solution Center. b Double-click the Dell AIO Printer A960 icon, and then click Printer. b Click the Maintenance tab. For help locating the scanner lock, see the... correctly. To check printer status: a Click Start → Control Panel → Printers and Other Hardware → Printers and Faxes (Windows XP). c Click Printer, and make sure: • Your printer is on . • Restart your setup documentation). Reconnect the power supply (see the Setup ...
... test page: a Click Start → All Programs (or Programs) → Dell Printers → Dell AIO Printer A960 → Dell Printer Solution Center. b Double-click the Dell AIO Printer A960 icon, and then click Printer. b Click the Maintenance tab. For help locating the scanner lock, see the... correctly. To check printer status: a Click Start → Control Panel → Printers and Other Hardware → Printers and Faxes (Windows XP). c Click Printer, and make sure: • Your printer is on . • Restart your setup documentation). Reconnect the power supply (see the Setup ...

Owner's Manual
Page 76
www.dell.com/supplies | support.dell.com Paper Jams If a paper jam occurs in the paper support, remove the paper from the printer. b Lower the scanner unit to close it. 3 Press Power to turn the printer off. 2 Pull slowly and firmly on the paper to turn the printer on, and then print your document. 76 Troubleshooting If the paper is too far into the printer and cannot be removed: 1 Press Power to remove it is lodged too far into the printer: a Lift the scanner unit, and then pull the paper out. If you cannot reach the paper because it .
www.dell.com/supplies | support.dell.com Paper Jams If a paper jam occurs in the paper support, remove the paper from the printer. b Lower the scanner unit to close it. 3 Press Power to turn the printer off. 2 Pull slowly and firmly on the paper to turn the printer on, and then print your document. 76 Troubleshooting If the paper is too far into the printer and cannot be removed: 1 Press Power to remove it is lodged too far into the printer: a Lift the scanner unit, and then pull the paper out. If you cannot reach the paper because it .

Owner's Manual
Page 80
... Preferences or Properties. c From the Quality/Speed area, select Better or Best. Check your software program, click File → Print. Use Dell™ Premium Photo Paper for printing photos. • Select a higher print quality: a From your computer screen for the document. •... Improving Print Quality If you : • Use the appropriate paper for error messages. 1 Turn the printer off. 2 Wait a few seconds, and then turn the printer on page 67. 80 Troubleshooting www.dell.com/supplies | support.dell.com Power Light Blinks Twice The ink cartridge carrier might be stalled.
... Preferences or Properties. c From the Quality/Speed area, select Better or Best. Check your software program, click File → Print. Use Dell™ Premium Photo Paper for printing photos. • Select a higher print quality: a From your computer screen for the document. •... Improving Print Quality If you : • Use the appropriate paper for error messages. 1 Turn the printer off. 2 Wait a few seconds, and then turn the printer on page 67. 80 Troubleshooting www.dell.com/supplies | support.dell.com Power Light Blinks Twice The ink cartridge carrier might be stalled.


