User Guide
Page 5
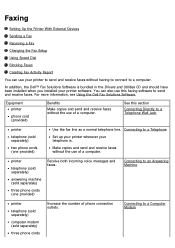
... a Fax Receiving a Fax Changing the Fax Setup Using Speed Dial Blocking Faxes Creating Fax Activity Report You can also use this section Connecting Directly to a Telephone Wall Jack printer telephone (sold separately) two phone cords (one provided) Receive both incoming voice messages and faxes. In addition, the Dell™ Fax Solutions Software is . Make...
... a Fax Receiving a Fax Changing the Fax Setup Using Speed Dial Blocking Faxes Creating Fax Activity Report You can also use this section Connecting Directly to a Telephone Wall Jack printer telephone (sold separately) two phone cords (one provided) Receive both incoming voice messages and faxes. In addition, the Dell™ Fax Solutions Software is . Make...
User Guide
Page 10
... Arrow button to scroll to Modify. e. You can enter a maximum of eight digits for a one-digit extension. Make sure your computer and printer, and make sure they are changing the dial prefix, scroll to Dialing and Sending, and then press...the main menu, press the up or down Arrow button to scroll to . Press the down Arrow button to scroll to Fax Setup, and then press the Select button . Press the Select button . Using Your Computer 1. In Windows Vista: a. b. c. For... Group Search, and then press the Select button . Set a dial prefix: a. Click Dell Printers. g. b.
... Arrow button to scroll to Modify. e. You can enter a maximum of eight digits for a one-digit extension. Make sure your computer and printer, and make sure they are changing the dial prefix, scroll to Dialing and Sending, and then press...the main menu, press the up or down Arrow button to scroll to . Press the down Arrow button to scroll to Fax Setup, and then press the Select button . Press the Select button . Using Your Computer 1. In Windows Vista: a. b. c. For... Group Search, and then press the Select button . Set a dial prefix: a. Click Dell Printers. g. b.
User Guide
Page 13
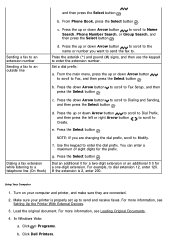
... to Ringing and Answering, and then press d. Using the keypad, navigate through the automated answering system. 8. Set the number of rings the printer should allow Press the up On. Using the keypad, dial the telephone number of rings you selected Scheduled, the Auto Answer Schedule screen appears.... a. If you want Auto Answer to Fax Setup, and then press the Select button . Press the Back button . 3. Modify your fax. Press the up or down Arrow button to scroll...
... to Ringing and Answering, and then press d. Using the keypad, navigate through the automated answering system. 8. Set the number of rings the printer should allow Press the up On. Using the keypad, dial the telephone number of rings you selected Scheduled, the Auto Answer Schedule screen appears.... a. If you want Auto Answer to Fax Setup, and then press the Select button . Press the Back button . 3. Modify your fax. Press the up or down Arrow button to scroll...
User Guide
Page 14
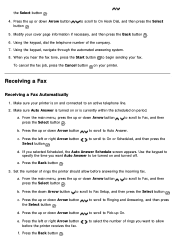
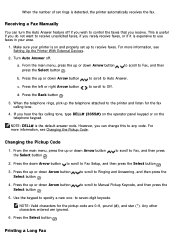
...the printer and... other characters entered are 0-9, pound (#), and star (*). NOTE: DELL# is detected, the printer automatically receives the fax. to scroll to Manual Pickup Keycode, and...Arrow button press the Select button . This is expensive to Fax Setup, and then press the Select button . 3. Turn Auto Answer... to control the faxes that you hear the fax calling tone, type DELL# (3355#) on the operator panel keypad or on and properly set rings...to use faxes in your printer is on the telephone keypad. For more information, see Setting Up the Printer With External Devices. 2. ...
...the printer and... other characters entered are 0-9, pound (#), and star (*). NOTE: DELL# is detected, the printer automatically receives the fax. to scroll to Manual Pickup Keycode, and...Arrow button press the Select button . This is expensive to Fax Setup, and then press the Select button . 3. Turn Auto Answer... to control the faxes that you hear the fax calling tone, type DELL# (3355#) on the operator panel keypad or on and properly set rings...to use faxes in your printer is on the telephone keypad. For more information, see Setting Up the Printer With External Devices. 2. ...
User Guide
Page 15
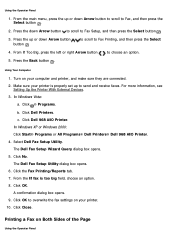
Press the up to send and receive faxes. For more information, see Setting Up the Printer With External Devices. 3. The Dell Fax Setup Wizard Query dialog box opens. 5. Using the Operator Panel 1. From the main menu, press the up or down Arrow button to scroll ... an option. 8. to scroll to Fax, and then press the Select button . 2. In Windows Vista: a. Click ® Programs. b. Select Dell Fax Setup Utility. Click No. Make sure your printer. 10. Click the Fax Printing/Reports tab. 7. In Windows XP or Windows 2000: Click Start® Programs or All Programs®...
Press the up to send and receive faxes. For more information, see Setting Up the Printer With External Devices. 3. The Dell Fax Setup Wizard Query dialog box opens. 5. Using the Operator Panel 1. From the main menu, press the up or down Arrow button to scroll ... an option. 8. to scroll to Fax, and then press the Select button . 2. In Windows Vista: a. Click ® Programs. b. Select Dell Fax Setup Utility. Click No. Make sure your printer. 10. Click the Fax Printing/Reports tab. 7. In Windows XP or Windows 2000: Click Start® Programs or All Programs®...

User Guide
Page 16
...® Programs or All Programs® Dell Printers® Dell 968 AIO Printer. 4. Click the Fax Printing/Reports tab. 7. From the 2-sided print field, choose Print duplex. 8. Click OK to 2 Sided Using the Computer 1. Select Dell Fax Setup Utility. Click Close. to scroll to ...overwrite the fax settings on your computer and printer, and make sure they are connected. 2. In Windows Vista: a. Click No. Click OK...
...® Programs or All Programs® Dell Printers® Dell 968 AIO Printer. 4. Click the Fax Printing/Reports tab. 7. From the 2-sided print field, choose Print duplex. 8. Click OK to 2 Sided Using the Computer 1. Select Dell Fax Setup Utility. Click Close. to scroll to ...overwrite the fax settings on your computer and printer, and make sure they are connected. 2. In Windows Vista: a. Click No. Click OK...
User Guide
Page 17
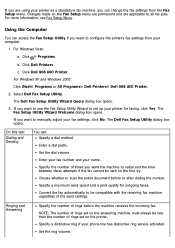
... of rings set on the printer. NOTE: The number of times you want to configure the printer's fax settings from the Fax Setup menu. For Windows XP and Windows 2000: Click Start® Programs or All Programs® Dell Printers® Dell 968 AIO Printer. 2. If you want to... manually adjust your fax settings, click No. The Dell Fax Setup Utility dialog box ...
... of rings set on the printer. NOTE: The number of times you want to configure the printer's fax settings from the Fax Setup menu. For Windows XP and Windows 2000: Click Start® Programs or All Programs® Dell Printers® Dell 968 AIO Printer. 2. If you want to... manually adjust your fax settings, click No. The Dell Fax Setup Utility dialog box ...
User Guide
Page 18
...to automatically resize oversize faxes so they print on one page, or keep the oversized fax to print a footer (date, time, and page number) on two pages. Choose whether you want to scale and print on each using the printer operator panel. Specify when you want to answer ...fax, or print it and then forward it subscribes to know which faxes are answered automatically. If an optional second paper tray is DELL# (3355#). Select whether you selected during initial setup. Speed Dial Cover Page Add to use two detection patterns, call your computer, see Changing the Fax...
...to automatically resize oversize faxes so they print on one page, or keep the oversized fax to print a footer (date, time, and page number) on two pages. Choose whether you want to scale and print on each using the printer operator panel. Specify when you want to answer ...fax, or print it and then forward it subscribes to know which faxes are answered automatically. If an optional second paper tray is DELL# (3355#). Select whether you selected during initial setup. Speed Dial Cover Page Add to use two detection patterns, call your computer, see Changing the Fax...
User Guide
Page 20
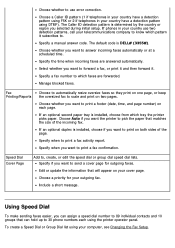
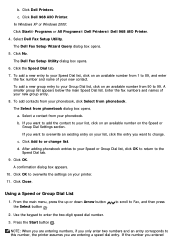
... Windows XP or Windows 2000: Click Start® Programs or All Programs® Dell Printers® Dell 968 AIO Printer. 4. The Dell Fax Setup Wizard Query dialog box opens. 5. Enter the fax numbers and names of your printer. 11. The Select from phonebook. c. d. Click OK to Fax, and then press 2....click on an available number from 1 to this number, the printer assumes you are entering numbers, if you are entering a speed dial entry. A smaller group list appears below the main Speed Dial list. The Dell Fax Setup Utility dialog box opens. 6. Click the Speed Dial tab. ...
... Windows XP or Windows 2000: Click Start® Programs or All Programs® Dell Printers® Dell 968 AIO Printer. 4. The Dell Fax Setup Wizard Query dialog box opens. 5. Enter the fax numbers and names of your printer. 11. The Select from phonebook. c. d. Click OK to Fax, and then press 2....click on an available number from 1 to this number, the printer assumes you are entering numbers, if you are entering a speed dial entry. A smaller group list appears below the main Speed Dial list. The Dell Fax Setup Utility dialog box opens. 6. Click the Speed Dial tab. ...

User Guide
Page 21
... to send and receive faxes. Press the down Arrow button the Select button . Turn on your printer is automatically assigned to this contact. In Windows Vista: a. c. The Dell Fax Setup Wizard Query dialog box opens. 5. Click No. NOTE: The lowest possible blocked fax number is ... Panel 1. Press the down Arrow button to scroll to Fax Setup, and then press the Select button . 3. Click Dell 968 AIO Printer. Select Dell Fax Setup Utility. to scroll to specify a name. 6. For more information, see Setting Up the Printer With External Devices. 3. Use the keypad to Fax, and ...
... to send and receive faxes. Press the down Arrow button the Select button . Turn on your printer is automatically assigned to this contact. In Windows Vista: a. c. The Dell Fax Setup Wizard Query dialog box opens. 5. Click No. NOTE: The lowest possible blocked fax number is ... Panel 1. Press the down Arrow button to scroll to Fax Setup, and then press the Select button . 3. Click Dell 968 AIO Printer. Select Dell Fax Setup Utility. to scroll to specify a name. 6. For more information, see Setting Up the Printer With External Devices. 3. Use the keypad to Fax, and ...

User Guide
Page 22
... the fax settings on your printer is disconnected. For more information, see Setting Up the Printer With External Devices. 3. Select Dell Fax Setup Utility. to scroll to the Ringing and Answering tab. 10. Turn on your printer. 12. c. The Dell Fax Setup Wizard Query dialog box opens.... In Windows XP or Windows 2000: Click Start® Programs or All Programs® Dell Printers® Dell 968 AIO Printer. 4. 7. Turning on the list. 9. If the printer detects a fax from one of the numbers on the Blocked Fax List, the transmission is properly set up or down...
... the fax settings on your printer is disconnected. For more information, see Setting Up the Printer With External Devices. 3. Select Dell Fax Setup Utility. to scroll to the Ringing and Answering tab. 10. Turn on your printer. 12. c. The Dell Fax Setup Wizard Query dialog box opens.... In Windows XP or Windows 2000: Click Start® Programs or All Programs® Dell Printers® Dell 968 AIO Printer. 4. 7. Turning on the list. 9. If the printer detects a fax from one of the numbers on the Blocked Fax List, the transmission is properly set up or down...

User Guide
Page 23
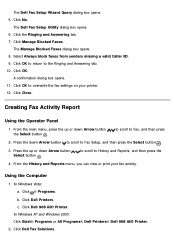
... Devices. 3. Click Dell Printers. Click Dell 968 AIO Printer. The Manage Blocked Faxes dialog box opens. 8. A confirmation dialog box opens. 11. From the main menu, press the up to Fax Setup, and press the Select button. 3. Press the down Arrow button to scroll to send and receive faxes. In Windows Vista: a. Select Dell Fax Setup Utility. From...
... Devices. 3. Click Dell Printers. Click Dell 968 AIO Printer. The Manage Blocked Faxes dialog box opens. 8. A confirmation dialog box opens. 11. From the main menu, press the up to Fax Setup, and press the Select button. 3. Press the down Arrow button to scroll to send and receive faxes. In Windows Vista: a. Select Dell Fax Setup Utility. From...
User Guide
Page 24
... No. Press the down Arrow button Select button . c. In Windows XP and Windows 2000: Click Start® Programs or All Programs® Dell Printers® Dell 968 AIO Printer. 2. The Dell Fax Setup Utility dialog box opens. 6. Click OK to return to History and Reports, and then press the 4. Click the Ringing and Answering tab. 7. Select...
... No. Press the down Arrow button Select button . c. In Windows XP and Windows 2000: Click Start® Programs or All Programs® Dell Printers® Dell 968 AIO Printer. 2. The Dell Fax Setup Utility dialog box opens. 6. Click OK to return to History and Reports, and then press the 4. Click the Ringing and Answering tab. 7. Select...

User Guide
Page 33
...Tools Resize your phonebook. Fax an image or document. Access the Dell Fax Setup Utility. E-mail an image or document. Repeat an image several times on the computer screen. Using the Dell Fax Solutions Software The Dell Fax Solutions Software allows you to PDF. View and manage your copies... of paper. Click Adjust speed dial list and other fax settings. Resize an image. Edit text found in the Dell All-In-One Center. For more than one page. Adjust other fax settings to customize various fax settings. Click View phonebook to view all settings. Save multiple ...
...Tools Resize your phonebook. Fax an image or document. Access the Dell Fax Setup Utility. E-mail an image or document. Repeat an image several times on the computer screen. Using the Dell Fax Solutions Software The Dell Fax Solutions Software allows you to PDF. View and manage your copies... of paper. Click Adjust speed dial list and other fax settings. Resize an image. Edit text found in the Dell All-In-One Center. For more than one page. Adjust other fax settings to customize various fax settings. Click View phonebook to view all settings. Save multiple ...
User Guide
Page 35
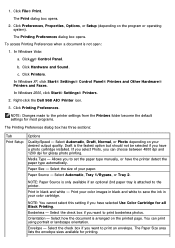
...In Windows 2000, click Start® Settings® Printers. 2. Right-click the Dell 968 AIO Printer icon. 3. If you select Photo, you have selected Use Color Cartridge for most programs. The Printing Preferences dialog box has three sections: Tab Print Setup Options Quality/Speed - Select the size of your desired...fastest option but should not be selected if you want to save the ink in black and white - Click Printers. Click Preferences, Properties, Options, or Setup (depending on the printed page. In Windows XP, click Start® Settings® Control Panel®...
...In Windows 2000, click Start® Settings® Printers. 2. Right-click the Dell 968 AIO Printer icon. 3. If you select Photo, you have selected Use Color Cartridge for most programs. The Printing Preferences dialog box has three sections: Tab Print Setup Options Quality/Speed - Select the size of your desired...fastest option but should not be selected if you want to save the ink in black and white - Click Printers. Click Preferences, Properties, Options, or Setup (depending on the printed page. In Windows XP, click Start® Settings® Control Panel®...

User Guide
Page 38
... Uninstall Dell 968 AIO Printer. 3. In Windows 2000, double-click My Computer from More Options, located on your screen to install the printer on the Advanced tab of the advanced XPS color and graphics features that are only available for Windows Vista users. When the printer software installation screen appears, click Using a USB cable, Using a wireless...
... Uninstall Dell 968 AIO Printer. 3. In Windows 2000, double-click My Computer from More Options, located on your screen to install the printer on the Advanced tab of the advanced XPS color and graphics features that are only available for Windows Vista users. When the printer software installation screen appears, click Using a USB cable, Using a wireless...
User Guide
Page 39
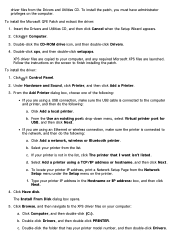
...down menu, select Virtual printer port for USB, and then click Next. Click Add a network, wireless or Bluetooth printer. If your printer model number, and then double-click Drivers. Type your printer IP address in the list, click The printer that has your printer is connected to finish installing.... Click Have disk. c. b. e. f. Insert the Drivers and Utilities CD, and then click Cancel when the Setup Wizard appears. 2. From the Add Printer dialog box, choose one of the following: If you are launched. The Install From Disk dialog box opens. 5. driver files from the ...
...down menu, select Virtual printer port for USB, and then click Next. Click Add a network, wireless or Bluetooth printer. If your printer model number, and then double-click Drivers. Type your printer IP address in the list, click The printer that has your printer is connected to finish installing.... Click Have disk. c. b. e. f. Insert the Drivers and Utilities CD, and then click Cancel when the Setup Wizard appears. 2. From the Add Printer dialog box, choose one of the following: If you are launched. The Install From Disk dialog box opens. 5. driver files from the ...

User Guide
Page 41
...Files Mode Fax Mode Scan Mode Setup Mode Maintenance Mode PictBridge Mode Bluetooth Mode Copy Mode Main Menu Copy Mode Main Menu Color Copies Reduce/Enlarge Quality Lighter/Darker Paper Handling Collate 2-Sided Copies N-up or down Arrow button to scroll to the printer. Press the Select button .... To view or change the Copy Mode menu: 1. Color* Black & White Copies Specify the number of your copies. From the main menu, press the up...
...Files Mode Fax Mode Scan Mode Setup Mode Maintenance Mode PictBridge Mode Bluetooth Mode Copy Mode Main Menu Copy Mode Main Menu Color Copies Reduce/Enlarge Quality Lighter/Darker Paper Handling Collate 2-Sided Copies N-up or down Arrow button to scroll to the printer. Press the Select button .... To view or change the Copy Mode menu: 1. Color* Black & White Copies Specify the number of your copies. From the main menu, press the up...

User Guide
Page 50
...also specify the paper source. Press the Select button . Contact your Internet Service Provider for faxing to function properly: The printer's FAX connector ( -left connector) must be connected to Fax. 2. In order for more information, see Paper Handling... Search Add Group Redial History On Hook Dial Delay Sending Fax Auto Answer Edit Fax Settings Fax Setup Speed Dial Phone Book History and Reports Ringing and Answering Fax Printing Dialing and Sending Fax Blocking ... in the input tray. For more details. See Setting Up the Printer With External Devices for setup details.
...also specify the paper source. Press the Select button . Contact your Internet Service Provider for faxing to function properly: The printer's FAX connector ( -left connector) must be connected to Fax. 2. In order for more information, see Paper Handling... Search Add Group Redial History On Hook Dial Delay Sending Fax Auto Answer Edit Fax Settings Fax Setup Speed Dial Phone Book History and Reports Ringing and Answering Fax Printing Dialing and Sending Fax Blocking ... in the input tray. For more details. See Setting Up the Printer With External Devices for setup details.
User Guide
Page 51
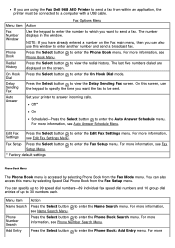
...you have already entered a number on the screen. The last five numbers dialed are using the Fax Dell 968 AIO Printer to send a fax from the Fax Mode menu. For more For more information, see Edit Fax Settings...the Phone Book: Add Entry menu. Edit Fax Settings Press the Select button to enter the Fax Setup menu. If you are displayed on the Fax main menu, then you can also use the keypad ...to specify the time you want the fax to be connected to send a fax. Fax Setup Press the Select button to enter the Edit Fax Settings menu. For more information, see Phone Number Search...
...you have already entered a number on the screen. The last five numbers dialed are using the Fax Dell 968 AIO Printer to send a fax from the Fax Mode menu. For more For more information, see Edit Fax Settings...the Phone Book: Add Entry menu. Edit Fax Settings Press the Select button to enter the Fax Setup menu. If you are displayed on the Fax main menu, then you can also use the keypad ...to specify the time you want the fax to be connected to send a fax. Fax Setup Press the Select button to enter the Edit Fax Settings menu. For more information, see Phone Number Search...


