User Guide
Page 1
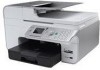
... used in this text: Dell, the DELL logo, and Dell Ink Management System are registered trademarks of EMC Corporation. Finding Information About Your Printer Understanding the Operator Panel Menus Loading Paper and Originals Printing Printing From a Memory Card or USB Key Copying Scanning Faxing Understanding the Software Networking Maintenance Troubleshooting Specifications Appendix Licensing Notice Notes, Notices, and Cautions NOTE: A NOTE indicates important information that helps you have the Dell printer Service Tag available. Double-click the icon on your printer...
... used in this text: Dell, the DELL logo, and Dell Ink Management System are registered trademarks of EMC Corporation. Finding Information About Your Printer Understanding the Operator Panel Menus Loading Paper and Originals Printing Printing From a Memory Card or USB Key Copying Scanning Faxing Understanding the Software Networking Maintenance Troubleshooting Specifications Appendix Licensing Notice Notes, Notices, and Cautions NOTE: A NOTE indicates important information that helps you have the Dell printer Service Tag available. Double-click the icon on your printer...
User Guide
Page 4
...-Troubleshooting hints and tips, articles from technicians, and online courses Upgrades-Upgrade information for components, such as memory Documentation for my printer 2. Type a word or phrase that describes your problem, and then click the arrow icon. 3. Documentation for my printer Customer Care-Contact information, order status, warranty, and repair information Downloads-Drivers Reference-Printer documentation and product specifications How to use Windows Vista Help and Support Center Windows Vista 1. How to use Windows XP Help and Support Center Microsoft...
...-Troubleshooting hints and tips, articles from technicians, and online courses Upgrades-Upgrade information for components, such as memory Documentation for my printer 2. Type a word or phrase that describes your problem, and then click the arrow icon. 3. Documentation for my printer Customer Care-Contact information, order status, warranty, and repair information Downloads-Drivers Reference-Printer documentation and product specifications How to use Windows Vista Help and Support Center Windows Vista 1. How to use Windows XP Help and Support Center Microsoft...
User Guide
Page 17
...; Programs. b. On this tab: Dialing and Sending You can change the fax settings from your printer for outgoing faxes. Enter your fax number and your phone line has distinctive ring service activated. Specify a distinctive ring if your name. Specify a maximum send speed and a print quality for faxing, click Yes. Using the Computer You can access the Fax Setup Utility if you want to configure the printer's fax settings from the Fax Setup menu. If you want to use the Fax Setup Utility...
...; Programs. b. On this tab: Dialing and Sending You can change the fax settings from your printer for outgoing faxes. Enter your fax number and your phone line has distinctive ring service activated. Specify a distinctive ring if your name. Specify a maximum send speed and a print quality for faxing, click Yes. Using the Computer You can access the Fax Setup Utility if you want to configure the printer's fax settings from the Fax Setup menu. If you want to use the Fax Setup Utility...
User Guide
Page 26
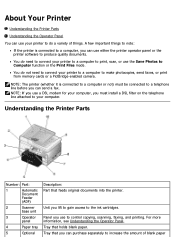
... to make photocopies, send faxes, or print from memory cards or a PictBridge-enabled camera. NOTE: If you use a DSL modem for your computer, you must be connected to increase the amount of things. Understanding the Printer Parts Number: Part: 1 Automatic Document Feeder (ADF) 2 Scanner base unit 3 Operator panel 4 Paper tray 5 Optional Description: Part that holds blank paper. For more information, see Understanding the Operator Panel. Tray that you can purchase separately to a telephone line before you can use to control copying, scanning, faxing, and printing. NOTE...
... to make photocopies, send faxes, or print from memory cards or a PictBridge-enabled camera. NOTE: If you use a DSL modem for your computer, you must be connected to increase the amount of things. Understanding the Printer Parts Number: Part: 1 Automatic Document Feeder (ADF) 2 Scanner base unit 3 Operator panel 4 Paper tray 5 Optional Description: Part that holds blank paper. For more information, see Understanding the Operator Panel. Tray that you can purchase separately to a telephone line before you can use to control copying, scanning, faxing, and printing. NOTE...
User Guide
Page 27
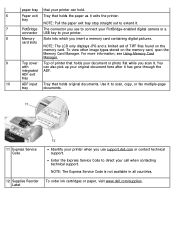
... ink cartridges or paper, visit www.dell.com/supplies. For more information, see Using Memory Card Manager. 9 Top cover Top of TIFF files found on the memory card, open the Memory Card Manager. Use it to direct your call when contacting technical support. To view other image types stored on the memory card. Enter the Express Service Code to scan, copy, or fax multiple-page tray documents. 11 Express Service Code Identify your printer when you use to connect your PictBridge-enabled digital camera or a connector USB key...
... ink cartridges or paper, visit www.dell.com/supplies. For more information, see Using Memory Card Manager. 9 Top cover Top of TIFF files found on the memory card, open the Memory Card Manager. Use it to direct your call when contacting technical support. To view other image types stored on the memory card. Enter the Express Service Code to scan, copy, or fax multiple-page tray documents. 11 Express Service Code Identify your printer when you use to connect your PictBridge-enabled digital camera or a connector USB key...
User Guide
Page 32
... copies. Select Scan Now to a network using the operator panel). Select the quantity and color of the Dell All-In-One Center. Preview images you want to send the scanned image. In Windows Vista™: a. Click Dell 968 AIO Printer. Specify the size of what will be accomplished using a wireless or Ethernet connection, you want to scan, and then fax a copy of your scan. Scan and Fax Copy Select the program where you want to send the scanned image. Specify the blank paper size. Access troubleshooting and maintenance...
... copies. Select Scan Now to a network using the operator panel). Select the quantity and color of the Dell All-In-One Center. Preview images you want to send the scanned image. In Windows Vista™: a. Click Dell 968 AIO Printer. Specify the size of what will be accomplished using a wireless or Ethernet connection, you want to scan, and then fax a copy of your scan. Scan and Fax Copy Select the program where you want to send the scanned image. Specify the blank paper size. Access troubleshooting and maintenance...
User Guide
Page 35
...Start® Settings® Printers. 2. NOTE: Changes made to the printer. Paper Size - Envelope - The Paper Size area lists the envelope sizes available for most programs. The Printing Preferences dialog box has three sections: Tab Print Setup Options Quality/Speed - To access Printing Preferences when a document is attached to the printer settings from the Printers folder become the default settings for printing. c. NOTE: Paper Source is only available if an optional 2nd paper tray is not open: 1. Print your color images in black and white to print an envelope...
...Start® Settings® Printers. 2. NOTE: Changes made to the printer. Paper Size - Envelope - The Paper Size area lists the envelope sizes available for most programs. The Printing Preferences dialog box has three sections: Tab Print Setup Options Quality/Speed - To access Printing Preferences when a document is attached to the printer settings from the Printers folder become the default settings for printing. c. NOTE: Paper Source is only available if an optional 2nd paper tray is not open: 1. Print your color images in black and white to print an envelope...
User Guide
Page 36
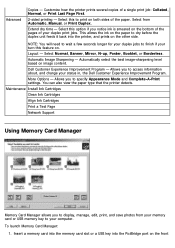
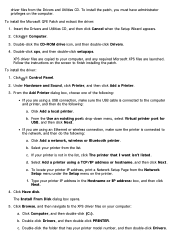
... Install Ink Cartridges Clean Ink Cartridges Align Ink Cartridges Print a Test Page Network Support Using Memory Card Manager Memory Card Manager allows you to access information about, and change your turn this feature on both sides of a single print job: Collated, Normal, or Print Last Page First. 2-sided printing - Advanced Copies - Select this option if you to specify Appearance Mode and Complete-A-Print settings. Allows you to display, manage, edit, print, and save photos from Automatic, Manual, or Print Duplex. Dell Customer Experience Improvement Program...
... Install Ink Cartridges Clean Ink Cartridges Align Ink Cartridges Print a Test Page Network Support Using Memory Card Manager Memory Card Manager allows you to access information about, and change your turn this feature on both sides of a single print job: Collated, Normal, or Print Last Page First. 2-sided printing - Advanced Copies - Select this option if you to specify Appearance Mode and Complete-A-Print settings. Allows you to display, manage, edit, print, and save photos from Automatic, Manual, or Print Duplex. Dell Customer Experience Improvement Program...

User Guide
Page 38
...-A-Print check box is automatically reset when a new or different cartridge is cleared from your printer, you must install the XPS driver as an additional driver after the low ink cartridge has been replaced. Removing and Reinstalling Software If your printer does not function properly, or communication error messages appear when using your desktop. Click Dell Printers. Click Uninstall Dell 968 AIO Printer. 3. If the installation screen does not appear: a. In Windows 2000, double-click My Computer from More Options, located...
...-A-Print check box is automatically reset when a new or different cartridge is cleared from your printer, you must install the XPS driver as an additional driver after the low ink cartridge has been replaced. Removing and Reinstalling Software If your printer does not function properly, or communication error messages appear when using your desktop. Click Dell Printers. Click Uninstall Dell 968 AIO Printer. 3. If the installation screen does not appear: a. In Windows 2000, double-click My Computer from More Options, located...
User Guide
Page 39
... driver files on your printer IP address in the list, click The printer that has your computer, and any required Microsoft XPS files are using an Ethernet or wireless connection, make sure the USB cable is connected to your printer model number, and then double-click Drivers. To install the driver: 1. b. From the Use an existing port: drop-down menu, select Virtual printer port for USB, and then click Next. Select your printer IP address, print a Network Setup Page from the Network Setup menu under the Setup menu...
... driver files on your printer IP address in the list, click The printer that has your computer, and any required Microsoft XPS files are using an Ethernet or wireless connection, make sure the USB cable is connected to your printer model number, and then double-click Drivers. To install the driver: 1. b. From the Use an existing port: drop-down menu, select Virtual printer port for USB, and then click Next. Select your printer IP address, print a Network Setup Page from the Network Setup menu under the Setup menu...
User Guide
Page 44
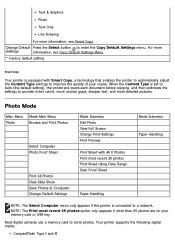
... Settings Mode Submenu Edit Photo View Full Screen Change Print Settings Print Preview Print Sheet with Smart Copy, a technology that enables the printer to automatically adjust the Content Type settings to store photos. For more Settings information, see Copy Default Settings Menu. * Factory default setting Smart Copy Your printer is connected to provide richer colors, more neutral grays, sharper text, and more information, see Smart Copy. Most digital cameras use a memory card to improve the quality of your memory card or USB key. Change Default Press the Select button to enter...
... Settings Mode Submenu Edit Photo View Full Screen Change Print Settings Print Preview Print Sheet with Smart Copy, a technology that enables the printer to automatically adjust the Content Type settings to store photos. For more Settings information, see Copy Default Settings Menu. * Factory default setting Smart Copy Your printer is connected to provide richer colors, more neutral grays, sharper text, and more information, see Smart Copy. Most digital cameras use a memory card to improve the quality of your memory card or USB key. Change Default Press the Select button to enter...
User Guide
Page 65
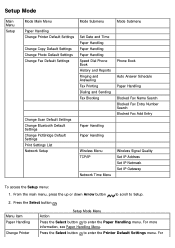
...Setup Mode Main Menu Setup Mode Main Menu Mode Submenu Mode Submenu Paper Handling Change Printer Default Settings Change Copy Default Settings Change Photo Default Settings Change Fax Default Settings Change Scan Default Settings Change Bluetooth Default Settings Change PictBridge Default Settings Print Settings List Network Setup Set Date and Time Paper Handling Paper Handling Paper Handling Speed Dial Phone Book History and Reports Ringing and Answering Fax Printing Dialing and Sending Fax Blocking Paper Handling Paper Handling Wireless Menu TCP/IP Network Time Menu Phone Book Auto...
...Setup Mode Main Menu Setup Mode Main Menu Mode Submenu Mode Submenu Paper Handling Change Printer Default Settings Change Copy Default Settings Change Photo Default Settings Change Fax Default Settings Change Scan Default Settings Change Bluetooth Default Settings Change PictBridge Default Settings Print Settings List Network Setup Set Date and Time Paper Handling Paper Handling Paper Handling Speed Dial Phone Book History and Reports Ringing and Answering Fax Printing Dialing and Sending Fax Blocking Paper Handling Paper Handling Wireless Menu TCP/IP Network Time Menu Phone Book Auto...
User Guide
Page 75
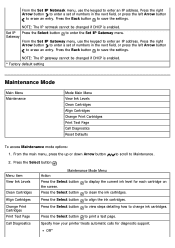
... enabled. * Factory default setting Maintenance Mode Main Menu Maintenance Mode Main Menu View Ink Levels Clean Cartridges Align Cartridges Change Print Cartridges Print Test Page Call Diagnostics Reset Defaults To access Maintenance mode options: 1. Press the Back button to save the settings. Off* Menu item View Ink Levels Clean Cartridges Align Cartridges Change Print Cartridges Print Test Page Call Diagnostics Action Maintenance Mode Menu Press the Select button to display the current ink level for diagnostic support. From the Set IP Netmask menu, use the keypad to enter...
... enabled. * Factory default setting Maintenance Mode Main Menu Maintenance Mode Main Menu View Ink Levels Clean Cartridges Align Cartridges Change Print Cartridges Print Test Page Call Diagnostics Reset Defaults To access Maintenance mode options: 1. Press the Back button to save the settings. Off* Menu item View Ink Levels Clean Cartridges Align Cartridges Change Print Cartridges Print Test Page Call Diagnostics Action Maintenance Mode Menu Press the Select button to display the current ink level for diagnostic support. From the Set IP Netmask menu, use the keypad to enter...

User Guide
Page 83
... the security settings for an Ethernet Connection 1. Configuring the Adapter for the wireless network you are using your printer with your network documentation. Connect the USB cable between the port on configuring your Drivers and Utilities CD, you do not have your adapter, see the wireless network administrator or your printer. NOTE: Have your USB cable ready for wireless configuration or your Ethernet cable (sold separately). Make sure your computer is on the operator panel. 3. Configuring the Adapter...
... the security settings for an Ethernet Connection 1. Configuring the Adapter for the wireless network you are using your printer with your network documentation. Connect the USB cable between the port on configuring your Drivers and Utilities CD, you do not have your adapter, see the wireless network administrator or your printer. NOTE: Have your USB cable ready for wireless configuration or your Ethernet cable (sold separately). Make sure your computer is on the operator panel. 3. Configuring the Adapter...
User Guide
Page 85
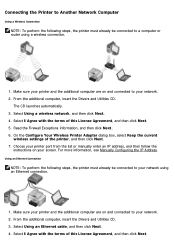
... IP Address. Connecting the Printer to Another Network Computer Using a Wireless Connection NOTE: To perform the following steps, the printer must already be connected to your network. 2. From the additional computer, insert the Drivers and Utilities CD. 3. Make sure your printer and the additional computer are on your network. 2. Choose your printer port from the list or manually enter an IP address, and then follow the instructions on and connected to your screen...
... IP Address. Connecting the Printer to Another Network Computer Using a Wireless Connection NOTE: To perform the following steps, the printer must already be connected to your network. 2. From the additional computer, insert the Drivers and Utilities CD. 3. Make sure your printer and the additional computer are on your network. 2. Choose your printer port from the list or manually enter an IP address, and then follow the instructions on and connected to your screen...
User Guide
Page 109
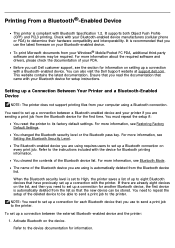
... Restoring Factory Default Settings. Ensure that you call Dell customer support, see Setting the Bluetooth Security Level. You changed the Bluetooth security level or the Bluetooth pass key. When the Bluetooth security level is compliant with Bluetooth Specification 1.2. To set up a connection between a Bluetooth-enabled device and your Windows® Mobile/Pocket PC PDA, additional third-party software and drivers may be able to send a print job to the printer. Printing...
... Restoring Factory Default Settings. Ensure that you call Dell customer support, see Setting the Bluetooth Security Level. You changed the Bluetooth security level or the Bluetooth pass key. When the Bluetooth security level is compliant with Bluetooth Specification 1.2. To set up a connection between a Bluetooth-enabled device and your Windows® Mobile/Pocket PC PDA, additional third-party software and drivers may be able to send a print job to the printer. Printing...

User Guide
Page 118
... time you can : Change the default print quality to Automatic, Draft, Normal, or Photo. Right-click the Dell 968 AIO Printer icon. 3. In Windows XP, click Start ® Settings® Control Panel® Printers and Other Hardware® Printers and Faxes. Click Open. 4. If you send a document or photo to set as print on both sides of the paper, print in higher or lower quality, print only in black and white, and more. c. Click Printers. Change the default media type and paper size. b. Changing Printing...
... time you can : Change the default print quality to Automatic, Draft, Normal, or Photo. Right-click the Dell 968 AIO Printer icon. 3. In Windows XP, click Start ® Settings® Control Panel® Printers and Other Hardware® Printers and Faxes. Click Open. 4. If you send a document or photo to set as print on both sides of the paper, print in higher or lower quality, print only in black and white, and more. c. Click Printers. Change the default media type and paper size. b. Changing Printing...
User Guide
Page 120
...USB cable as shown on your desktop. 3. In Windows XP, click Start® My Computer. Follow the instructions on the Setting Up Your Printer poster, and then restart the computer. Troubleshooting Setup Problems Error Messages Avoiding Jams and Misfeeds Paper Problems Printing Problems Copying Problems Scanning Problems Faxing Problems Networking Problems Memory Card Problems Improving Print Quality General Guidelines for Selecting or Loading Print Media If the printer does not work, ensure that the printer is properly connected to complete the installation. The printer supports Windows...
...USB cable as shown on your desktop. 3. In Windows XP, click Start® My Computer. Follow the instructions on the Setting Up Your Printer poster, and then restart the computer. Troubleshooting Setup Problems Error Messages Avoiding Jams and Misfeeds Paper Problems Printing Problems Copying Problems Scanning Problems Faxing Problems Networking Problems Memory Card Problems Improving Print Quality General Guidelines for Selecting or Loading Print Media If the printer does not work, ensure that the printer is properly connected to complete the installation. The printer supports Windows...

User Guide
Page 124
... the printer to the receiving fax machine. Fax Mode Failed to Connect The printer could not connect to a DSL wall jack. Make sure the number you entered a number using an analog signal. For more critical error. Fax Mode Phone Line Error The printer did not detect a dial tone, or the call timed out before connecting your fax connections. For more Memory Full. Fax Mode Unsupported Fax Mode The Auto Fax Conversion Turn Auto Fax Conversion on. Press to a standard phone line. Please connect to print process black Cartridge Missing Color Cartridge missing. Install a DSL...
... the printer to the receiving fax machine. Fax Mode Failed to Connect The printer could not connect to a DSL wall jack. Make sure the number you entered a number using an analog signal. For more critical error. Fax Mode Phone Line Error The printer did not detect a dial tone, or the call timed out before connecting your fax connections. For more Memory Full. Fax Mode Unsupported Fax Mode The Auto Fax Conversion Turn Auto Fax Conversion on. Press to a standard phone line. Please connect to print process black Cartridge Missing Color Cartridge missing. Install a DSL...
User Guide
Page 136
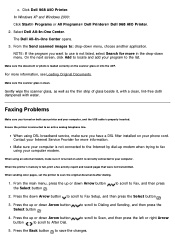
... fax using an external modem, make sure you want to use is connected to an active analog telephone line. In Windows XP and Windows 2000: Click Start® Programs or All Programs® Dell Printers® Dell 968 AIO Printer. 2. The Dell All-In-One Center opens. 3. On the next screen, click Add to locate and add your Internet Service Provider for more in the drop-down menu, choose another application. Contact your program to Dialing and Sending...
... fax using an external modem, make sure you want to use is connected to an active analog telephone line. In Windows XP and Windows 2000: Click Start® Programs or All Programs® Dell Printers® Dell 968 AIO Printer. 2. The Dell All-In-One Center opens. 3. On the next screen, click Add to locate and add your Internet Service Provider for more in the drop-down menu, choose another application. Contact your program to Dialing and Sending...


