
User Guide
Page 38
.... Double-click the CD-ROM drive icon, and then double-click setup.exe. In Windows XP and WIndows 2000: Click Start® Programs or All Programs® Dell Printers® Dell 968 AIO Printer. 2. Restart your desktop. Installing the Optional XPS Driver The XML Paper... the installation. Click Uninstall Dell 968 AIO Printer. 3. c. When the printer software installation screen appears, click Using a USB cable, Using a wireless network, or Using an Ethernet cable. Follow the instructions on the Advanced tab of the advanced XPS color and graphics features that are...
.... Double-click the CD-ROM drive icon, and then double-click setup.exe. In Windows XP and WIndows 2000: Click Start® Programs or All Programs® Dell Printers® Dell 968 AIO Printer. 2. Restart your desktop. Installing the Optional XPS Driver The XML Paper... the installation. Click Uninstall Dell 968 AIO Printer. 3. c. When the printer software installation screen appears, click Using a USB cable, Using a wireless network, or Using an Ethernet cable. Follow the instructions on the Advanced tab of the advanced XPS color and graphics features that are...
User Guide
Page 39
...Have disk. Click Computer, and then double-click (C:). Double-click xps, and then double-click setupxps. c. Select Add a printer using an Ethernet or wireless connection, make sure the USB cable is not in the Hostname or IP address: box, and then click Next. 4. ... Drivers, and then double-click PRINTER. Follow the instructions on the printer. From the Add Printer dialog box, choose one of the following: If you must have administrator privileges on your printer IP address, print a Network Setup Page from the Network Setup menu under the Setup menu on the screen to the...
...Have disk. Click Computer, and then double-click (C:). Double-click xps, and then double-click setupxps. c. Select Add a printer using an Ethernet or wireless connection, make sure the USB cable is not in the Hostname or IP address: box, and then click Next. 4. ... Drivers, and then double-click PRINTER. Follow the instructions on the printer. From the Add Printer dialog box, choose one of the following: If you must have administrator privileges on your printer IP address, print a Network Setup Page from the Network Setup menu under the Setup menu on the screen to the...
User Guide
Page 65
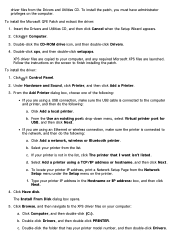
... menu, press the up or down Arrow button to scroll to enter the Printer Default Settings menu. Setup Mode Main Menu Setup Mode Main Menu Mode Submenu Mode Submenu Paper Handling Change Printer Default Settings Change Copy Default Settings Change Photo Default Settings Change Fax Default Settings...Fax Name Search Blocked Fax Entry Number Search Blocked Fax Add Entry Wireless Signal Quality Set IP Address Set IP Netmask Set IP Gateway To access the Setup menu: 1. Menu item Paper Handling Change Printer Action Setup Mode Menu Press the Select button to enter the Paper Handling menu...
... menu, press the up or down Arrow button to scroll to enter the Printer Default Settings menu. Setup Mode Main Menu Setup Mode Main Menu Mode Submenu Mode Submenu Paper Handling Change Printer Default Settings Change Copy Default Settings Change Photo Default Settings Change Fax Default Settings...Fax Name Search Blocked Fax Entry Number Search Blocked Fax Add Entry Wireless Signal Quality Set IP Address Set IP Netmask Set IP Gateway To access the Setup menu: 1. Menu item Paper Handling Change Printer Action Setup Mode Menu Press the Select button to enter the Paper Handling menu...

User Guide
Page 74
... Set IP Netmask menu. Netmask NOTE: When Time Server is enabled, the wireless Ethernet card updates the printer's time once a day or every time the printer is enabled. Auto* Ethernet 10/100 Wireless 802.11b/g * Factory default setting Wireless Menu You can view or change or set of Network Name. Menu item ... set an IP Address, IP Netmask, and IP Gateway if DHCP is enabled. NOTE: You cannot change the settings in the Wireless Setup Menu by selecting TCP/IP from the Network Setup menu. TCP/IP Menu You can view or change the value of numbers in the TCP/IP Menu by selecting...
... Set IP Netmask menu. Netmask NOTE: When Time Server is enabled, the wireless Ethernet card updates the printer's time once a day or every time the printer is enabled. Auto* Ethernet 10/100 Wireless 802.11b/g * Factory default setting Wireless Menu You can view or change or set of Network Name. Menu item ... set an IP Address, IP Netmask, and IP Gateway if DHCP is enabled. NOTE: You cannot change the settings in the Wireless Setup Menu by selecting TCP/IP from the Network Setup menu. TCP/IP Menu You can view or change the value of numbers in the TCP/IP Menu by selecting...

User Guide
Page 80
... 1150 Configuring the Adapter Using the Wireless Setup Utility The optional Dell™ Internal Network Adapter 1150 enables you use-Ad-Hoc or Infrastructure) Wireless Channel Number Network Authentication and encryption type Security Key(s) Wireless Encryption Networking Minimum Requirements for Setup The Dell Internal Network Adapter 1150 The Dell All-In-One Printer An existing wireless network The Drivers and Utilities...
... 1150 Configuring the Adapter Using the Wireless Setup Utility The optional Dell™ Internal Network Adapter 1150 enables you use-Ad-Hoc or Infrastructure) Wireless Channel Number Network Authentication and encryption type Security Key(s) Wireless Encryption Networking Minimum Requirements for Setup The Dell Internal Network Adapter 1150 The Dell All-In-One Printer An existing wireless network The Drivers and Utilities...

User Guide
Page 83
.... 5. NOTE: The network name (SSID) and the security settings for the wireless network you are using your network documentation. Connect your printer to complete this License Agreement, and then click Next. 7. The Dell Wireless Setup Utility launches. NOTE: Have your USB cable ready for wireless configuration or your network using an Ethernet cable (sold separately) ready...
.... 5. NOTE: The network name (SSID) and the security settings for the wireless network you are using your network documentation. Connect your printer to complete this License Agreement, and then click Next. 7. The Dell Wireless Setup Utility launches. NOTE: Have your USB cable ready for wireless configuration or your network using an Ethernet cable (sold separately) ready...
User Guide
Page 86
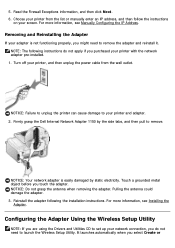
..., see Manually Configuring the IP Address. NOTICE: Failure to unplug the printer can cause damage to launch the Wireless Setup Utility. NOTICE: Your network adapter is not functioning properly, you might need to your printer and adapter. 2. NOTICE: Do not grasp the antenna when removing the...Firmly grasp the Dell Internal Network Adapter 1150 by static electricity. Configuring the Adapter Using the Wireless Setup Utility NOTE: If you are using the Drivers and Utilities CD to remove. Read the Firewall Exceptions information, and then click Next. 6. Turn off your printer, and then ...
..., see Manually Configuring the IP Address. NOTICE: Failure to unplug the printer can cause damage to launch the Wireless Setup Utility. NOTICE: Your network adapter is not functioning properly, you might need to your printer and adapter. 2. NOTICE: Do not grasp the antenna when removing the...Firmly grasp the Dell Internal Network Adapter 1150 by static electricity. Configuring the Adapter Using the Wireless Setup Utility NOTE: If you are using the Drivers and Utilities CD to remove. Read the Firewall Exceptions information, and then click Next. 6. Turn off your printer, and then ...
User Guide
Page 87
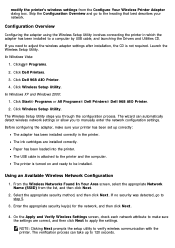
... Printer. 4. Click Dell Printers. 3. The wizard can take up correctly: The adapter has been installed correctly in which the adapter has been installed to step 5. 3. Using an Available Wireless Network Configuration 1. If no security was detected, go to apply the settings. Configuration Overview Configuring the adapter using the Wireless Setup Utility involves connecting the printer in the printer...
... Printer. 4. Click Dell Printers. 3. The wizard can take up correctly: The adapter has been installed correctly in which the adapter has been installed to step 5. 3. Using an Available Wireless Network Configuration 1. If no security was detected, go to apply the settings. Configuration Overview Configuring the adapter using the Wireless Setup Utility involves connecting the printer in the printer...
User Guide
Page 88
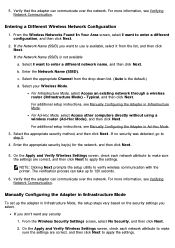
... Select the appropriate security method, and then click Next. Select your Wireless Mode. NOTE: Clicking Next prompts the setup utility to step 5. 4. For Infrastructure Mode, select Access an existing network through a wireless router (Infrastructure Mode) - Select the appropriate Channel from the list,...Mode To set up to apply the settings. c. For additional setup instructions, see Verifying Network Communication. If no security was detected, go to verify wireless communication with the printer. The verification process can take up the adapter in Infrastructure ...
... Select the appropriate security method, and then click Next. Select your Wireless Mode. NOTE: Clicking Next prompts the setup utility to step 5. 4. For Infrastructure Mode, select Access an existing network through a wireless router (Infrastructure Mode) - Select the appropriate Channel from the list,...Mode To set up to apply the settings. c. For additional setup instructions, see Verifying Network Communication. If no security was detected, go to verify wireless communication with the printer. The verification process can take up the adapter in Infrastructure ...

User Guide
Page 118
...Setup tab, you can make your printing preferences each time you send a print job. Click Hardware and Sound. Click Printers. Click Printers. In Windows XP, click Start® Settings® Control Panel® Printers and Other Hardware® Printers and Faxes. Right-click the Dell 968 AIO Printer... XP, click Start ® Settings® Control Panel® Printers and Other Hardware® Printers and Faxes. If you want to Automatic, Draft, Normal, or Photo. Sent From a Computer Over a Wireless Network 1. In Windows Vista: a. Select Printing Preferences. 4. Click...
...Setup tab, you can make your printing preferences each time you send a print job. Click Hardware and Sound. Click Printers. Click Printers. In Windows XP, click Start® Settings® Control Panel® Printers and Other Hardware® Printers and Faxes. Right-click the Dell 968 AIO Printer... XP, click Start ® Settings® Control Panel® Printers and Other Hardware® Printers and Faxes. If you want to Automatic, Draft, Normal, or Photo. Sent From a Computer Over a Wireless Network 1. In Windows Vista: a. Select Printing Preferences. 4. Click...
User Guide
Page 120
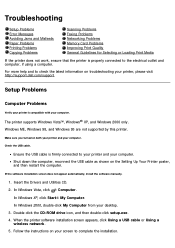
... the computer. Shut down the computer, reconnect the USB cable as shown on troubleshooting your printer, please visit http://support.dell.com/support. If the software installation screen does not appear automatically, install the software manually....printer. Insert the Drivers and Utilities CD. 2. Follow the instructions on both your printer and your computer. Setup Problems Computer Problems Verify your printer is compatible with your desktop. 3. Check the USB cable. When the printer software installation screen appears, click Using a USB cable or Using a wireless...
... the computer. Shut down the computer, reconnect the USB cable as shown on troubleshooting your printer, please visit http://support.dell.com/support. If the software installation screen does not appear automatically, install the software manually....printer. Insert the Drivers and Utilities CD. 2. Follow the instructions on both your printer and your computer. Setup Problems Computer Problems Verify your printer is compatible with your desktop. 3. Check the USB cable. When the printer software installation screen appears, click Using a USB cable or Using a wireless...


