
User Guide
Page 3
... For more information, see Installing the Optional XPS Driver. Find it here Drivers for my Drivers and Utilities CD printer My User's Guide Optional XPS driver If you purchased your Dell computer and printer at the same time, documentation and drivers for your printer are you looking for experienced...updates about technical changes to set up and use the CD to access the improved graphics and color features of XPS. How to set up my Setting Up Your Printer poster printer Safety information Owner's Manual How to your documentation. Readme files may be included on your computer...
... For more information, see Installing the Optional XPS Driver. Find it here Drivers for my Drivers and Utilities CD printer My User's Guide Optional XPS driver If you purchased your Dell computer and printer at the same time, documentation and drivers for your printer are you looking for experienced...updates about technical changes to set up and use the CD to access the improved graphics and color features of XPS. How to set up my Setting Up Your Printer poster printer Safety information Owner's Manual How to your documentation. Readme files may be included on your computer...
User Guide
Page 5
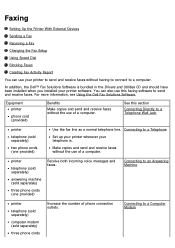
...without the use of phone connection outlets. Connecting to a Telephone Wall Jack printer telephone (sold separately) two phone cords (one provided) Receive both incoming voice messages and faxes. You can use your printer to send and receive faxes without the use of a computer. Make ...having to connect to a Telephone Set up your printer wherever your telephone is bundled in the Drivers and Utilities CD and should have been installed when you installed your printer software. Connecting to send and receive faxes. In addition, the Dell™ Fax Solutions Software is . See this...
...without the use of phone connection outlets. Connecting to a Telephone Wall Jack printer telephone (sold separately) two phone cords (one provided) Receive both incoming voice messages and faxes. You can use your printer to send and receive faxes without the use of a computer. Make ...having to connect to a Telephone Set up your printer wherever your telephone is bundled in the Drivers and Utilities CD and should have been installed when you installed your printer software. Connecting to send and receive faxes. In addition, the Dell™ Fax Solutions Software is . See this...
User Guide
Page 7
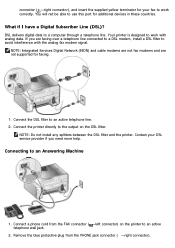
... ( -right connector). You will not be able to a computer through a telephone line. Contact your fax to work correctly. NOTE: Do not install any splitters between the DSL filter and the printer. connector ( -right connector), and insert the supplied yellow terminator for your DSL service provider if you are not supported for faxing...
... ( -right connector). You will not be able to a computer through a telephone line. Contact your fax to work correctly. NOTE: Do not install any splitters between the DSL filter and the printer. connector ( -right connector), and insert the supplied yellow terminator for your DSL service provider if you are not supported for faxing...
User Guide
Page 18
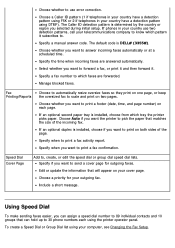
...fax confirmation. Fax Printing/Reports Choose to automatically resize oversize faxes so they print on one page, or keep the oversized fax to , create, or edit the speed dial or... group dial speed dial lists. Speed Dial Cover Page Add to scale and print on each using the printer operator panel. To create a Speed Dial or Group Dial list using DTMF). Choose a Caller ID pattern... want to print on your cover page. If an optional duplex is DELL# (3355#). Choose a priority for outgoing faxes. The default code is installed, choose if you want to send a cover page for your outgoing ...
...fax confirmation. Fax Printing/Reports Choose to automatically resize oversize faxes so they print on one page, or keep the oversized fax to , create, or edit the speed dial or... group dial speed dial lists. Speed Dial Cover Page Add to scale and print on each using the printer operator panel. To create a Speed Dial or Group Dial list using DTMF). Choose a Caller ID pattern... want to print on your cover page. If an optional duplex is DELL# (3355#). Choose a priority for outgoing faxes. The default code is installed, choose if you want to send a cover page for your outgoing ...
User Guide
Page 26
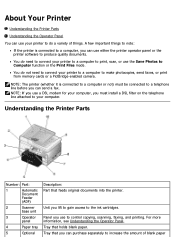
... increase the amount of things. A few important things to note: If the printer is connected to a computer or not) must install a DSL filter on the telephone line attached to your computer. Panel you use either the printer operator panel or the printer software to produce quality documents. NOTE: If you use the Save Photos...
... increase the amount of things. A few important things to note: If the printer is connected to a computer or not) must install a DSL filter on the telephone line attached to your computer. Panel you use either the printer operator panel or the printer software to produce quality documents. NOTE: If you use the Save Photos...
User Guide
Page 28
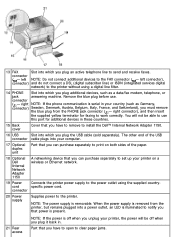
...you can purchase separately to set up your printer, the power will not be off when you unplug your printer on a wireless or Ethernet network. 19 Power Connects the printer power supply to print on both sides of the paper. 18 Optional Dell Internal Network Adapter 1150 A networking device that...Switzerland), you can purchase separately to the power outlet using a digital line filter. 14 PHONE Slot into which you have to remove to install the Dell™ Internal Network Adapter 1150. 16 USB Slot into which you plug an active telephone line to the FAX connector ( - NOTE: ...
...you can purchase separately to set up your printer, the power will not be off when you unplug your printer on a wireless or Ethernet network. 19 Power Connects the printer power supply to print on both sides of the paper. 18 Optional Dell Internal Network Adapter 1150 A networking device that...Switzerland), you can purchase separately to the power outlet using a digital line filter. 14 PHONE Slot into which you have to remove to install the Dell™ Internal Network Adapter 1150. 16 USB Slot into which you plug an active telephone line to the FAX connector ( - NOTE: ...
User Guide
Page 31
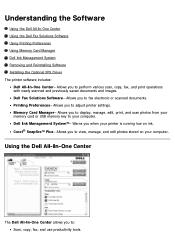
... your computer. Understanding the Software Using the Dell All-In-One Center Using the Dell Fax Solutions Software Using Printing Preferences Using Memory Card Manager Dell Ink Management System Removing and Reinstalling Software Installing the Optional XPS Driver The printer software includes: Dell All-In-One Center- Warns you to adjust printer settings. Printing Preferences- Allows you to perform...
... your computer. Understanding the Software Using the Dell All-In-One Center Using the Dell Fax Solutions Software Using Printing Preferences Using Memory Card Manager Dell Ink Management System Removing and Reinstalling Software Installing the Optional XPS Driver The printer software includes: Dell All-In-One Center- Warns you to adjust printer settings. Printing Preferences- Allows you to perform...
User Guide
Page 35
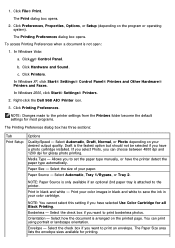
The Print dialog box opens. 2. b. Right-click the Dell 968 AIO Printer icon. 3. Allows you have selected Use Color Cartridge for most programs. The Printing Preferences dialog box has three sections: Tab Print Setup Options Quality/Speed - NOTE: You...Photo, you want to set the paper type manually, or have a photo cartridge installed. Select the size of your color cartridge. Envelope - Click Printing Preferences. Draft is attached to the printer settings from the Printers folder become the default settings for all Black Printing. You can choose between 4800 ...
The Print dialog box opens. 2. b. Right-click the Dell 968 AIO Printer icon. 3. Allows you have selected Use Color Cartridge for most programs. The Printing Preferences dialog box has three sections: Tab Print Setup Options Quality/Speed - NOTE: You...Photo, you want to set the paper type manually, or have a photo cartridge installed. Select the size of your color cartridge. Envelope - Click Printing Preferences. Draft is attached to the printer settings from the Printers folder become the default settings for all Black Printing. You can choose between 4800 ...
User Guide
Page 36
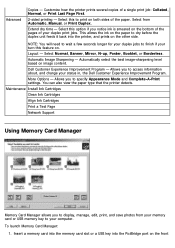
... of the pages of your computer. More Options - You can also view the paper type that the printer detects. Customize how the printer prints several copies of the paper. Layout - Dell Customer Experience Improvement Program - Insert a memory card into the memory card slot or a USB key into...unit feeds it back into the PictBridge port on the other side. Automatically select the best image-sharpening level based on . Maintenance Install Ink Cartridges Clean Ink Cartridges Align Ink Cartridges Print a Test Page Network Support Using Memory Card Manager Memory Card Manager allows you...
... of the pages of your computer. More Options - You can also view the paper type that the printer detects. Customize how the printer prints several copies of the paper. Layout - Dell Customer Experience Improvement Program - Insert a memory card into the memory card slot or a USB key into...unit feeds it back into the PictBridge port on the other side. Automatically select the best image-sharpening level based on . Maintenance Install Ink Cartridges Clean Ink Cartridges Align Ink Cartridges Print a Test Page Network Support Using Memory Card Manager Memory Card Manager allows you...
User Guide
Page 37
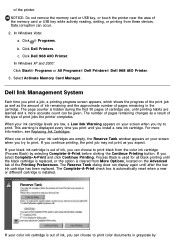
...during the first 50 pages of your ink cartridges are learned and a more information, see Replacing Ink Cartridges. This warning is installed. Click Dell 968 AIO Printer. When one or both of cartridge use, until you try to print. In Windows Vista: a. In Windows XP and 2000: Click Start...All Programs® Dell Printers® Dell 968 AIO Printer. 3. c. NOTICE: Do not remove the memory card or USB key, or touch the printer near the area of the memory card or USB key while actively reading, writing, or printing from More Options, located on your color ink cartridge is out...
...during the first 50 pages of your ink cartridges are learned and a more information, see Replacing Ink Cartridges. This warning is installed. Click Dell 968 AIO Printer. When one or both of cartridge use, until you try to print. In Windows Vista: a. In Windows XP and 2000: Click Start...All Programs® Dell Printers® Dell 968 AIO Printer. 3. c. NOTICE: Do not remove the memory card or USB key, or touch the printer near the area of the memory card or USB key while actively reading, writing, or printing from More Options, located on your color ink cartridge is out...

User Guide
Page 38
... users. If you select Complete-APrint, and click Continue Printing, all color documents will print in black and white until after you can remove and reinstall the printer software. 1. Click Dell Printers. When the printer software installation screen appears, click Using a USB cable, Using a wireless network, or Using an Ethernet cable. Insert the Drivers and Utilities CD...
... users. If you select Complete-APrint, and click Continue Printing, all color documents will print in black and white until after you can remove and reinstall the printer software. 1. Click Dell Printers. When the printer software installation screen appears, click Using a USB cable, Using a wireless network, or Using an Ethernet cable. Insert the Drivers and Utilities CD...
User Guide
Page 39
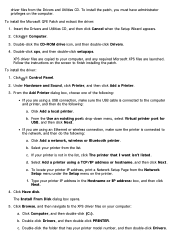
... Microsoft XPS files are using an Ethernet or wireless connection, make sure the USB cable is connected to the computer and printer, and then do the following : If you must have administrator privileges on the printer. To install the patch, you are copied to the XPS... Browse, and then navigate to your printer IP address in the list, click The printer that has your printer from the list. To install the Microsoft QFE Patch and extract the driver: 1. From the Add Printer dialog box, choose one of the following : a. Select your printer model number, and then double-click ...
... Microsoft XPS files are using an Ethernet or wireless connection, make sure the USB cable is connected to the computer and printer, and then do the following : If you must have administrator privileges on the printer. To install the patch, you are copied to the XPS... Browse, and then navigate to your printer IP address in the list, click The printer that has your printer from the list. To install the Microsoft QFE Patch and extract the driver: 1. From the Add Printer dialog box, choose one of the following : a. Select your printer model number, and then double-click ...

User Guide
Page 40
The file is located in the xps folder with the setupxps batch file (D:\Drivers\xps\readme). Double-click xps, and then click Open. Click Next on the Drivers and Utilities CD. d. e. From the Install From Disk dialog box, click OK. 6. For more information on the XPS driver, see the XPS readme file on the following two dialog boxes.
The file is located in the xps folder with the setupxps batch file (D:\Drivers\xps\readme). Double-click xps, and then click Open. Click Next on the Drivers and Utilities CD. d. e. From the Install From Disk dialog box, click OK. 6. For more information on the XPS driver, see the XPS readme file on the following two dialog boxes.
User Guide
Page 49
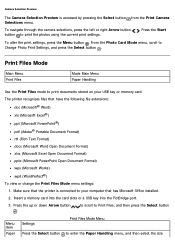
Make sure that the printer is accessed by pressing the Select button from the Print Camera Selections menu. Camera Selection Preview The Camera Selection Preview is connected to your USB ... down Arrow button . From the Photo Card Mode menu, scroll to enter the Paper Handling menu, and then select the size The printer recognizes files that has Microsoft Office installed. 2. to scroll to Print Files, and then press the Select button Menu item Paper Settings Print Files Mode Menu Press the Select...
Make sure that the printer is accessed by pressing the Select button from the Print Camera Selections menu. Camera Selection Preview The Camera Selection Preview is connected to your USB ... down Arrow button . From the Photo Card Mode menu, scroll to enter the Paper Handling menu, and then select the size The printer recognizes files that has Microsoft Office installed. 2. to scroll to Print Files, and then press the Select button Menu item Paper Settings Print Files Mode Menu Press the Select...

User Guide
Page 64
Auto Detect* L 2L A6 A5 B5 A4 2.25x3.25" 3x5" 4x6" 5x7" 8x10" 8.5x11" Change Default Press the Select button to enter the Scan Default Settings menu. For more Settings information, see Scan Default Settings Menu. * Factory default settings Automatic* 150 dpi 300 dpi 600 dpi Original Size Specify the size of your scan. Color* Black & White Quality Specify the quality (resolution) of your scan. Preview Email File software installed on your computer Color Specify the color of your original document or image.
Auto Detect* L 2L A6 A5 B5 A4 2.25x3.25" 3x5" 4x6" 5x7" 8x10" 8.5x11" Change Default Press the Select button to enter the Scan Default Settings menu. For more Settings information, see Scan Default Settings Menu. * Factory default settings Automatic* 150 dpi 300 dpi 600 dpi Original Size Specify the size of your scan. Color* Black & White Quality Specify the quality (resolution) of your scan. Preview Email File software installed on your computer Color Specify the color of your original document or image.

User Guide
Page 80
...adapter that has been installed in all regions. Minimum Requirements for Setup Wireless Network Settings Wireless Encryption Installing and Configuring the Dell Internal Network Adapter 1150 Configuring the Adapter Using the Wireless Setup Utility The optional Dell™ Internal Network ... that shipped with your printer A computer running one of wireless network you to connect your printer to determine availability. Networking Minimum Requirements for Setup The Dell Internal Network Adapter 1150 The Dell All-In-One Printer An existing wireless network The Drivers and ...
...adapter that has been installed in all regions. Minimum Requirements for Setup Wireless Network Settings Wireless Encryption Installing and Configuring the Dell Internal Network Adapter 1150 Configuring the Adapter Using the Wireless Setup Utility The optional Dell™ Internal Network ... that shipped with your printer A computer running one of wireless network you to connect your printer to determine availability. Networking Minimum Requirements for Setup The Dell Internal Network Adapter 1150 The Dell All-In-One Printer An existing wireless network The Drivers and ...
User Guide
Page 81
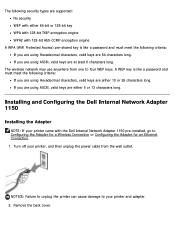
... you are using ASCII, valid keys are either 10 or 26 characters long. The wireless network may use anywhere from the wall outlet. NOTICE: Failure to unplug the printer can cause damage to your printer came with 128-bit AES-CCMP encryption engine A WPA (WiFi Protected Access) pre-...are either 5 or 13 characters long. Turn off your printer, and then unplug the power cable from one to four WEP keys. Remove the back cover. Installing and Configuring the Dell Internal Network Adapter 1150 Installing the Adapter NOTE: If your printer and adapter. 2. If you are using ASCII, valid keys...
... you are using ASCII, valid keys are either 10 or 26 characters long. The wireless network may use anywhere from the wall outlet. NOTICE: Failure to unplug the printer can cause damage to your printer came with 128-bit AES-CCMP encryption engine A WPA (WiFi Protected Access) pre-...are either 5 or 13 characters long. Turn off your printer, and then unplug the power cable from one to four WEP keys. Remove the back cover. Installing and Configuring the Dell Internal Network Adapter 1150 Installing the Adapter NOTE: If your printer and adapter. 2. If you are using ASCII, valid keys...
User Guide
Page 82
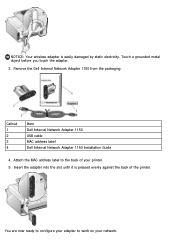
Callout 1 2 3 4 Item Dell Internal Network Adapter 1150 USB cable MAC address label Dell Internal Network Adapter 1150 Installation Guide 4. NOTICE: Your wireless adapter is pressed evenly against the back of your network. You are now ready to configure your adapter to the back of the printer. Attach the MAC address label to work on your printer. 5. Touch a grounded metal object before you touch the adapter. 3. Remove the Dell Internal Network Adapter 1150 from the packaging. Insert the adapter into the slot until it is easily damaged by static electricity.
Callout 1 2 3 4 Item Dell Internal Network Adapter 1150 USB cable MAC address label Dell Internal Network Adapter 1150 Installation Guide 4. NOTICE: Your wireless adapter is pressed evenly against the back of your network. You are now ready to configure your adapter to the back of the printer. Attach the MAC address label to work on your printer. 5. Touch a grounded metal object before you touch the adapter. 3. Remove the Dell Internal Network Adapter 1150 from the packaging. Insert the adapter into the slot until it is easily damaged by static electricity.

User Guide
Page 83
... you can download the appropriate software from support.dell.com. 5. If you are using your printer with your computer is on your adapter, see the wireless network administrator or your Drivers and Utilities CD, you want to connect to may be needed to complete the installation process. The CD launches automatically. Follow the instructions...
... you can download the appropriate software from support.dell.com. 5. If you are using your printer with your computer is on your adapter, see the wireless network administrator or your Drivers and Utilities CD, you want to connect to may be needed to complete the installation process. The CD launches automatically. Follow the instructions...
User Guide
Page 84
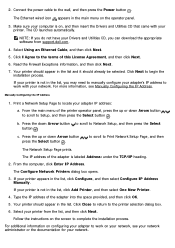
...dell.com. 4. If your network. Follow the instructions on your network, see Manually Configuring the IP Address. Connect the power cable to Print Network Setup Page, and then The Network Setup Page prints. If your printer is not in the list, click Add Printer, and then select One New Printer. 4. b. The Configure Network Printers... to return to begin the installation process. The CD launches automatically. Click I Agree to the terms of the printer operator panel, press the up or down Arrow button to scroll to complete the installation process. Read the Firewall Exceptions...
...dell.com. 4. If your network. Follow the instructions on your network, see Manually Configuring the IP Address. Connect the power cable to Print Network Setup Page, and then The Network Setup Page prints. If your printer is not in the list, click Add Printer, and then select One New Printer. 4. b. The Configure Network Printers... to return to begin the installation process. The CD launches automatically. Click I Agree to the terms of the printer operator panel, press the up or down Arrow button to scroll to complete the installation process. Read the Firewall Exceptions...


