User Guide
Page 28
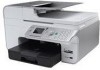
... . When the power supply is removed from the PHONE jack connector ( - connector ( - left NOTE: Do not connect additional devices to work correctly. cord specific power cord. connector ( - right NOTE: If the phone communication is illuminated to notify you that you have to remove ... a wireless or Ethernet network. 19 Power Connects the printer power supply to the printer without using the supplied country- 13 FAX Slot into which you plug an active telephone line to the printer. The other end of the paper. 18 Optional Dell Internal Network Adapter 1150 A networking...
... . When the power supply is removed from the PHONE jack connector ( - connector ( - left NOTE: Do not connect additional devices to work correctly. cord specific power cord. connector ( - right NOTE: If the phone communication is illuminated to notify you that you have to remove ... a wireless or Ethernet network. 19 Power Connects the printer power supply to the printer without using the supplied country- 13 FAX Slot into which you plug an active telephone line to the printer. The other end of the paper. 18 Optional Dell Internal Network Adapter 1150 A networking...
User Guide
Page 82
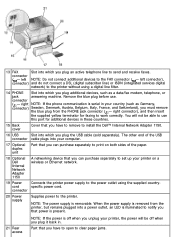
You are now ready to configure your adapter to the back of the printer. NOTICE: Your wireless adapter is pressed evenly against the back of your network. Callout 1 2 3 4 Item Dell Internal Network Adapter 1150 USB cable MAC address label Dell Internal Network Adapter 1150 Installation Guide 4. Remove the Dell Internal Network Adapter 1150 from the packaging. Attach the MAC address label to work on your printer. 5. Insert the adapter into the slot until it is easily damaged by static electricity. Touch a grounded metal object before you touch the adapter. 3.
You are now ready to configure your adapter to the back of the printer. NOTICE: Your wireless adapter is pressed evenly against the back of your network. Callout 1 2 3 4 Item Dell Internal Network Adapter 1150 USB cable MAC address label Dell Internal Network Adapter 1150 Installation Guide 4. Remove the Dell Internal Network Adapter 1150 from the packaging. Attach the MAC address label to work on your printer. 5. Insert the adapter into the slot until it is easily damaged by static electricity. Touch a grounded metal object before you touch the adapter. 3.
User Guide
Page 120
...4. Shut down the computer, reconnect the USB cable as shown on both your printer and your printer, please visit http://support.dell.com/support. Insert the Drivers and Utilities CD. 2. In Windows XP, click...screen does not appear automatically, install the software manually. 1. When the printer software installation screen appears, click Using a USB cable or Using a wireless network. 5. For more help and to the electrical outlet and computer... Media If the printer does not work, ensure that the printer is properly connected to check the latest information on your desktop. 3....
...4. Shut down the computer, reconnect the USB cable as shown on both your printer and your printer, please visit http://support.dell.com/support. Insert the Drivers and Utilities CD. 2. In Windows XP, click...screen does not appear automatically, install the software manually. 1. When the printer software installation screen appears, click Using a USB cable or Using a wireless network. 5. For more help and to the electrical outlet and computer... Media If the printer does not work, ensure that the printer is properly connected to check the latest information on your desktop. 3....


