User Guide
Page 35
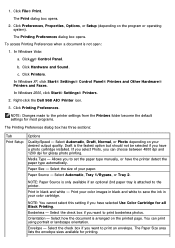
Right-click the Dell 968 AIO Printer icon. 3. NOTE: Changes made to print borderless photos. Allows you want to the printer settings from the Printers folder become the default settings for printing. Paper Source - NOTE: Paper Source is only available if an optional 2nd ... selected Use Color Cartridge for glossy photo printing. Orientation - Media Type - Select the size of your color images in black and white to the printer. Select Automatic, Tray 1/Bypass, or Tray 2. Select Automatic, Draft, Normal, or Photo depending on the printed page. Print your paper....
Right-click the Dell 968 AIO Printer icon. 3. NOTE: Changes made to print borderless photos. Allows you want to the printer settings from the Printers folder become the default settings for printing. Paper Source - NOTE: Paper Source is only available if an optional 2nd ... selected Use Color Cartridge for glossy photo printing. Orientation - Media Type - Select the size of your color images in black and white to the printer. Select Automatic, Tray 1/Bypass, or Tray 2. Select Automatic, Draft, Normal, or Photo depending on the printed page. Print your paper....
User Guide
Page 37
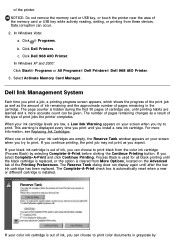
... USB key while actively reading, writing, or printing from the color ink cartridge (Process Black) by c. In Windows XP and 2000: Click Start® Programs or All Programs® Dell Printers® Dell 968 AIO Printer. 3. Select Activate Memory Card Manager. When one or both of cartridge use, until you try to print color documents in the cartridge. Click ®...
... USB key while actively reading, writing, or printing from the color ink cartridge (Process Black) by c. In Windows XP and 2000: Click Start® Programs or All Programs® Dell Printers® Dell 968 AIO Printer. 3. Select Activate Memory Card Manager. When one or both of cartridge use, until you try to print color documents in the cartridge. Click ®...

User Guide
Page 38
... of the Printing Preferences. selecting Complete-A-Print before clicking the Continue Printing button. Click Dell Printers. Double-click the CD-ROM drive icon, and then double-click setup.exe. NOTE: Before installing the XPS driver, you can remove and reinstall the printer software. 1. If you select Complete-APrint, and click Continue Printing, all color documents will print in black and...
... of the Printing Preferences. selecting Complete-A-Print before clicking the Continue Printing button. Click Dell Printers. Double-click the CD-ROM drive icon, and then double-click setup.exe. NOTE: Before installing the XPS driver, you can remove and reinstall the printer software. 1. If you select Complete-APrint, and click Continue Printing, all color documents will print in black and...

User Guide
Page 41
...the optional duplex unit is attached to Copy. 2. Copy menu item Color Settings Specify the color of copies. Understanding the Operator Panel Menus Copy Mode Photo Mode Print Files Mode Fax Mode Scan Mode Setup Mode Maintenance Mode PictBridge Mode ...Bluetooth Mode Copy Mode Main Menu Copy Mode Main Menu Color Copies Reduce/Enlarge Quality Lighter/Darker Paper Handling Collate 2-Sided Copies N-up or down Arrow button to scroll to the printer. To view or change the Copy Mode menu: 1. Color* Black...
...the optional duplex unit is attached to Copy. 2. Copy menu item Color Settings Specify the color of copies. Understanding the Operator Panel Menus Copy Mode Photo Mode Print Files Mode Fax Mode Scan Mode Setup Mode Maintenance Mode PictBridge Mode ...Bluetooth Mode Copy Mode Main Menu Copy Mode Main Menu Color Copies Reduce/Enlarge Quality Lighter/Darker Paper Handling Collate 2-Sided Copies N-up or down Arrow button to scroll to the printer. To view or change the Copy Mode menu: 1. Color* Black...

User Guide
Page 59
...left or right Arrow button is shown on the fax header of outgoing faxes. 2 Sided Print Paper Press the Select button to enter your fax number. No* Yes Color Specify the color of the blank paper loaded in the input tray. Menu item Your Fax Number Your ...Pulse Behind PBX (Dial Tone Detect Off) Redial Time Specify the time the printer waits before redialing failed faxes. 1 Minute Black & White* Color Quality Specify the scan quality of outgoing faxes. to specify the name for the printer. For more information, see Paper Handling Menu. * Factory default settings Dialing and...
...left or right Arrow button is shown on the fax header of outgoing faxes. 2 Sided Print Paper Press the Select button to enter your fax number. No* Yes Color Specify the color of the blank paper loaded in the input tray. Menu item Your Fax Number Your ...Pulse Behind PBX (Dial Tone Detect Off) Redial Time Specify the time the printer waits before redialing failed faxes. 1 Minute Black & White* Color Quality Specify the scan quality of outgoing faxes. to specify the name for the printer. For more information, see Paper Handling Menu. * Factory default settings Dialing and...

User Guide
Page 97
... tab, select the paper type. 4. In Windows 2000, click Start® Settings® Printers. 2. On the Print Setup tab, select the paper size. 4. To choose paper size: 1. Paper type Quality/Speed settings Black and Color Cartridges Installed Photo and Color Cartridges Installed Plain/heavyweight matte Normal Photo Transparency Normal Photo Photo/glossy Photo Photo NOTE...
... tab, select the paper type. 4. In Windows 2000, click Start® Settings® Printers. 2. On the Print Setup tab, select the paper size. 4. To choose paper size: 1. Paper type Quality/Speed settings Black and Color Cartridges Installed Photo and Color Cartridges Installed Plain/heavyweight matte Normal Photo Transparency Normal Photo Photo/glossy Photo Photo NOTE...
User Guide
Page 104
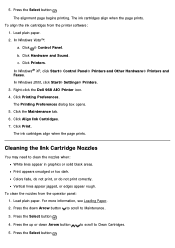
...click the Dell 968 AIO Printer icon. 4. Click the Maintenance tab. 6. Vertical lines appear jagged, or edges appear rough. Click Printing Preferences. Click Align Ink Cartridges. 7. Colors fade, do not print, or do not print correctly. Load plain paper. c. In Windows 2000, click Start® Settings® Printers. 3. Print appears ...down Arrow button to scroll to clean the nozzles when: White lines appear in graphics or solid black areas. Press the Select button . b. Click Print. Click Printers. To align the ink cartridges from the operator panel: 1.
...click the Dell 968 AIO Printer icon. 4. Click the Maintenance tab. 6. Vertical lines appear jagged, or edges appear rough. Click Printing Preferences. Click Align Ink Cartridges. 7. Colors fade, do not print, or do not print correctly. Load plain paper. c. In Windows 2000, click Start® Settings® Printers. 3. Print appears ...down Arrow button to scroll to clean the nozzles when: White lines appear in graphics or solid black areas. Press the Select button . b. Click Print. Click Printers. To align the ink cartridges from the operator panel: 1.

User Guide
Page 118
... Photo. In Windows XP, click Start® Settings® Control Panel® Printers and Other Hardware® Printers and Faxes. Select Printing Preferences. 4. Sent From a Computer Over a Wireless Network 1. b. Right-click the Dell 968 AIO Printer icon. 3. To make these the default so you do not have to specify ... Select the job you want to set as print on both sides of the paper, print in higher or lower quality, print only in black and white, and more. In Windows Vista: a. In Windows 2000, click Start® Settings® Printers. 2. Change the default media type and paper ...
... Photo. In Windows XP, click Start® Settings® Control Panel® Printers and Other Hardware® Printers and Faxes. Select Printing Preferences. 4. Sent From a Computer Over a Wireless Network 1. b. Right-click the Dell 968 AIO Printer icon. 3. To make these the default so you do not have to specify ... Select the job you want to set as print on both sides of the paper, print in higher or lower quality, print only in black and white, and more. In Windows Vista: a. In Windows 2000, click Start® Settings® Printers. 2. Change the default media type and paper ...
User Guide
Page 119
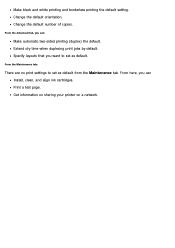
Extend dry time when duplexing print jobs by default. Make black and white printing and borderless printing the default setting. From the Maintenance tab: There are no print settings to set as default. Print a test page. Change the default number of copies. Specify layouts that you can : Make automatic two-sided printing (duplex) the default. From here, you want to set as default from the Maintenance tab. From the Advanced tab, you can Install, clean, and align ink cartridges. Get information on sharing your printer on a network. Change the default orientation.
Extend dry time when duplexing print jobs by default. Make black and white printing and borderless printing the default setting. From the Maintenance tab: There are no print settings to set as default. Print a test page. Change the default number of copies. Specify layouts that you can : Make automatic two-sided printing (duplex) the default. From here, you want to set as default from the Maintenance tab. From the Advanced tab, you can Install, clean, and align ink cartridges. Get information on sharing your printer on a network. Change the default orientation.
User Guide
Page 123
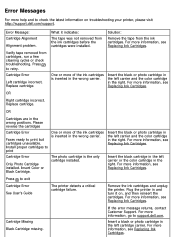
...printer, please visit http://support.dell.com/support. One or more of the ink cartridges is inserted in the right. Insert the black or photo cartridge in the left carrier or the color cartridge in the wrong carrier. Insert Color or Black Cartridge. Insert the black cartridge in the left carrier and the color...Replacing Ink Cartridges. Remove the ink cartridges and unplug the printer. For more information, see Replacing Ink Cartridges. Press to print but cartridges unavailable. Install proper cartridges to print One or more of the ink cartridges is inserted in the ...
...printer, please visit http://support.dell.com/support. One or more of the ink cartridges is inserted in the right. Insert the black or photo cartridge in the left carrier or the color cartridge in the wrong carrier. Insert Color or Black Cartridge. Insert the black cartridge in the left carrier and the color...Replacing Ink Cartridges. Remove the ink cartridges and unplug the printer. For more information, see Replacing Ink Cartridges. Press to print but cartridges unavailable. Install proper cartridges to print One or more of the ink cartridges is inserted in the ...

User Guide
Page 124
...printer continues to support.dell.com. information, go to print the remaining pages. scroll to Press the up or down Arrow button to scroll to Print. Replace Cartridge to Dialing and Sending, and then press the Select button . 4. For more information, see Setting Up the Printer...and then press the Select button . 3. Press the down Arrow button to print process black Cartridge Missing Color Cartridge missing. There is unavailable due to print grayscale Insert a color cartridge in Memory. Press to a Contact Customer Support. For more information, see...
...printer continues to support.dell.com. information, go to print the remaining pages. scroll to Press the up or down Arrow button to scroll to Print. Replace Cartridge to Dialing and Sending, and then press the Select button . 4. For more information, see Setting Up the Printer...and then press the Select button . 3. Press the down Arrow button to print process black Cartridge Missing Color Cartridge missing. There is unavailable due to print grayscale Insert a color cartridge in Memory. Press to a Contact Customer Support. For more information, see...
User Guide
Page 125
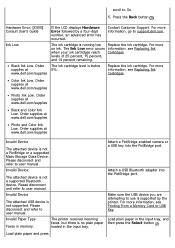
Order supplies at www.dell.com/supplies Black and Color Ink Low. The ink cartridge is not supported. levels of 25 percent, 15 percent, and 10 percent remaining. Order supplies at www.dell.com/supplies If the LCD displays Hardware Error followed by the printer. Invalid Paper Type Faxes ...PictBridge-enabled camera or a USB key into the PictBridge port. Load plain paper and press Hardware Error: [XXXX]. For more information, see Printing From a Memory Card or USB Key. The Ink Low error occurs information, see Replacing Ink Cartridges. For more information, go to use ...
Order supplies at www.dell.com/supplies Black and Color Ink Low. The ink cartridge is not supported. levels of 25 percent, 15 percent, and 10 percent remaining. Order supplies at www.dell.com/supplies If the LCD displays Hardware Error followed by the printer. Invalid Paper Type Faxes ...PictBridge-enabled camera or a USB key into the PictBridge port. Load plain paper and press Hardware Error: [XXXX]. For more information, see Printing From a Memory Card or USB Key. The Ink Low error occurs information, see Replacing Ink Cartridges. For more information, go to use ...
User Guide
Page 147
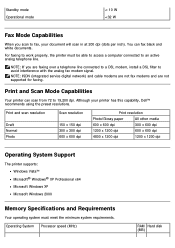
Standby mode Operational mode < 10 W
Standby mode Operational mode < 10 W
User Guide
Page 150
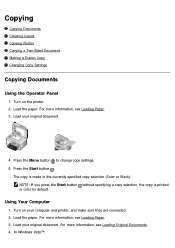
... make sure they are connected. 2. Turn on the printer. 2. Load the paper. In Windows Vista™: Load the paper. Press the Menu button to change copy settings. 5. Load your original document. Copying Copying ... document. 4. NOTE: If you press the Start button without specifying a copy selection, the copy is made in color by default. For more information, see Loading Original Documents. 4. Press the Start button . Using Your Computer 1. The copy is printed in the currently specified copy selection (Color or Black). For more information, see Loading Paper. 3.
... make sure they are connected. 2. Turn on the printer. 2. Load the paper. In Windows Vista™: Load the paper. Press the Menu button to change copy settings. 5. Load your original document. Copying Copying ... document. 4. NOTE: If you press the Start button without specifying a copy selection, the copy is made in color by default. For more information, see Loading Original Documents. 4. Press the Start button . Using Your Computer 1. The copy is printed in the currently specified copy selection (Color or Black). For more information, see Loading Paper. 3.


