Owner's Manual
Page 5
... Type Sensor 17 Loading Paper 18 Print Media Guidelines for the Paper Support 19 Placing Your Document on the Scanner Glass 21 2 Using Your Printer Printing 24 Printing a Document 24 Printing Photos 24 Printing Borderless Photos 25 Printing Other Projects 26 Copying 26 Copying Documents Using the Operator Panel 26 Copying Documents Using Your...
... Type Sensor 17 Loading Paper 18 Print Media Guidelines for the Paper Support 19 Placing Your Document on the Scanner Glass 21 2 Using Your Printer Printing 24 Printing a Document 24 Printing Photos 24 Printing Borderless Photos 25 Printing Other Projects 26 Copying 26 Copying Documents Using the Operator Panel 26 Copying Documents Using Your...
Owner's Manual
Page 13
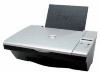
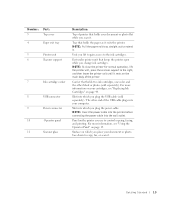
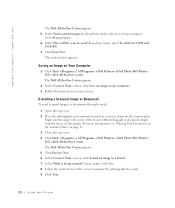
..., one color and the other end of the USB cable plugs into the wall outlet. Slot into which you place your document or photo flat while you plug the USB cable (sold separately). For more information, see "Replacing Ink Cartridges" on your computer. Number: 3 Part: Top cover 4 Paper exit tray 5 Printer unit 6 Scanner support...
..., one color and the other end of the USB cable plugs into the wall outlet. Slot into which you place your document or photo flat while you plug the USB cable (sold separately). For more information, see "Replacing Ink Cartridges" on your computer. Number: 3 Part: Top cover 4 Paper exit tray 5 Printer unit 6 Scanner support...

Owner's Manual
Page 21
... a single transparency into the paper support without removing plain paper. • You select Normal or Photo print quality. • The transparencies are loaded vertically against the left edge of the paper support. Placing Your Document on the Scanner Glass 1 Open the top cover. 2 Place the item you want to : 20 transparencies Make... of the transparencies faces up. • The paper guide rests against the right side of the transparencies. Load up to copy face down on the scanner glass in the lower right corner. Getting Started 21
... a single transparency into the paper support without removing plain paper. • You select Normal or Photo print quality. • The transparencies are loaded vertically against the left edge of the paper support. Placing Your Document on the Scanner Glass 1 Open the top cover. 2 Place the item you want to : 20 transparencies Make... of the transparencies faces up. • The paper guide rests against the right side of the transparencies. Load up to copy face down on the scanner glass in the lower right corner. Getting Started 21

Owner's Manual
Page 26
You may want to print a photo, print on an envelope, print a banner, make a poster, create a booklet, or print a greeting card. 1 With your document open, click File→ Print. 2 To customize print ... operating system). Printing Other Projects The I Want To menu. 3 Select one of the operator panel buttons, see "Operator Panel Menus" on the scanner glass. Copying Documents Using the Operator Panel 1 Turn on the program or operating system). www.dell.com/supplies | support.dell.com 7 Click OK or Print (depending on your printer. 2 Load the paper.
You may want to print a photo, print on an envelope, print a banner, make a poster, create a booklet, or print a greeting card. 1 With your document open, click File→ Print. 2 To customize print ... operating system). Printing Other Projects The I Want To menu. 3 Select one of the operator panel buttons, see "Operator Panel Menus" on the scanner glass. Copying Documents Using the Operator Panel 1 Turn on the program or operating system). www.dell.com/supplies | support.dell.com 7 Click OK or Print (depending on your printer. 2 Load the paper.
Owner's Manual
Page 27
... "Placing Your Document on the Scanner Glass" on page 21. 4 Click Start→ Programs or All Programs → Dell Printers→ Dell Photo AIO Printer 922→ Dell All-In-One Center. For more information, see "Placing Your Document on the Scanner Glass" on your document. Copying...cover. 6 Click Start→ Programs or All Programs → Dell Printers→ Dell Photo AIO Printer 922→ Dell All-In-One Center. For more information, see "Loading Paper" on the scanner glass. The Dell All-In-One Center appears. Make sure the upper left corner of the front ...
... "Placing Your Document on the Scanner Glass" on page 21. 4 Click Start→ Programs or All Programs → Dell Printers→ Dell Photo AIO Printer 922→ Dell All-In-One Center. For more information, see "Placing Your Document on the Scanner Glass" on your document. Copying...cover. 6 Click Start→ Programs or All Programs → Dell Printers→ Dell Photo AIO Printer 922→ Dell All-In-One Center. For more information, see "Loading Paper" on the scanner glass. The Dell All-In-One Center appears. Make sure the upper left corner of the front ...
Owner's Manual
Page 30
... customizing your image, click Scan Now. Scanning Photos 1 Turn on the operator panel. For more information, see "Placing Your Document on the Scanner Glass" on page 21. 3 Press Scan on the printer. NOTE: If the program you want to use . When your scan. The Dell All-In-One Center appears. 4 In the Send scanned image...
... customizing your image, click Scan Now. Scanning Photos 1 Turn on the operator panel. For more information, see "Placing Your Document on the Scanner Glass" on page 21. 3 Press Scan on the printer. NOTE: If the program you want to use . When your scan. The Dell All-In-One Center appears. 4 In the Send scanned image...

Owner's Manual
Page 31
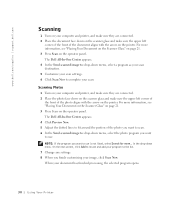
.... 10 Place the next sheet on page 21. 2 Click Start→ Programs or All Programs→ Dell Printers→ Dell Photo AIO Printer 922→ Dell All-In-One Center. Scanning Multiple Pages or Images 1 Place the first sheet on the scanner glass and make sure the upper left corner of the front of the sheet aligns with the...
.... 10 Place the next sheet on page 21. 2 Click Start→ Programs or All Programs→ Dell Printers→ Dell Photo AIO Printer 922→ Dell All-In-One Center. Scanning Multiple Pages or Images 1 Place the first sheet on the scanner glass and make sure the upper left corner of the front of the sheet aligns with the...
Owner's Manual
Page 32
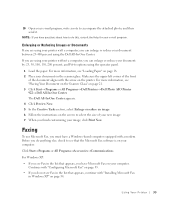
... the instructions on page 21. 3 Close the top cover. 4 Click Start→ Programs or All Programs→ Dell Printers→ Dell Photo AIO Printer 922→ Dell All-In-One Center. For more information, see "Placing Your Document on the Scanner Glass" on your screen. drop-down menu, select a word processing or text-editing program. 6 In the How will...
... the instructions on page 21. 3 Close the top cover. 4 Click Start→ Programs or All Programs→ Dell Printers→ Dell Photo AIO Printer 922→ Dell All-In-One Center. For more information, see "Placing Your Document on the Scanner Glass" on your screen. drop-down menu, select a word processing or text-editing program. 6 In the How will...
Owner's Manual
Page 33
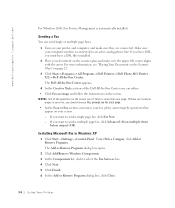
...For more information, see Fax in Windows XP" on page 21. 3 Click Start→ Programs or All Programs→ Dell Printers→ Dell Photo AIO Printer 922→ Dell All-In-One Center. The Dell All-In-One Center appears. 4 Click Preview Now. 5 In the Creative Tasks section, select Enlarge or reduce an image. 6 Follow ... and Fit-to do anything else, check to see that appears, you see "Placing Your Document on the Scanner Glass" on page 34. 10 Open your document on the scanner glass. Continue with "Configuring Microsoft Fax" on page 35. • If you do not see Fax in...
...For more information, see Fax in Windows XP" on page 21. 3 Click Start→ Programs or All Programs→ Dell Printers→ Dell Photo AIO Printer 922→ Dell All-In-One Center. The Dell All-In-One Center appears. 4 Click Preview Now. 5 In the Creative Tasks section, select Enlarge or reduce an image. 6 Follow ... and Fit-to do anything else, check to see that appears, you see "Placing Your Document on the Scanner Glass" on page 34. 10 Open your document on the scanner glass. Continue with "Configuring Microsoft Fax" on page 35. • If you do not see Fax in...
Owner's Manual
Page 34
...if there is more information, see "Placing Your Document on the Scanner Glass" on the screen. For more than one page. The Dell All-In-One Center appears. 4 In the Creative Tasks section of the questions on the scanner glass and make sure they are connected. Under Pick a Category...• Click Fax an image and follow the instructions on page 21. 3 Click Start→ Programs or All Programs→ Dell Printers→ Dell Photo AIO Printer 922→ Dell All-In-One Center. If there are multiple pages in Windows XP 1 Click Start →Settings →Control Panel. If you want to ...
...if there is more information, see "Placing Your Document on the Scanner Glass" on the screen. For more than one page. The Dell All-In-One Center appears. 4 In the Creative Tasks section of the questions on the scanner glass and make sure they are connected. Under Pick a Category...• Click Fax an image and follow the instructions on page 21. 3 Click Start→ Programs or All Programs→ Dell Printers→ Dell Photo AIO Printer 922→ Dell All-In-One Center. If there are multiple pages in Windows XP 1 Click Start →Settings →Control Panel. If you want to ...

Owner's Manual
Page 44
...printer. 2 Lift the printer unit and position the scanner support between the tabs to keep it open. Dell ink cartridges are available only through Dell. The ink cartridge carrier moves and stops at www.dell.com/supplies or by phone, see "Ordering Ink Cartridges and Supplies" on page 9. www.dell.com/supplies | support.dell...CAUTION: SAFETY INSTRUCTIONS" on page 2. To order by phone. Dell recommends Dell ink cartridges for problems caused by using accessories, parts, or components not supplied by Dell. 1 Turn on your printer. You can order more ink online at the loading position ...
...printer. 2 Lift the printer unit and position the scanner support between the tabs to keep it open. Dell ink cartridges are available only through Dell. The ink cartridge carrier moves and stops at www.dell.com/supplies or by phone, see "Ordering Ink Cartridges and Supplies" on page 9. www.dell.com/supplies | support.dell...CAUTION: SAFETY INSTRUCTIONS" on page 2. To order by phone. Dell recommends Dell ink cartridges for problems caused by using accessories, parts, or components not supplied by Dell. 1 Turn on your printer. You can order more ink online at the loading position ...
Owner's Manual
Page 47
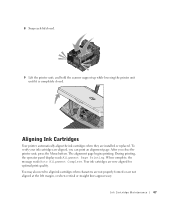
... page. You may also need to align ink cartridges when characters are not properly formed or are installed or replaced. Aligning Ink Cartridges Your printer automatically aligns the ink cartridges when they are not aligned at the left margin, or when vertical or straight lines appear wavy. During printing,... the operator panel display reads Alignment Page Printing. Ink Cartridge Maintenance 47 8 Snap each lid closed. 9 Lift the printer unit, and hold the scanner support up while lowering the printer unit until it is completely closed.
... page. You may also need to align ink cartridges when characters are not properly formed or are installed or replaced. Aligning Ink Cartridges Your printer automatically aligns the ink cartridges when they are not aligned at the left margin, or when vertical or straight lines appear wavy. During printing,... the operator panel display reads Alignment Page Printing. Ink Cartridge Maintenance 47 8 Snap each lid closed. 9 Lift the printer unit, and hold the scanner support up while lowering the printer unit until it is completely closed.

Owner's Manual
Page 56
www.dell.com/supplies | support.dell.com CHECK FOR A PAPER JAM Using your printer and your computer • Follow the instructions on the printer, and print the document again. 56 Troubleshooting Using your printer only If the paper jam is not visible: 1 Turn off your printer. 2 Firmly grasp the paper and ...gently pull it open. 3 Gently pull the paper from the printer. 3 Turn on your printer. 2 Lift the printer unit and position the scanner support between the tabs to keep it from the printer. 4 Close the printer unit, turn on the screen for clearing the paper jam. If the...
www.dell.com/supplies | support.dell.com CHECK FOR A PAPER JAM Using your printer and your computer • Follow the instructions on the printer, and print the document again. 56 Troubleshooting Using your printer only If the paper jam is not visible: 1 Turn off your printer. 2 Firmly grasp the paper and ...gently pull it open. 3 Gently pull the paper from the printer. 3 Turn on your printer. 2 Lift the printer unit and position the scanner support between the tabs to keep it from the printer. 4 Close the printer unit, turn on the screen for clearing the paper jam. If the...


