
Owner's Manual
Page 5
... Operator Panel 15 Operator Panel Menus 16 Understanding the Automatic Paper Type Sensor 17 Loading Paper 18 Print Media Guidelines for the Paper Support 19 Placing Your Document on the Scanner Glass 21 2 Using Your Printer Printing 24 Printing a Document 24 Printing Photos 24 Printing Borderless Photos 25 Printing Other Projects 26 Copying 26 Copying Documents...
... Operator Panel 15 Operator Panel Menus 16 Understanding the Automatic Paper Type Sensor 17 Loading Paper 18 Print Media Guidelines for the Paper Support 19 Placing Your Document on the Scanner Glass 21 2 Using Your Printer Printing 24 Printing a Document 24 Printing Photos 24 Printing Borderless Photos 25 Printing Other Projects 26 Copying 26 Copying Documents...

Owner's Manual
Page 11
SECTION 1 Getting Started Understanding the Printer Parts Accessing Your User's Guide Setting Up Your Printer Using the Operator Panel Understanding the Automatic Paper Type Sensor Loading Paper 1
SECTION 1 Getting Started Understanding the Printer Parts Accessing Your User's Guide Setting Up Your Printer Using the Operator Panel Understanding the Automatic Paper Type Sensor Loading Paper 1

Owner's Manual
Page 12
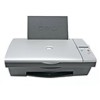
Guide that supports loaded paper. www.dell.com/supplies | support.dell.com Understanding the Printer Parts 2 1 3 4 11 5 10 6 7 Number: 1 2 Part: Paper support Paper guide 8 9 Description: Part that helps the paper feed into the printer properly. 12 Getting Started
Guide that supports loaded paper. www.dell.com/supplies | support.dell.com Understanding the Printer Parts 2 1 3 4 11 5 10 6 7 Number: 1 2 Part: Paper support Paper guide 8 9 Description: Part that helps the paper feed into the printer properly. 12 Getting Started
Owner's Manual
Page 13
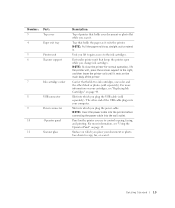
... that holds two ink cartridges, one color and the other end of the USB cable plugs into the wall outlet. For more information, see "Replacing Ink Cartridges" on your computer. For more information on page 44. Carrier that keeps the printer open while you change ink cartridges.... The other black or photo (sold separately). Panel on the main body of the printer. NOTE: To close the printer for normal operation, lift the printer unit, press the scanner support to control copying, faxing, and printing. Tray that holds the paper as it rests on the printer you lift to gain ...
... that holds two ink cartridges, one color and the other end of the USB cable plugs into the wall outlet. For more information, see "Replacing Ink Cartridges" on your computer. For more information on page 44. Carrier that keeps the printer open while you change ink cartridges.... The other black or photo (sold separately). Panel on the main body of the printer. NOTE: To close the printer for normal operation, lift the printer unit, press the scanner support to control copying, faxing, and printing. Tray that holds the paper as it rests on the printer you lift to gain ...

Owner's Manual
Page 15
... the display. • Feed newly loaded paper. 3 Color Copy button Make a color copy. 4 Scan button Start the scanning process and open the Dell All-In-One Center (if your printer without a computer, this button does not function. NOTE: If using your printer is on page 16. 2 Menu button ...• Scroll through the available menus. Getting Started 15 The printer is connected to scan, copy, ...
... the display. • Feed newly loaded paper. 3 Color Copy button Make a color copy. 4 Scan button Start the scanning process and open the Dell All-In-One Center (if your printer without a computer, this button does not function. NOTE: If using your printer is on page 16. 2 Menu button ...• Scroll through the available menus. Getting Started 15 The printer is connected to scan, copy, ...

Owner's Manual
Page 17
... • Glossy/photo • Coated If you turn off the automatic paper type sensor, it always remains on your document open , click File→ Print. 2 In the Print dialog box, click Preferences or Properties (depending on your program or operating system). Unless you load one of these paper types, the printer detects the paper type and...
... • Glossy/photo • Coated If you turn off the automatic paper type sensor, it always remains on your document open , click File→ Print. 2 In the Print dialog box, click Preferences or Properties (depending on your program or operating system). Unless you load one of these paper types, the printer detects the paper type and...
Owner's Manual
Page 18
... to the left edge of the paper. NOTE: Do not force paper into the printer. To turn off the automatic paper type sensor for all print jobs: 1 In Windows XP, click Start→ Control Panel→ Printers and Other Hardware→ Printers and Faxes. www.dell.com/supplies | support.dell.com The Printing Preferences screen appears. 3 Click the...
... to the left edge of the paper. NOTE: Do not force paper into the printer. To turn off the automatic paper type sensor for all print jobs: 1 In Windows XP, click Start→ Control Panel→ Printers and Other Hardware→ Printers and Faxes. www.dell.com/supplies | support.dell.com The Printing Preferences screen appears. 3 Click the...

Owner's Manual
Page 19
...: 100 sheets of plain paper • The paper is installed), Normal, or Photo print quality. 20 sheets of banner paper • You remove any paper from the paper support before inserting banner paper. • You place a stack of banner paper on page 55. • You load the leading edge of the banner paper into the printer against the left edge...
...: 100 sheets of plain paper • The paper is installed), Normal, or Photo print quality. 20 sheets of banner paper • You remove any paper from the paper support before inserting banner paper. • You place a stack of banner paper on page 55. • You load the leading edge of the banner paper into the printer against the left edge...

Owner's Manual
Page 20
...dell.com/supplies | support.dell.com Load up to: 10 envelopes Make sure: • The print side of the envelopes faces up. • The envelopes are loaded vertically against the right side of the paper support. • The paper guide rests against the left edge of the cards. • You select Normal or Photo...in the upper left corner. 25 greeting cards, index cards, postcards, or photo cards 25 sheets of photo or glossy paper 1 iron-on the packaging. • The blank side of the transfer faces up . • The paper guide rests against the left edge of the transfer. • You select...
...dell.com/supplies | support.dell.com Load up to: 10 envelopes Make sure: • The print side of the envelopes faces up. • The envelopes are loaded vertically against the right side of the paper support. • The paper guide rests against the left edge of the cards. • You select Normal or Photo...in the upper left corner. 25 greeting cards, index cards, postcards, or photo cards 25 sheets of photo or glossy paper 1 iron-on the packaging. • The blank side of the transfer faces up . • The paper guide rests against the left edge of the transfer. • You select...

Owner's Manual
Page 21
... lower right corner. Getting Started 21 NOTE: You can load a single transparency into the paper support without removing plain paper. • You select Normal or Photo print quality. • The transparencies are loaded vertically against the left edge of the paper support. Placing Your Document on the Scanner Glass 1 Open the top cover. 2 Place...
... lower right corner. Getting Started 21 NOTE: You can load a single transparency into the paper support without removing plain paper. • You select Normal or Photo print quality. • The transparencies are loaded vertically against the left edge of the paper support. Placing Your Document on the Scanner Glass 1 Open the top cover. 2 Place...

Owner's Manual
Page 24
... , click File→ Print. 4 To customize your computer and printer, and make sure they are connected. 2 Load paper with the print (glossy) side facing up . The Print Properties dialog box appears. 5 On the Quality/Copies tab, select Photo and the paper type. 2 4 Us ing Yo ur Pri n te r For... more information, see details about a setting, right-click the setting on the program or operating system). www.dell.com/supplies | support.dell.com Printing Printing a Document 1 Turn on the ...
... , click File→ Print. 4 To customize your computer and printer, and make sure they are connected. 2 Load paper with the print (glossy) side facing up . The Print Properties dialog box appears. 5 On the Quality/Copies tab, select Photo and the paper type. 2 4 Us ing Yo ur Pri n te r For... more information, see details about a setting, right-click the setting on the program or operating system). www.dell.com/supplies | support.dell.com Printing Printing a Document 1 Turn on the ...

Owner's Manual
Page 25
.... The Print Properties dialog box appears. 5 On the Print Layout tab, click Borderless. 6 When finished customizing your prints. Printing Borderless Photos 1 For best results, load photo/glossy paper and make sure the print side is recommended for the prints to dry thoroughly (12 to 24 hours, depending on the ambient conditions). ...r 25 NOTE: Before placing your print settings, click Preferences, Properties, Options, or Setup (depending on the program or operating system). 10 To prevent your photos from sticking together or smudging, remove each photo after it exits the printer.
.... The Print Properties dialog box appears. 5 On the Print Layout tab, click Borderless. 6 When finished customizing your prints. Printing Borderless Photos 1 For best results, load photo/glossy paper and make sure the print side is recommended for the prints to dry thoroughly (12 to 24 hours, depending on the ambient conditions). ...r 25 NOTE: Before placing your print settings, click Preferences, Properties, Options, or Setup (depending on the program or operating system). 10 To prevent your photos from sticking together or smudging, remove each photo after it exits the printer.
Owner's Manual
Page 26
...The I Want To menu. 3 Select one of the operator panel buttons, see "Operator Panel Menus" on page 28. 2 6 Us ing Yo ur Pri n te r You may want to print a photo, print on an envelope, print a banner, make copies, you are using the Dell software on a computer instead of the ...available projects or click See more than one -touch color or black and white copies, press Color Copy or Black Copy on the operator panel to complete your printer. 2 Load the paper.
...The I Want To menu. 3 Select one of the operator panel buttons, see "Operator Panel Menus" on page 28. 2 6 Us ing Yo ur Pri n te r You may want to print a photo, print on an envelope, print a banner, make copies, you are using the Dell software on a computer instead of the ...available projects or click See more than one -touch color or black and white copies, press Color Copy or Black Copy on the operator panel to complete your printer. 2 Load the paper.

Owner's Manual
Page 27
... 21. 5 Close the top cover. 6 Click Start→ Programs or All Programs → Dell Printers→ Dell Photo AIO Printer 922→ Dell All-In-One Center. For more information, see "Loading Paper" on page 18. 3 Open the top cover. 4 Place your document. The Dell All-In-One Center appears. 7 Select a copy quantity (1-99) and color. 8 Click See More Copy Settings...
... 21. 5 Close the top cover. 6 Click Start→ Programs or All Programs → Dell Printers→ Dell Photo AIO Printer 922→ Dell All-In-One Center. For more information, see "Loading Paper" on page 18. 3 Open the top cover. 4 Place your document. The Dell All-In-One Center appears. 7 Select a copy quantity (1-99) and color. 8 Click See More Copy Settings...
Owner's Manual
Page 28
...8594; Dell Printers→ Dell Photo AIO Printer 922→ Dell All-In-One Center. For more information, see "Operator Panel Menus" on the glass. 4 Close the top cover. 5 Select the copy quality. The Dell All-In-One Center ...appears. 2 Select a copy quantity and color. 3 Click See More Copy Settings to print. 7 In the Copy section, select Photo. 8 Select a copy quantity and color. 9 To customize your photo, click See More Copy Settings. 10 When you want to : - Select the blank paper size. - Copying Photos Without a Computer 1 Load photo paper. www.dell...
...8594; Dell Printers→ Dell Photo AIO Printer 922→ Dell All-In-One Center. For more information, see "Operator Panel Menus" on the glass. 4 Close the top cover. 5 Select the copy quality. The Dell All-In-One Center ...appears. 2 Select a copy quantity and color. 3 Click See More Copy Settings to print. 7 In the Copy section, select Photo. 8 Select a copy quantity and color. 9 To customize your photo, click See More Copy Settings. 10 When you want to : - Select the blank paper size. - Copying Photos Without a Computer 1 Load photo paper. www.dell...

Owner's Manual
Page 29
Click this tab: Print Scan Image Enhancements Image Patterns To: • Select the paper size and type. • Select borderless printing options. • Select the print quality. • Select the color depth and scan resolution. • Auto-crop the ...
Click this tab: Print Scan Image Enhancements Image Patterns To: • Select the paper size and type. • Select borderless printing options. • Select the print quality. • Select the color depth and scan resolution. • Auto-crop the ...
Owner's Manual
Page 33
... the Microsoft Fax software is on page 21. 3 Click Start→ Programs or All Programs→ Dell Printers→ Dell Photo AIO Printer 922→ Dell All-In-One Center. For more information, see "Loading Paper" on page 35. • If you must have a Windows-based computer equipped with "Installing Microsoft ...Enlarge or reduce an image. 6 Follow the instructions on the printer. Before you have Microsoft Fax on your printer with the arrow on the screen to do anything else, check to options using the Dell All-In-One Center. NOTE: If you do this, consult the Help for...
... the Microsoft Fax software is on page 21. 3 Click Start→ Programs or All Programs→ Dell Printers→ Dell Photo AIO Printer 922→ Dell All-In-One Center. For more information, see "Loading Paper" on page 35. • If you must have a Windows-based computer equipped with "Installing Microsoft ...Enlarge or reduce an image. 6 Follow the instructions on the printer. Before you have Microsoft Fax on your printer with the arrow on the screen to do anything else, check to options using the Dell All-In-One Center. NOTE: If you do this, consult the Help for...
Owner's Manual
Page 41
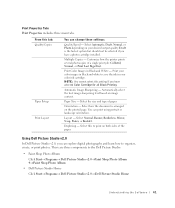
... black and white to organize, create, or print photos. Paper Size - Using Dell Picture Studio v2.0 In Dell Picture Studio v2.0, you have selected Color Cartridge for all Black Printing. Customize how the printer prints several photocopies of paper. NOTE: You cannot select this tab: Quality/Copies Paper Setup Print Layout You can change these settings: Quality...
... black and white to organize, create, or print photos. Paper Size - Using Dell Picture Studio v2.0 In Dell Picture Studio v2.0, you have selected Color Cartridge for all Black Printing. Customize how the printer prints several photocopies of paper. NOTE: You cannot select this tab: Quality/Copies Paper Setup Print Layout You can change these settings: Quality...
Owner's Manual
Page 48
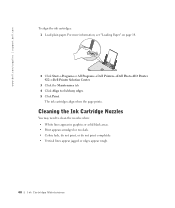
... Nozzles You may need to fix blurry edges. 5 Click Print. For more information, see "Loading Paper" on page 18. 2 Click Start→ Programs or All Programs→ Dell Printers→ Dell Photo AIO Printer 922→ Dell Printer Solution Center. 3 Click the Maintenance tab 4 Click Align to clean the nozzles when: • ...print, or do not print completely. • Vertical lines appear jagged or edges appear rough. 48 Ink Cartridge Maintenance www.dell.com/supplies | support.dell.com To align the ink cartridges: 1 Load plain paper. The ink cartridges align when the page prints.
... Nozzles You may need to fix blurry edges. 5 Click Print. For more information, see "Loading Paper" on page 18. 2 Click Start→ Programs or All Programs→ Dell Printers→ Dell Photo AIO Printer 922→ Dell Printer Solution Center. 3 Click the Maintenance tab 4 Click Align to clean the nozzles when: • ...print, or do not print completely. • Vertical lines appear jagged or edges appear rough. 48 Ink Cartridge Maintenance www.dell.com/supplies | support.dell.com To align the ink cartridges: 1 Load plain paper. The ink cartridges align when the page prints.

Owner's Manual
Page 49
... your document again to fix horizontal streaks. 5 Click Print. Ink Cartridge Maintenance 49 For more information, see "Loading Paper" on page 18. 2 Click Start→ Programs or All Programs→ Dell Printers→ Dell Photo AIO Printer 922→ Dell Printer Solution Center. 3 Click the Maintenance tab. 4 Click Clean to verify the improved print quality. 7 If you are not...
... your document again to fix horizontal streaks. 5 Click Print. Ink Cartridge Maintenance 49 For more information, see "Loading Paper" on page 18. 2 Click Start→ Programs or All Programs→ Dell Printers→ Dell Photo AIO Printer 922→ Dell Printer Solution Center. 3 Click the Maintenance tab. 4 Click Clean to verify the improved print quality. 7 If you are not...


