User's Guide
Page 30
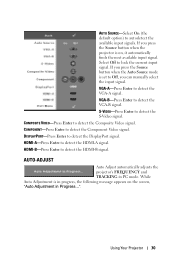
... button when the projector is on the screen, "Auto Adjustment in Progress...". COMPOSITE VIDEO-Press Enter to detect the VGA-A signal. VGA-A-Press Enter to detect the Composite Video signal. HDMI-B-Press Enter to detect the S-Video signal. S-VIDEO-Press Enter to detect the HDMI-B signal. If you can manually select the...
... button when the projector is on the screen, "Auto Adjustment in Progress...". COMPOSITE VIDEO-Press Enter to detect the VGA-A signal. VGA-A-Press Enter to detect the Composite Video signal. HDMI-B-Press Enter to detect the S-Video signal. S-VIDEO-Press Enter to detect the HDMI-B signal. If you can manually select the...
User's Guide
Page 32
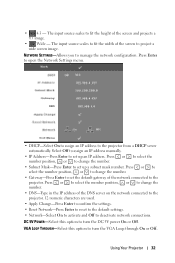
.... • Gateway-Press Enter to set the default gateway of the screen to set up a subnet mask number. Select Off to assign an IP address manually. • IP Address-Press Enter to turn the VGA Loop through On or Off. VGA LOOP THROUGH-Select this option to set up an IP... to confirm the settings. • Reset Network-Press Enter to reset to the default settings. • Network-Select On to activate and Off to the projector. The input source scales to fit the width of the network connected to deactivate network connections. DC 5V POWER-Select this option to change the...
.... • Gateway-Press Enter to set the default gateway of the screen to set up a subnet mask number. Select Off to assign an IP address manually. • IP Address-Press Enter to turn the VGA Loop through On or Off. VGA LOOP THROUGH-Select this option to set up an IP... to confirm the settings. • Reset Network-Press Enter to reset to the default settings. • Network-Select On to activate and Off to the projector. The input source scales to fit the width of the network connected to deactivate network connections. DC 5V POWER-Select this option to change the...
User's Guide
Page 33
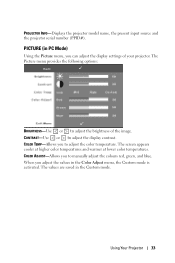
CONTRAST-Use or to manually adjust the colours red, green, and blue. The screen appears cooler at higher color temperatures and warmer at lower color temperatures. COLOR ADJUST-Allows you to adjust the brightness of your projector. The values are saved in the Color Adjust menu, the Custom mode is activated. The Picture... (in PC Mode) Using the Picture menu, you adjust the values in the Custom mode. When you can adjust the display settings of the image. PROJECTOR INFO-Displays the projector model name, the present input source and the...
CONTRAST-Use or to manually adjust the colours red, green, and blue. The screen appears cooler at higher color temperatures and warmer at lower color temperatures. COLOR ADJUST-Allows you to adjust the brightness of your projector. The values are saved in the Color Adjust menu, the Custom mode is activated. The Picture... (in PC Mode) Using the Picture menu, you adjust the values in the Custom mode. When you can adjust the display settings of the image. PROJECTOR INFO-Displays the projector model name, the present input source and the...
User's Guide
Page 34
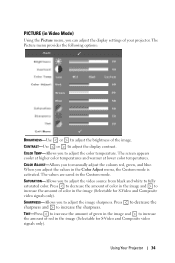
...Press to decrease the sharpness and to adjust the color temperature. COLOR ADJUST-Allows you to adjust the video source from black and white to manually adjust the colours red, green, and blue. TINT-Press to increase the amount of green in the image (Selectable for S-Video and Composite ...video signals only). Using Your Projector 34 SATURATION-Allows you to fully saturated color. Press to decrease the amount of color in the image and to adjust the brightness of color...
...Press to decrease the sharpness and to adjust the color temperature. COLOR ADJUST-Allows you to adjust the video source from black and white to manually adjust the colours red, green, and blue. TINT-Press to increase the amount of green in the image (Selectable for S-Video and Composite ...video signals only). Using Your Projector 34 SATURATION-Allows you to fully saturated color. Press to decrease the amount of color in the image and to adjust the brightness of color...

User's Guide
Page 35
... digitally magnify an image up to 8 times on the projection screen and press to reduce the zoomed image (for White Intensity or Degamma, the projector automatically switches to manually select the signal type: RGB, YCbCr, or YPbPr. HORIZONTAL POSITION-Press image to maximize the brightness. If you adjust the settings for single...
... digitally magnify an image up to 8 times on the projection screen and press to reduce the zoomed image (for White Intensity or Degamma, the projector automatically switches to manually select the signal type: RGB, YCbCr, or YPbPr. HORIZONTAL POSITION-Press image to maximize the brightness. If you adjust the settings for single...
User's Guide
Page 36
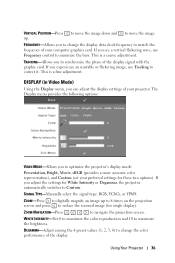
... MODE-Allows you to minimize the bars. If you to change the display data clock frequency to correct it. SIGNAL TYPE-Manually select the signal type: RGB, YCbCr, or YPbPr. ZOOM-Press to digitally magnify an image up . TRACKING-Allows you ...experience an unstable or flickering image, use Frequency control to optimize the projector's display mode: Presentation, Bright, Movie, sRGB (provides a more accurate color representation), and Custom (set your computer graphics card. DEGAMMA-Adjust among ...
... MODE-Allows you to minimize the bars. If you to change the display data clock frequency to correct it. SIGNAL TYPE-Manually select the signal type: RGB, YCbCr, or YPbPr. ZOOM-Press to digitally magnify an image up . TRACKING-Allows you ...experience an unstable or flickering image, use Frequency control to optimize the projector's display mode: Presentation, Bright, Movie, sRGB (provides a more accurate color representation), and Custom (set your computer graphics card. DEGAMMA-Adjust among ...


