RS232 Command Set Document
Page 1
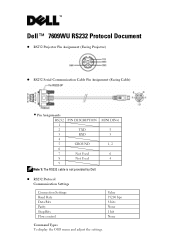
Dell™ 7609WU RS232 Protocol Document z RS232 Projector Pin Assignment (Facing Projector) z RS232 Serial Communication Cable Pin Assignment (Facing Cable) Š Pin Assignments RS232 PIN DESCRIPTION 1 2 TXD 3 RXD 4 5 GROUND 6 7 Not Used 8 Not Used 9 Note 1: The RS232 cable is not provided by Dell. MINI DIN-6 5 3 1, 2 6 4 z RS232 Protocol Communication Settings Connection Settings Baud Rate Data Bits Parity Stop Bits Flow control Value 19200 bps 8 bits None 1 bit None Command Types To display the OSD menu and adjust the settings.
Dell™ 7609WU RS232 Protocol Document z RS232 Projector Pin Assignment (Facing Projector) z RS232 Serial Communication Cable Pin Assignment (Facing Cable) Š Pin Assignments RS232 PIN DESCRIPTION 1 2 TXD 3 RXD 4 5 GROUND 6 7 Not Used 8 Not Used 9 Note 1: The RS232 cable is not provided by Dell. MINI DIN-6 5 3 1, 2 6 4 z RS232 Protocol Communication Settings Connection Settings Baud Rate Data Bits Parity Stop Bits Flow control Value 19200 bps 8 bits None 1 bit None Command Types To display the OSD menu and adjust the settings.
User's Guide
Page 4
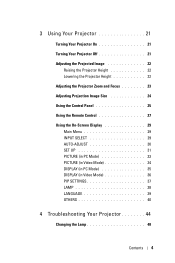
... Turning Your Projector Off 21 Adjusting the Projected Image 22 Raising the Projector Height 22 Lowering the Projector Height 22 Adjusting the Projector Zoom and Focus 23 Adjusting Projection Image Size 24 Using the Control Panel 25 Using the Remote Control 27 Using the On-Screen Display 29 Main Menu 29 INPUT SELECT 29 AUTO-ADJUST 30 SET UP 31 PICTURE (in PC Mode 33 PICTURE (in Video Mode 34 DISPLAY (in PC Mode 35 DISPLAY (in Video Mode 36 PIP SETTINGS 37 LAMP 38 LANGUAGE 39 OTHERS 40 4 Troubleshooting Your Projector 44 Changing...
... Turning Your Projector Off 21 Adjusting the Projected Image 22 Raising the Projector Height 22 Lowering the Projector Height 22 Adjusting the Projector Zoom and Focus 23 Adjusting Projection Image Size 24 Using the Control Panel 25 Using the Remote Control 27 Using the On-Screen Display 29 Main Menu 29 INPUT SELECT 29 AUTO-ADJUST 30 SET UP 31 PICTURE (in PC Mode 33 PICTURE (in Video Mode 34 DISPLAY (in PC Mode 35 DISPLAY (in Video Mode 36 PIP SETTINGS 37 LAMP 38 LANGUAGE 39 OTHERS 40 4 Troubleshooting Your Projector 44 Changing...
User's Guide
Page 21
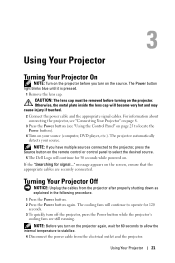
... "Using the Control Panel" on page 25 to locate the Power button). 4 Turn on your source. message appears on the screen, ensure that the appropriate cables are still running. Using Your Projector 21 The Power button light blinks blue until it is pressed. 1 Remove the lens cap. The projector automatically detects your source (computer, DVD player, etc.). NOTE: If you turn on the projector again, wait for 60 seconds to allow the internal temperature to operate...
... "Using the Control Panel" on page 25 to locate the Power button). 4 Turn on your source. message appears on the screen, ensure that the appropriate cables are still running. Using Your Projector 21 The Power button light blinks blue until it is pressed. 1 Remove the lens cap. The projector automatically detects your source (computer, DVD player, etc.). NOTE: If you turn on the projector again, wait for 60 seconds to allow the internal temperature to operate...
User's Guide
Page 25
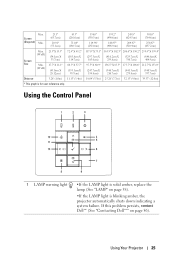
If this problem persists, contact Dell™ (See "Contacting Dell™" on page 38). •If the LAMP light is solid amber, replace the lamp (See "LAMP" on page 56). Screen (Diagonal) Max. Using Your Projector 25 Min. 25.1" (63.7cm) 20.91" (53.1cm) 85.3" (216.6cm) 71.08" (180.5cm) Screen Size Max. (WxH)...) (540.3cm X 337.7cm) 18.04' (5.5m) 25.26' (7.7m) 32.15' (9.8m) 39.37' (12.0m) Using the Control Panel 1 2 3 12 11 10 9 4 5 6 7 8 1 LAMP warning light •If the LAMP light is blinking amber, the projector automatically shuts down indicating a system failure.
If this problem persists, contact Dell™ (See "Contacting Dell™" on page 38). •If the LAMP light is solid amber, replace the lamp (See "LAMP" on page 56). Screen (Diagonal) Max. Using Your Projector 25 Min. 25.1" (63.7cm) 20.91" (53.1cm) 85.3" (216.6cm) 71.08" (180.5cm) Screen Size Max. (WxH)...) (540.3cm X 337.7cm) 18.04' (5.5m) 25.26' (7.7m) 32.15' (9.8m) 39.37' (12.0m) Using the Control Panel 1 2 3 12 11 10 9 4 5 6 7 8 1 LAMP warning light •If the LAMP light is blinking amber, the projector automatically shuts down indicating a system failure.
User's Guide
Page 26
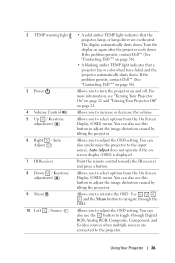
... remote control towards the IR receiver and press a button. The display automatically shuts down . Turn the display on page 56). Using Your Projector 26 Auto Adjust does not operate if the onscreen display (OSD) is displayed. For more information, see "Turning Your Projector On" on page 21 and "Turning Your Projector Off" on page 56). • A blinking amber TEMP light indicates that the projector, lamp, or lamp driver are connected to the projector. Allows you to navigate through Digital...
... remote control towards the IR receiver and press a button. The display automatically shuts down . Turn the display on page 56). Using Your Projector 26 Auto Adjust does not operate if the onscreen display (OSD) is displayed. For more information, see "Turning Your Projector On" on page 21 and "Turning Your Projector Off" on page 56). • A blinking amber TEMP light indicates that the projector, lamp, or lamp driver are connected to the projector. Allows you to navigate through Digital...
User's Guide
Page 28
... CUSTOM mode (for the user to activate the laser light. Lamp error, over heat etc.) Press to the previous page. Press to move to the next page. Press the Video Mode button to toggle between display modes. Aim the remote control at the screen, press and hold for displaying data (PC Graphics) or videos (movies, games, etc.). Press to select OSD items. Press to standby mode when projector is...
... CUSTOM mode (for the user to activate the laser light. Lamp error, over heat etc.) Press to the previous page. Press to move to the next page. Press the Video Mode button to toggle between display modes. Aim the remote control at the screen, press and hold for displaying data (PC Graphics) or videos (movies, games, etc.). Press to select OSD items. Press to standby mode when projector is...

User's Guide
Page 29
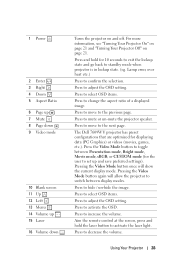
... Enter button on your projector's control panel or remote control. To navigate through the tabs in the Main menu, press the or buttons on the control panel or remote control to adjust the settings. Use or on your projector's input source. Press to synchronize the projector to dark blue. 17 Keystone adjustment 18 Source 19 Auto adjust 20 Keystone adjustment Press to adjust image distortion caused by tilting the projector. (±30 degrees) Using the On-Screen Display The projector has a multi-language On-Screen Display...
... Enter button on your projector's control panel or remote control. To navigate through the tabs in the Main menu, press the or buttons on the control panel or remote control to adjust the settings. Use or on your projector's input source. Press to synchronize the projector to dark blue. 17 Keystone adjustment 18 Source 19 Auto adjust 20 Keystone adjustment Press to adjust image distortion caused by tilting the projector. (±30 degrees) Using the On-Screen Display The projector has a multi-language On-Screen Display...
User's Guide
Page 30
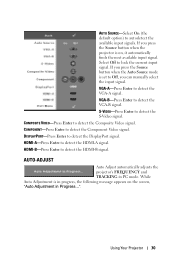
... the HDMI-B signal. HDMI-B-Press Enter to detect the VGA-A signal. If you press the Source button when the Auto Source mode is set to Off, you press the Source button when the projector is in progress, the following message appears on , it automatically finds the next available input signal. VGA-B-Press Enter to detect the Composite Video signal. AUTO-ADJUST Auto Adjust automatically adjusts the projector's FREQUENCY and TRACKING in Progress...". Using Your Projector 30 COMPOSITE VIDEO-Press...
... the HDMI-B signal. HDMI-B-Press Enter to detect the VGA-A signal. If you press the Source button when the Auto Source mode is set to Off, you press the Source button when the projector is in progress, the following message appears on , it automatically finds the next available input signal. VGA-B-Press Enter to detect the Composite Video signal. AUTO-ADJUST Auto Adjust automatically adjusts the projector's FREQUENCY and TRACKING in Progress...". Using Your Projector 30 COMPOSITE VIDEO-Press...
User's Guide
Page 33
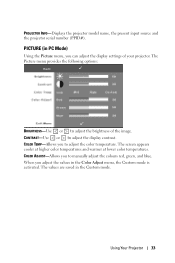
... color temperature. COLOR TEMP-Allows you to adjust the brightness of your projector. When you can adjust the display settings of the image. Using Your Projector 33 The Picture menu provides the following options: BRIGHTNESS-Use or to manually adjust the colours red, green, and blue. COLOR ADJUST-Allows you to adjust the display contrast. The screen appears cooler at higher color temperatures and warmer at lower color temperatures. The values are saved in the Color Adjust menu, the Custom mode is activated. PICTURE...
... color temperature. COLOR TEMP-Allows you to adjust the brightness of your projector. When you can adjust the display settings of the image. Using Your Projector 33 The Picture menu provides the following options: BRIGHTNESS-Use or to manually adjust the colours red, green, and blue. COLOR ADJUST-Allows you to adjust the display contrast. The screen appears cooler at higher color temperatures and warmer at lower color temperatures. The values are saved in the Color Adjust menu, the Custom mode is activated. PICTURE...
User's Guide
Page 34
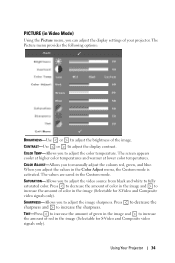
... lower color temperatures. CONTRAST-Use or to increase the sharpness. COLOR TEMP-Allows you to adjust the video source from black and white to increase the amount of your projector. When you can adjust the display settings of red in the Color Adjust menu, the Custom mode is activated. SHARPNESS-Allows you to adjust the image sharpness. COLOR ADJUST-Allows you to manually adjust the colours red, green, and blue. PICTURE (in the image (Selectable for S-Video and Composite video signals only...
... lower color temperatures. CONTRAST-Use or to increase the sharpness. COLOR TEMP-Allows you to adjust the video source from black and white to increase the amount of your projector. When you can adjust the display settings of red in the Color Adjust menu, the Custom mode is activated. SHARPNESS-Allows you to adjust the image sharpness. COLOR ADJUST-Allows you to manually adjust the colours red, green, and blue. PICTURE (in the image (Selectable for S-Video and Composite video signals only...

User's Guide
Page 38
... the time that you want the projector to wait without an input signal. QUICK SHUTDOWN-Select Yes to turn on the screen. LAMP Using the Lamp menu, you can set this to 5, 15, 30, 45, 60, or 120 minutes. The Lamp menu provides the following options: LAMP HOUR-Displays the operating hours since the last lamp timer reset. Select Off to Power Off mode. To turn off with a single press of your projector. LAMP RESET-After you install a new lamp...
... the time that you want the projector to wait without an input signal. QUICK SHUTDOWN-Select Yes to turn on the screen. LAMP Using the Lamp menu, you can set this to 5, 15, 30, 45, 60, or 120 minutes. The Lamp menu provides the following options: LAMP HOUR-Displays the operating hours since the last lamp timer reset. Select Off to Power Off mode. To turn off with a single press of your projector. LAMP RESET-After you install a new lamp...
User's Guide
Page 41
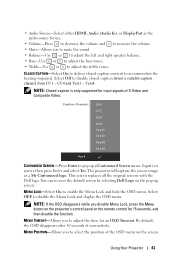
...-Use or to pop up screen. Input in a source then press Enter and select Yes. Select OFF to enable the Menu Lock and hide the OSD menu. Select Off to disable closed caption content to adjust the time for 15 seconds, and then disable the function. The projector will capture the screen image as the audio source for input signals of non-activity. • Audio Source-Select either HDMI, Audio (Audio...
...-Use or to pop up screen. Input in a source then press Enter and select Yes. Select OFF to enable the Menu Lock and hide the OSD menu. Select Off to disable closed caption content to adjust the time for 15 seconds, and then disable the function. The projector will capture the screen image as the audio source for input signals of non-activity. • Audio Source-Select either HDMI, Audio (Audio...

User's Guide
Page 45
... the OSD Display tab. • Use Test Pattern in the Others menu. If problem persists, upgrade your presentation If you are using a Dell™ portable computer, set the signal type to 39.37 ft [12 m]). The screen does not display your computer graphic card driver (video driver) to its latest version and test again with projector. Image has vertical flickering Adjust the frequency in PC Mode only). Troubleshooting Your Projector 45
... the OSD Display tab. • Use Test Pattern in the Others menu. If problem persists, upgrade your presentation If you are using a Dell™ portable computer, set the signal type to 39.37 ft [12 m]). The screen does not display your computer graphic card driver (video driver) to its latest version and test again with projector. Image has vertical flickering Adjust the frequency in PC Mode only). Troubleshooting Your Projector 45
User's Guide
Page 46
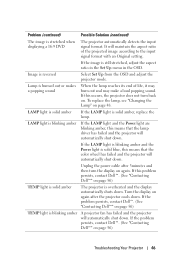
...) Troubleshooting Your Projector 46 If the problem persists, contact Dell™. (See "Contacting Dell™" on again. LAMP light is solid amber If the LAMP light is still stretched, adjust the aspect ratio in the Set Up menu in the OSD. LAMP light is stretched when displaying a 16:9 DVD The projector automatically detects the input signal format. Problem (continued) Possible Solution (continued) The image is blinking amber If the LAMP light and the Power light...
...) Troubleshooting Your Projector 46 If the problem persists, contact Dell™. (See "Contacting Dell™" on again. LAMP light is solid amber If the LAMP light is still stretched, adjust the aspect ratio in the Set Up menu in the OSD. LAMP light is stretched when displaying a 16:9 DVD The projector automatically detects the input signal format. Problem (continued) Possible Solution (continued) The image is blinking amber If the LAMP light and the Power light...

User's Guide
Page 47
Check if the laser beam transmitted from the remote is not operating smoothly or works only within a limited range Possible Solution (continued) Try to unlock the OSD. Troubleshooting Your Projector 47 The battery may be low. Check the Menu Lock "Menu Lock" on the panel or the remote control for 15 seconds to press the Menu button on page 41. If so, replace the batteries with two new AAA batteries. Problem (continued) The OSD does not appear on the screen The remote control is too dim.
Check if the laser beam transmitted from the remote is not operating smoothly or works only within a limited range Possible Solution (continued) Try to unlock the OSD. Troubleshooting Your Projector 47 The battery may be low. Check the Menu Lock "Menu Lock" on the panel or the remote control for 15 seconds to press the Menu button on page 41. If so, replace the batteries with two new AAA batteries. Problem (continued) The OSD does not appear on the screen The remote control is too dim.

User's Guide
Page 48
... full power operation. Projector lamps are very fragile and may shatter if touched. Visit www.dell.com/lamps CAUTION: Before you begin any time. To replace the lamp: 1 Turn off the projector and disconnect the power cable. Troubleshooting Your Projector 48 CAUTION: Do not touch the projector lamp or the lamp glass at least 30 minutes. 3 Loosen the two screws that secure the lamp cover, and remove the cover. Changing the Lamp The following message appears...
... full power operation. Projector lamps are very fragile and may shatter if touched. Visit www.dell.com/lamps CAUTION: Before you begin any time. To replace the lamp: 1 Turn off the projector and disconnect the power cable. Troubleshooting Your Projector 48 CAUTION: Do not touch the projector lamp or the lamp glass at least 30 minutes. 3 Loosen the two screws that secure the lamp cover, and remove the cover. Changing the Lamp The following message appears...

User's Guide
Page 52
... for Dell's projectors refers to 2500 hours in eco mode) NOTE: The actual operating life span of a projector in stressful conditions which may include dusty environments, under non-stressful operating conditions for powering external devices 264~300-watt user-replaceable lamp, up to 2000 hours (up to the typical time under high temperatures and abrupt powering-off may result in a lamp's shortened operating life span or possibly lamp failure. Specifications 52 Usage of a projector lamp...
... for Dell's projectors refers to 2500 hours in eco mode) NOTE: The actual operating life span of a projector in stressful conditions which may include dusty environments, under non-stressful operating conditions for powering external devices 264~300-watt user-replaceable lamp, up to 2000 hours (up to the typical time under high temperatures and abrupt powering-off may result in a lamp's shortened operating life span or possibly lamp failure. Specifications 52 Usage of a projector lamp...

User's Guide
Page 59
... the three colors. VGA- Zoom Lens Ratio- For example, a 1.4:1 zoom lens ratio means that a 10 foot image without zoom would be a 14 foot image with a variable focal length that allows the operator to describe a monitor that uses a 4-pin mini-DIN connector to as Y/C. RGB- S-Video-A video transmission standard that requires separate signals for rear projection. Extended Graphics Array- 1024 x 768 pixels count. Lens with full zoom. Red, Green, Blue- WUXGA- Is...
... the three colors. VGA- Zoom Lens Ratio- For example, a 1.4:1 zoom lens ratio means that a 10 foot image without zoom would be a 14 foot image with a variable focal length that allows the operator to describe a monitor that uses a 4-pin mini-DIN connector to as Y/C. RGB- S-Video-A video transmission standard that requires separate signals for rear projection. Extended Graphics Array- 1024 x 768 pixels count. Lens with full zoom. Red, Green, Blue- WUXGA- Is...

User's Guide
Page 60
... A Adjusting the Projected Image 22 Adjusting the Projector Height 22 lower the projector Elevator button 22 Elevator foot 22 Tilt adjustment wheel 22 Adjusting the Projector Zoom and Focus 23 Focus ring adjustment 23 Horizontal lens shift knob 23 Side door 23 Vertical lens shift knob 23 Zoom ring adjustment 23 Zoom tab 23 C Changing the Lamp 48 Connecting the Projector 12V DC power cable 19 Automatic screen 19 Commercial RS232 control box 20 Composite video cable 15 Connecting a Commercial RS232 Control...
... A Adjusting the Projected Image 22 Adjusting the Projector Height 22 lower the projector Elevator button 22 Elevator foot 22 Tilt adjustment wheel 22 Adjusting the Projector Zoom and Focus 23 Focus ring adjustment 23 Horizontal lens shift knob 23 Side door 23 Vertical lens shift knob 23 Zoom ring adjustment 23 Zoom tab 23 C Changing the Lamp 48 Connecting the Projector 12V DC power cable 19 Automatic screen 19 Commercial RS232 control box 20 Composite video cable 15 Connecting a Commercial RS232 Control...

User's Guide
Page 62
Color Wheel Speed 50 Contrast Ratio 50 Dimensions 51 Displayable Color 50 Environmental 51 I/O Connectors 51 Lamp 52 Light Valve 50 Noise Level 51 Number of Pixels 50 PIP combination sources 54 Power Consumption 50 Power Supply 50 Projection Distance 50 Projection Lens 50 Projection Screen Size 50 Regulatory 51 RS232 Protocol 53 Uniformity 50 Video Compatibility 50 Weight 51 support contacting Dell 56 T telephone numbers 56 Troubleshooting 44 Contact Dell 44 Index 62
Color Wheel Speed 50 Contrast Ratio 50 Dimensions 51 Displayable Color 50 Environmental 51 I/O Connectors 51 Lamp 52 Light Valve 50 Noise Level 51 Number of Pixels 50 PIP combination sources 54 Power Consumption 50 Power Supply 50 Projection Distance 50 Projection Lens 50 Projection Screen Size 50 Regulatory 51 RS232 Protocol 53 Uniformity 50 Video Compatibility 50 Weight 51 support contacting Dell 56 T telephone numbers 56 Troubleshooting 44 Contact Dell 44 Index 62


