
Owner's Manual
Page 1
Dell™ Photo Printer 540 Owner's Manual Look Inside For: • Ordering Photo Print Packs • Getting Started • Using Your Printer • Printing With a Computer • Care and Maintenance • Troubleshooting www.dell.com | support.dell.com
Dell™ Photo Printer 540 Owner's Manual Look Inside For: • Ordering Photo Print Packs • Getting Started • Using Your Printer • Printing With a Computer • Care and Maintenance • Troubleshooting www.dell.com | support.dell.com

Owner's Manual
Page 2
... your local distributor. Please contact your printer, and other supplies online at www.dell.com/supplies or by phone. Your printer has been designed to print using: Item: Dell Photo Print Pack Part number: 0D6605 Ordering Photo Print Packs You can order Dell™ Photo Print Packs, which contain the photo cartridge and photo paper for your local distributor. Please...
... your local distributor. Please contact your printer, and other supplies online at www.dell.com/supplies or by phone. Your printer has been designed to print using: Item: Dell Photo Print Pack Part number: 0D6605 Ordering Photo Print Packs You can order Dell™ Photo Print Packs, which contain the photo cartridge and photo paper for your local distributor. Please...

Owner's Manual
Page 5
... Accessing Your User's Guide 11 Understanding the Printer Parts 11 Setting Up Your Printer 14 Loading the Photo Cartridge 14 Loading the Photo Paper 15 Changing Settings-Press Menu 17 Select Menu Items 17 Print Options Menu 17 Photo Quality Menu 17 Photo Display Menu 18 Photo Management Menu 19 Printer Settings Menu 19 Maintenance Menu 20 2 Using...
... Accessing Your User's Guide 11 Understanding the Printer Parts 11 Setting Up Your Printer 14 Loading the Photo Cartridge 14 Loading the Photo Paper 15 Changing Settings-Press Menu 17 Select Menu Items 17 Print Options Menu 17 Photo Quality Menu 17 Photo Display Menu 18 Photo Management Menu 19 Printer Settings Menu 19 Maintenance Menu 20 2 Using...
Owner's Manual
Page 6
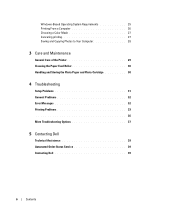
Windows-Based Operating System Requirements 25 Printing From a Computer 26 Choosing a Color Mode 27 Canceling printing 27 Saving and Copying Photos to Your Computer 28 3 Care and Maintenance General Care of the Printer 29 Cleaning the Paper Feed Roller 30 Handling and Storing the Photo Paper and Photo Cartridge 30 4 Troubleshooting Setup Problems 31 General Problems 32 Error Messages 32 Printing Problems 33 36 More Troubleshooting Options 37 5 Contacting Dell Technical Assistance 39 Automated Order-Status Service 39 Contacting Dell 39 6 Contents
Windows-Based Operating System Requirements 25 Printing From a Computer 26 Choosing a Color Mode 27 Canceling printing 27 Saving and Copying Photos to Your Computer 28 3 Care and Maintenance General Care of the Printer 29 Cleaning the Paper Feed Roller 30 Handling and Storing the Photo Paper and Photo Cartridge 30 4 Troubleshooting Setup Problems 31 General Problems 32 Error Messages 32 Printing Problems 33 36 More Troubleshooting Options 37 5 Contacting Dell Technical Assistance 39 Automated Order-Status Service 39 Contacting Dell 39 6 Contents

Owner's Manual
Page 7
... Only) . . . . 69 Dell™ Photo Print Pack Limited Warranty (Latin America Only) . . . . . 69 Regulatory Notices 70 NOM Information (Mexico Only 71 Dell™ Software License Agreement 71 Limited Warranty 72 U.S. Only 63 Limited Warranty Terms for Dell-Branded Hardware Products (U.S. Only). . . . 60 Total Satisfaction Return Policy (U.S. Government Restricted Rights 72 General 72 Printer Specifications 73...
... Only) . . . . 69 Dell™ Photo Print Pack Limited Warranty (Latin America Only) . . . . . 69 Regulatory Notices 70 NOM Information (Mexico Only 71 Dell™ Software License Agreement 71 Limited Warranty 72 U.S. Only 63 Limited Warranty Terms for Dell-Branded Hardware Products (U.S. Only). . . . 60 Total Satisfaction Return Policy (U.S. Government Restricted Rights 72 General 72 Printer Specifications 73...
Owner's Manual
Page 9
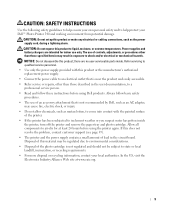
Power supplies and battery chargers are no user-serviceable parts inside the printer, turn off the printer and remove the paper tray and photo cartridge. NOTICE: Do not disassemble this product to liquid, moisture, or extreme temperatures. there are intended for ...be subject to state or local landfill, incineration, or recycling requirements. • For more disposal or recycling information, contact your Dell™ Photo Printer 540 and working environment from potential damage. Always follow basic safety procedures. • The use of controls, adjustments, or procedures other...
Power supplies and battery chargers are no user-serviceable parts inside the printer, turn off the printer and remove the paper tray and photo cartridge. NOTICE: Do not disassemble this product to liquid, moisture, or extreme temperatures. there are intended for ...be subject to state or local landfill, incineration, or recycling requirements. • For more disposal or recycling information, contact your Dell™ Photo Printer 540 and working environment from potential damage. Always follow basic safety procedures. • The use of controls, adjustments, or procedures other...

Owner's Manual
Page 11
...→Dell Printers →Dell Photo Printer 540 → View Dell User's Guide. Understanding the Printer Parts 1 1 11 2 10 9 8 7 6 5 4 3 Lights and Buttons 1 Error indicator light 2 Power button 3 Save to the computer. button is lit when power is pressed. (For display purposes only. Rotates a photo 90 degrees... checking card, then glows steady green. Establishes a connection with your computer that allows you to save photos from your printer on . Turn your memory card, USB storage device, or camera directly to PC 4 Rotate 5 Menu 6 Memory card light 7 Navigation (...
...→Dell Printers →Dell Photo Printer 540 → View Dell User's Guide. Understanding the Printer Parts 1 1 11 2 10 9 8 7 6 5 4 3 Lights and Buttons 1 Error indicator light 2 Power button 3 Save to the computer. button is lit when power is pressed. (For display purposes only. Rotates a photo 90 degrees... checking card, then glows steady green. Establishes a connection with your computer that allows you to save photos from your printer on . Turn your memory card, USB storage device, or camera directly to PC 4 Rotate 5 Menu 6 Memory card light 7 Navigation (...

Owner's Manual
Page 12
...print job or back out of the selected photo(s). 1 5 2 3 6 4 7 Part 1 LCD 2 Power connector 3 USB connector to a computer. Supply power to insert the paper tray 12 Getting Started Memory card slot for CompactFlash (CF). www.dell.com | support.dell.com Lights and Buttons 8 Select 9 Cancel ...(SM) cards. Provides access to the printer. Print black and white copy of the menus. Connect your printer to PC 4 Camera or USB storage device connector 5 Memory card slot 6 Memory card slot 7 Paper tray door Description Display photos, printer status, messages, menu options, or settings....
...print job or back out of the selected photo(s). 1 5 2 3 6 4 7 Part 1 LCD 2 Power connector 3 USB connector to a computer. Supply power to insert the paper tray 12 Getting Started Memory card slot for CompactFlash (CF). www.dell.com | support.dell.com Lights and Buttons 8 Select 9 Cancel ...(SM) cards. Provides access to the printer. Print black and white copy of the menus. Connect your printer to PC 4 Camera or USB storage device connector 5 Memory card slot 6 Memory card slot 7 Paper tray door Description Display photos, printer status, messages, menu options, or settings....

Owner's Manual
Page 13
... printer when you use support.dell.com or contact technical support. Do not block the vents. 3 Express Service Code Located on the bottom of finished prints. 2 Top paper tray cover Finished prints are stacked here. 3 Bottom paper tray cover Keeps dust off photo paper. 4 Photo ...cartridge door Provides access to load photo cartridge. 5 in . (12.7 cm) clearance is used to the printer. Getting Started 13 Do not block the slot. 5 in . (12.7 cm) 2 1 ...
... printer when you use support.dell.com or contact technical support. Do not block the vents. 3 Express Service Code Located on the bottom of finished prints. 2 Top paper tray cover Finished prints are stacked here. 3 Bottom paper tray cover Keeps dust off photo paper. 4 Photo ...cartridge door Provides access to load photo cartridge. 5 in . (12.7 cm) clearance is used to the printer. Getting Started 13 Do not block the slot. 5 in . (12.7 cm) 2 1 ...

Owner's Manual
Page 14
...slack in the print ribbon, remove it by pushing in your printer. For setup troubleshooting, see page 31. Do not expose your printer with a computer). Loading the Photo Cartridge NOTE: Use only the photo cartridge from a Dell Photo Print Pack. Do not use any other type of prints you ...the number of photo cartridge in on the spool, then rotating the spool clockwise a maximum of one half turn. NOTE: Be careful not to make. 2 Open the photo cartridge door. 14 Getting Started www.dell.com | support.dell.com Setting Up Your Printer NOTE: The Dell Photo Printer 540 supports Microsoft®...
...slack in the print ribbon, remove it by pushing in your printer. For setup troubleshooting, see page 31. Do not expose your printer with a computer). Loading the Photo Cartridge NOTE: Use only the photo cartridge from a Dell Photo Print Pack. Do not use any other type of prints you ...the number of photo cartridge in on the spool, then rotating the spool clockwise a maximum of one half turn. NOTE: Be careful not to make. 2 Open the photo cartridge door. 14 Getting Started www.dell.com | support.dell.com Setting Up Your Printer NOTE: The Dell Photo Printer 540 supports Microsoft®...

Owner's Manual
Page 15
... paper tray cover by grasping the sides as indicated by the arrows. Do not remove perforated tabs from a Dell Photo Print Pack. When there are displayed on the green lever and slide the photo cartridge out. Do not insert your fingers under the cover to remove the...error light blinks Loading the Photo Paper NOTE: Use only the perforated photo paper from the photo paper until it clicks into place. 4 Close the photo cartridge door. 5 To remove the photo cartridge, push up , with the arrow pointing toward the printer. Push the photo cartridge until a photo is printed. 1 If ...
... paper tray cover by grasping the sides as indicated by the arrows. Do not remove perforated tabs from a Dell Photo Print Pack. When there are displayed on the green lever and slide the photo cartridge out. Do not insert your fingers under the cover to remove the...error light blinks Loading the Photo Paper NOTE: Use only the perforated photo paper from the photo paper until it clicks into place. 4 Close the photo cartridge door. 5 To remove the photo cartridge, push up , with the arrow pointing toward the printer. Push the photo cartridge until a photo is printed. 1 If ...

Owner's Manual
Page 16
... into the paper tray, with the glossy side up and the Dell logo side down. www.dell.com | support.dell.com 4 Fan the photo paper to keep the sheets from sticking together. 5 Load the photo paper into the printer. 16 Getting Started Do not load photo paper that is missing perforated tabs. To avoid fingerprints, hold the...
... into the paper tray, with the glossy side up and the Dell logo side down. www.dell.com | support.dell.com 4 Fan the photo paper to keep the sheets from sticking together. 5 Load the photo paper into the printer. 16 Getting Started Do not load photo paper that is missing perforated tabs. To avoid fingerprints, hold the...
Owner's Manual
Page 17
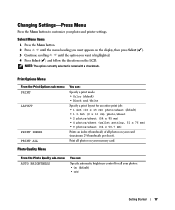
...control for an entire print job: • 1 4x6 (10 x 15 cm) photo/sheet (default) • 1 3.5x5 (9 x 13 cm) photo/sheet • 2 photos/sheet (54 x 85 mm) • 4 photos/sheet (wallet setting, 51 x 76 mm) • 9 photos/sheet (34 x 50.7 mm) Prints an index (thumbnail) of all your card ...BRIGHTNESS You can : Specify a print mode: • Color (default) • Black and White Specify a print layout for all photos on your photo and printer settings. Changing Settings-Press Menu Press the Menu button to customize your memory card. Select Menu Items 1 Press the Menu button. 2...
...control for an entire print job: • 1 4x6 (10 x 15 cm) photo/sheet (default) • 1 3.5x5 (9 x 13 cm) photo/sheet • 2 photos/sheet (54 x 85 mm) • 4 photos/sheet (wallet setting, 51 x 76 mm) • 9 photos/sheet (34 x 50.7 mm) Prints an index (thumbnail) of all your card ...BRIGHTNESS You can : Specify a print mode: • Color (default) • Black and White Specify a print layout for all photos on your photo and printer settings. Changing Settings-Press Menu Press the Menu button to customize your memory card. Select Menu Items 1 Press the Menu button. 2...

Owner's Manual
Page 19
Navigate as pressing the Save to order Dell photo print packs. this provides a number to PC button. Same functionality as you to save photos from your memory card, USB storage device, or camera directly to the computer. Select your country; Printer Settings Menu From the Printer Settings sub-menu: RESTORE DEFAULTS LANGUAGE COUNTRY POWER SAVE You can...
Navigate as pressing the Save to order Dell photo print packs. this provides a number to PC button. Same functionality as you to save photos from your memory card, USB storage device, or camera directly to the computer. Select your country; Printer Settings Menu From the Printer Settings sub-menu: RESTORE DEFAULTS LANGUAGE COUNTRY POWER SAVE You can...

Owner's Manual
Page 20
Display directions for changing the photo cartridge. www.dell.com | support.dell.com Maintenance Menu From the sub-menu: PRINTS REMAINING You can: Check if the photo cartridge is low; Help diagnose print quality problems and provide printer identification information. • Test Print • Service Tag-display your printer's service tag identification information. 20 Getting Started if...
Display directions for changing the photo cartridge. www.dell.com | support.dell.com Maintenance Menu From the sub-menu: PRINTS REMAINING You can: Check if the photo cartridge is low; Help diagnose print quality problems and provide printer identification information. • Test Print • Service Tag-display your printer's service tag identification information. 20 Getting Started if...

Owner's Manual
Page 21
...), SD (Secure Digital), MS (Memory Stick), MMC (MultiMedia Card), or SM (Smart Media), or a USB memory key. The fourth pass applies the Dell Clear Life Coating that protects and preserves the photo. For help , see your Setting Up Your Printer poster. • Printing starts when you print, make sure the power is printed. •...
...), SD (Secure Digital), MS (Memory Stick), MMC (MultiMedia Card), or SM (Smart Media), or a USB memory key. The fourth pass applies the Dell Clear Life Coating that protects and preserves the photo. For help , see your Setting Up Your Printer poster. • Printing starts when you print, make sure the power is printed. •...
Owner's Manual
Page 22
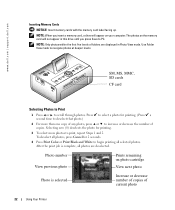
www.dell.com | support.dell.com Inserting Memory Cards NOTICE: Insert memory cards with the memory card label facing up. Press to select a photo for printing. (Press a second time to deselect that photo.) 2 For more photos to navigate photos at deeper levels. NOTE: When you insert a memory card, a ... The photos on the memory card will appear on photo cartridge View next photo Increase or decrease number of copies of current photo 22 Using Your Printer SM, MS, MMC, SD cards CF card Selecting Photos to Print 1 Press or to begin printing all photos are displayed in Photo View mode...
www.dell.com | support.dell.com Inserting Memory Cards NOTICE: Insert memory cards with the memory card label facing up. Press to select a photo for printing. (Press a second time to deselect that photo.) 2 For more photos to navigate photos at deeper levels. NOTE: When you insert a memory card, a ... The photos on the memory card will appear on photo cartridge View next photo Increase or decrease number of copies of current photo 22 Using Your Printer SM, MS, MMC, SD cards CF card Selecting Photos to Print 1 Press or to begin printing all photos are displayed in Photo View mode...

Owner's Manual
Page 27
...: 1 From the Start menu, select Settings, then select Printers. 2 Right-click the Photo Printer icon, then select Printing Preferences. 3 Click the Advanced button. 4 Under Document Options, select Printer Features, then select Color Mode. 5 Select a color mode option, then click OK. 6 Click OK when complete. The Dell Photo Printer 540 features three color mode options: Natural-high-quality, natural...
...: 1 From the Start menu, select Settings, then select Printers. 2 Right-click the Photo Printer icon, then select Printing Preferences. 3 Click the Advanced button. 4 Under Document Options, select Printer Features, then select Color Mode. 5 Select a color mode option, then click OK. 6 Click OK when complete. The Dell Photo Printer 540 features three color mode options: Natural-high-quality, natural...
Owner's Manual
Page 31
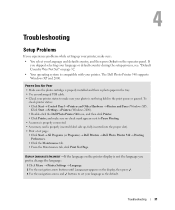
... XP). Troubleshooting 31 Click Start → Settings → Printers (Windows 2000). • Double-click the Dell Photo Printer 540 icon, and then click Printer. • Click Printer, and make sure: • You select your photo is not being held in the tray. • Use an undamaged USB cable. • Check your printer status to make sure your language and default...
... XP). Troubleshooting 31 Click Start → Settings → Printers (Windows 2000). • Double-click the Dell Photo Printer 540 icon, and then click Printer. • Click Printer, and make sure: • You select your photo is not being held in the tray. • Use an undamaged USB cable. • Check your printer status to make sure your language and default...

Owner's Manual
Page 32
... A COMPUTER, MAKE SURE: • The USB cable is plugged into your printer. Turn the power on the LCD to your printer and an electrical outlet. IF YOUR PRINTER IS NOT ATTACHED TO A COMPUTER, MAKE SURE: • You read and follow any messages on . • The Dell Photo Printer 540 is the selected printer. (It should not be set your...
... A COMPUTER, MAKE SURE: • The USB cable is plugged into your printer. Turn the power on the LCD to your printer and an electrical outlet. IF YOUR PRINTER IS NOT ATTACHED TO A COMPUTER, MAKE SURE: • You read and follow any messages on . • The Dell Photo Printer 540 is the selected printer. (It should not be set your...


