
Owner's Manual
Page 2
.... Please contact your local distributor. Please contact your local distributor. Your printer has been designed to print using: Item: Dell Photo Print Pack Part number: 0D6605 Ordering Photo Print Packs You can order Dell™ Photo Print Packs, which contain the photo cartridge and photo paper for your printer, and other supplies online at www.dell.com/supplies or by phone.
.... Please contact your local distributor. Please contact your local distributor. Your printer has been designed to print using: Item: Dell Photo Print Pack Part number: 0D6605 Ordering Photo Print Packs You can order Dell™ Photo Print Packs, which contain the photo cartridge and photo paper for your printer, and other supplies online at www.dell.com/supplies or by phone.

Owner's Manual
Page 5
... Started Accessing Your User's Guide 11 Understanding the Printer Parts 11 Setting Up Your Printer 14 Loading the Photo Cartridge 14 Loading the Photo Paper 15 Changing Settings-Press Menu 17 Select Menu Items 17 Print Options Menu 17 Photo Quality Menu 17 Photo Display Menu 18 Photo Management Menu 19 Printer Settings Menu 19 Maintenance Menu 20 2 Using...
... Started Accessing Your User's Guide 11 Understanding the Printer Parts 11 Setting Up Your Printer 14 Loading the Photo Cartridge 14 Loading the Photo Paper 15 Changing Settings-Press Menu 17 Select Menu Items 17 Print Options Menu 17 Photo Quality Menu 17 Photo Display Menu 18 Photo Management Menu 19 Printer Settings Menu 19 Maintenance Menu 20 2 Using...
Owner's Manual
Page 6
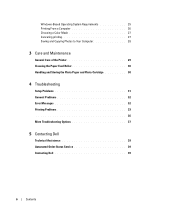
Windows-Based Operating System Requirements 25 Printing From a Computer 26 Choosing a Color Mode 27 Canceling printing 27 Saving and Copying Photos to Your Computer 28 3 Care and Maintenance General Care of the Printer 29 Cleaning the Paper Feed Roller 30 Handling and Storing the Photo Paper and Photo Cartridge 30 4 Troubleshooting Setup Problems 31 General Problems 32 Error Messages 32 Printing Problems 33 36 More Troubleshooting Options 37 5 Contacting Dell Technical Assistance 39 Automated Order-Status Service 39 Contacting Dell 39 6 Contents
Windows-Based Operating System Requirements 25 Printing From a Computer 26 Choosing a Color Mode 27 Canceling printing 27 Saving and Copying Photos to Your Computer 28 3 Care and Maintenance General Care of the Printer 29 Cleaning the Paper Feed Roller 30 Handling and Storing the Photo Paper and Photo Cartridge 30 4 Troubleshooting Setup Problems 31 General Problems 32 Error Messages 32 Printing Problems 33 36 More Troubleshooting Options 37 5 Contacting Dell Technical Assistance 39 Automated Order-Status Service 39 Contacting Dell 39 6 Contents
Owner's Manual
Page 9
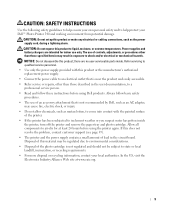
...be subject to state or local landfill, incineration, or recycling requirements. • For more disposal or recycling information, contact your Dell™ Photo Printer 540 and working environment from potential damage. The use only. Refer servicing to qualified service personnel. • Use only the power ...contact with this does not resolve the problem, contact customer support (see page 39). • The printer and the power supply contain a small amount of the photo cartridge is near the product and easily accessible. • Refer service or repairs, other than those specified ...
...be subject to state or local landfill, incineration, or recycling requirements. • For more disposal or recycling information, contact your Dell™ Photo Printer 540 and working environment from potential damage. The use only. Refer servicing to qualified service personnel. • Use only the power ...contact with this does not resolve the problem, contact customer support (see page 39). • The printer and the power supply contain a small amount of the photo cartridge is near the product and easily accessible. • Refer service or repairs, other than those specified ...

Owner's Manual
Page 13
... 13 This is required. 2 Air vents Provide ventilation and cooling to load photo cartridge. 5 in . (12.7 cm) clearance is used to identify your printer when you use support.dell.com or contact technical support. 4 3 2 1 Part Description 1 Paper stop Maintains orderly stack of the printer. Do not block the vents. 3 Express Service Code Located on the...
... 13 This is required. 2 Air vents Provide ventilation and cooling to load photo cartridge. 5 in . (12.7 cm) clearance is used to identify your printer when you use support.dell.com or contact technical support. 4 3 2 1 Part Description 1 Paper stop Maintains orderly stack of the printer. Do not block the vents. 3 Express Service Code Located on the...

Owner's Manual
Page 14
... a computer). Do not expose your Setting Up Your Printer poster to make. 2 Open the photo cartridge door. 14 Getting Started www.dell.com | support.dell.com Setting Up Your Printer NOTE: The Dell Photo Printer 540 supports Microsoft® Windows® 2000 and Windows XP. Loading the Photo Cartridge NOTE: Use only the photo cartridge from a Dell Photo Print Pack. Doing so could reduce the number...
... a computer). Do not expose your Setting Up Your Printer poster to make. 2 Open the photo cartridge door. 14 Getting Started www.dell.com | support.dell.com Setting Up Your Printer NOTE: The Dell Photo Printer 540 supports Microsoft® Windows® 2000 and Windows XP. Loading the Photo Cartridge NOTE: Use only the photo cartridge from a Dell Photo Print Pack. Doing so could reduce the number...

Owner's Manual
Page 15
...tabs from a Dell Photo Print Pack. When there are displayed on the green lever and slide the photo cartridge out. Do not insert your fingers under the cover to remove the photo cartridge without first clearing the paper jam. Arrows Getting Started 15 Push the photo cartridge until a photo is printed.... to open it clicks into place. 4 Close the photo cartridge door. 5 To remove the photo cartridge, push up , with the arrow pointing toward the printer. 3 Slide the photo cartridge in, label side up on the LCD when the photo cartridge is in place if there is a paper jam. Do...
...tabs from a Dell Photo Print Pack. When there are displayed on the green lever and slide the photo cartridge out. Do not insert your fingers under the cover to remove the photo cartridge without first clearing the paper jam. Arrows Getting Started 15 Push the photo cartridge until a photo is printed.... to open it clicks into place. 4 Close the photo cartridge door. 5 To remove the photo cartridge, push up , with the arrow pointing toward the printer. 3 Slide the photo cartridge in, label side up on the LCD when the photo cartridge is in place if there is a paper jam. Do...

Owner's Manual
Page 20
Display directions for changing the photo cartridge. www.dell.com | support.dell.com Maintenance Menu From the sub-menu: PRINTS REMAINING You can: Check if the photo cartridge is low; Help diagnose print quality problems and provide printer identification information. • Test Print • Service Tag-display your printer's service tag identification information. 20 Getting Started if so, directions...
Display directions for changing the photo cartridge. www.dell.com | support.dell.com Maintenance Menu From the sub-menu: PRINTS REMAINING You can: Check if the photo cartridge is low; Help diagnose print quality problems and provide printer identification information. • Test Print • Service Tag-display your printer's service tag identification information. 20 Getting Started if so, directions...

Owner's Manual
Page 21
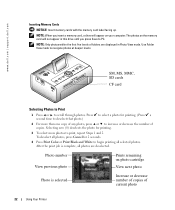
...Memory Card You can damage the printer. The first 3 passes apply layers of yellow, magenta, and cyan color. The fourth pass applies the Dell Clear Life Coating that protects and preserves the photo. Failure to print directly from a memory card, USB storage device, or PictBridgeenabled or ...or SM (Smart Media), or a USB memory key. NOTE: Your printer reads only one memory source at a time. Printing is connected, and the photo cartridge and photo paper are loaded or connected. NOTE: If you press Print. Using Your Printer 21 The photo paper cycles 4 times during printing, then...
...Memory Card You can damage the printer. The first 3 passes apply layers of yellow, magenta, and cyan color. The fourth pass applies the Dell Clear Life Coating that protects and preserves the photo. Failure to print directly from a memory card, USB storage device, or PictBridgeenabled or ...or SM (Smart Media), or a USB memory key. NOTE: Your printer reads only one memory source at a time. Printing is connected, and the photo cartridge and photo paper are loaded or connected. NOTE: If you press Print. Using Your Printer 21 The photo paper cycles 4 times during printing, then...
Owner's Manual
Page 22
...appear on photo cartridge View next photo Increase or decrease number of copies of copies. Use Folder View mode to scroll through photos. Photo number View previous photo Photo is complete, all selected photos. The photos on the memory card will not appear in Photo View mode. www.dell.com | support.dell.com ...photo for printing. 3 To select more than one copy of any photo, press or to PC. After the print job is selected Prints remaining on your computer. NOTE: When you press Save to increase or decrease the number of current photo 22 Using Your Printer...
...appear on photo cartridge View next photo Increase or decrease number of copies of copies. Use Folder View mode to scroll through photos. Photo number View previous photo Photo is complete, all selected photos. The photos on the memory card will not appear in Photo View mode. www.dell.com | support.dell.com ...photo for printing. 3 To select more than one copy of any photo, press or to PC. After the print job is selected Prints remaining on your computer. NOTE: When you press Save to increase or decrease the number of current photo 22 Using Your Printer...

Owner's Manual
Page 30
...tray cover and paper tray door to make sure your prints, handle the photo paper by the edges or by the perforated tabs. Store paper flat. • Keep the photo paper and photo cartridge away from the printer, and leave the paper tray door open. 3 Lightly moisten a lint..., handle the photo cartridge by the spool ends. • To avoid fingerprints on your photos are the best quality, keep out dust and debris. Handling and Storing the Photo Paper and Photo Cartridge • For best quality prints, store the photo paper and photo cartridge in . www.dell.com | support.dell.com Cleaning the...
...tray cover and paper tray door to make sure your prints, handle the photo paper by the edges or by the perforated tabs. Store paper flat. • Keep the photo paper and photo cartridge away from the printer, and leave the paper tray door open. 3 Lightly moisten a lint..., handle the photo cartridge by the spool ends. • To avoid fingerprints on your photos are the best quality, keep out dust and debris. Handling and Storing the Photo Paper and Photo Cartridge • For best quality prints, store the photo paper and photo cartridge in . www.dell.com | support.dell.com Cleaning the...
Owner's Manual
Page 31
.... • Use an undamaged USB cable. • Check your printer status to make sure your language as the default. 4 Troubleshooting Setup Problems If you prefer, change the language: 1 Click Menu → Printer Settings → Language. 2 Use the navigation arrow buttons until Language appears on the operator panel. The Dell Photo Printer 540 supports Windows XP and 2000...
.... • Use an undamaged USB cable. • Check your printer status to make sure your language as the default. 4 Troubleshooting Setup Problems If you prefer, change the language: 1 Click Menu → Printer Settings → Language. 2 Use the navigation arrow buttons until Language appears on the operator panel. The Dell Photo Printer 540 supports Windows XP and 2000...
Owner's Manual
Page 33
...: 1 Remove the paper tray (page 15). 2 Inspect the paper supply: make sure photo paper is not damaged in place if there is still lit, check the photo cartridge: NOTE: The photo cartridge may be empty. PRINTER IS JAMMED NOTE: Use only Dell photo paper from sticking together. 3 Reload the paper tray using no more than 20 sheets. 4 Re...
...: 1 Remove the paper tray (page 15). 2 Inspect the paper supply: make sure photo paper is not damaged in place if there is still lit, check the photo cartridge: NOTE: The photo cartridge may be empty. PRINTER IS JAMMED NOTE: Use only Dell photo paper from sticking together. 3 Reload the paper tray using no more than 20 sheets. 4 Re...
Owner's Manual
Page 35
...USB cable from an application on your camera user's guide for details. • Make sure the printer is not placed in direct sunlight or is not operating in print options. Troubleshooting 35 Review the photo on the memory card (page 21). See your camera user's guide for details. • Adjust cropped photos using Dell Photo... camera to Best (3:2) photo quality, if available. See the Setting Up Your Printer poster. • Remove the paper tray, check that photo paper is properly loaded, and re-install (page 15). • Make sure the photo cartridge is properly installed (page...
...USB cable from an application on your camera user's guide for details. • Make sure the printer is not placed in direct sunlight or is not operating in print options. Troubleshooting 35 Review the photo on the memory card (page 21). See your camera user's guide for details. • Adjust cropped photos using Dell Photo... camera to Best (3:2) photo quality, if available. See the Setting Up Your Printer poster. • Remove the paper tray, check that photo paper is properly loaded, and re-install (page 15). • Make sure the photo cartridge is properly installed (page...

Owner's Manual
Page 36
... Make sure your system. Upgrade your printer. UNABLE TO REMOVE PHOTO CARTRIDGE (ERROR LIGHT GLOWS STEADY.) NOTE: The photo cartridge may be transferring images. Reload photo paper if necessary (page 15), then try again. • Make sure photo paper is a paper error. If you... continue to use your system if necessary. www.dell.com | support.dell.com NOTHING HAPPENS WHEN YOU TRY TO PRINT (FROM COMPUTER) • Check the USB...
... Make sure your system. Upgrade your printer. UNABLE TO REMOVE PHOTO CARTRIDGE (ERROR LIGHT GLOWS STEADY.) NOTE: The photo cartridge may be transferring images. Reload photo paper if necessary (page 15), then try again. • Make sure photo paper is a paper error. If you... continue to use your system if necessary. www.dell.com | support.dell.com NOTHING HAPPENS WHEN YOU TRY TO PRINT (FROM COMPUTER) • Check the USB...


