
Quick Reference Guide
Page 1
Dell 5230/5350 Quick Reference Loading paper and specialty media Loading the 250-sheet or 550-sheet tray 1 Pull the tray out. Do not overload the ... the side of paper was loaded than the type previously loaded in the tray, then change the Paper Type setting for the tray from the printer control panel. Note: For print jobs using an optional Staple Finisher, place the leading edge of the paper toward the back of the tray. •...
Dell 5230/5350 Quick Reference Loading paper and specialty media Loading the 250-sheet or 550-sheet tray 1 Pull the tray out. Do not overload the ... the side of paper was loaded than the type previously loaded in the tray, then change the Paper Type setting for the tray from the printer control panel. Note: For print jobs using an optional Staple Finisher, place the leading edge of the paper toward the back of the tray. •...

Quick Reference Guide
Page 2
...the toner cartridge. 7 Close the front cover. 8 Close the multipurpose feeder door. 9 Press . 202 and 203 paper jams If the paper is exiting the printer, then pull the paper out, and then press . Use the cartridge handle whenever you are holding the cartridge. CAUTION-HOT SURFACE: The inside of the... 1 Pull out the tray indicated on the display. 2 Warning-Potential Damage: The jammed paper may be hot. Note: If the paper is not exiting the printer: 1 Pull down the top rear door. 2 Remove any jammed paper, and then insert the tray. 3 Press . 4 If the jam message persists for extended ...
...the toner cartridge. 7 Close the front cover. 8 Close the multipurpose feeder door. 9 Press . 202 and 203 paper jams If the paper is exiting the printer, then pull the paper out, and then press . Use the cartridge handle whenever you are holding the cartridge. CAUTION-HOT SURFACE: The inside of the... 1 Pull out the tray indicated on the display. 2 Warning-Potential Damage: The jammed paper may be hot. Note: If the paper is not exiting the printer: 1 Pull down the top rear door. 2 Remove any jammed paper, and then insert the tray. 3 Press . 4 If the jam message persists for extended ...
User Guide
Page 1
... proprietary interest in any manner whatsoever without notice. Microsoft and Windows are trademarks of this material in trademarks and trade names other than its own. Dell Inc. Dell 5230n/dn and 5350dn Laser Printers User's Guide November 2009 www.dell.com | support.dell.com Trademarks Information in this document is strictly forbidden. Reproduction of...
... proprietary interest in any manner whatsoever without notice. Microsoft and Windows are trademarks of this material in trademarks and trade names other than its own. Dell Inc. Dell 5230n/dn and 5350dn Laser Printers User's Guide November 2009 www.dell.com | support.dell.com Trademarks Information in this document is strictly forbidden. Reproduction of...

User Guide
Page 2
...Installing a memory card ...21 Installing a flash memory or firmware card...22 Installing an Internal Solutions Port...25 Installing a printer hard disk ...31 Installing hardware options...35 Order of installation ...35 Installing paper drawers...35 Attaching cables...36 Verifying...Setting up wireless printing...40 Information you will need to set up the printer on a wireless network 40 Installing the printer on a wireless network (Windows 40 Installing the printer on a wireless network (Macintosh 42 Installing the printer on a wired network...45 Changing port settings after installing a new ...
...Installing a memory card ...21 Installing a flash memory or firmware card...22 Installing an Internal Solutions Port...25 Installing a printer hard disk ...31 Installing hardware options...35 Order of installation ...35 Installing paper drawers...35 Attaching cables...36 Verifying...Setting up wireless printing...40 Information you will need to set up the printer on a wireless network 40 Installing the printer on a wireless network (Windows 40 Installing the printer on a wireless network (Macintosh 42 Installing the printer on a wired network...45 Changing port settings after installing a new ...
User Guide
Page 3
... sizes, types, and weights...70 Paper sizes supported by the printer ...70 Paper types and weights supported by the printer ...72 Software overview 73 Status Monitor Center...73 Driver Profiler...73 Dell Printer Alert Utility...73 Dell Toner Management System...74 Printing Status Window...74 Dell Printer Supplies Reorder Application ...74 Printing 76 Printing a document...76 Printing...
... sizes, types, and weights...70 Paper sizes supported by the printer ...70 Paper types and weights supported by the printer ...72 Software overview 73 Status Monitor Center...73 Driver Profiler...73 Dell Printer Alert Utility...73 Dell Toner Management System...74 Printing Status Window...74 Dell Printer Supplies Reorder Application ...74 Printing 76 Printing a document...76 Printing...

User Guide
Page 4
... a directory list...82 Printing the print quality test pages ...82 Canceling a print job...83 Canceling a print job from the printer control panel ...83 Canceling a print job from the computer ...83 Understanding printer menus 85 Menus list...85 Paper menu...86 Default Source menu...86 Paper Size/Type menu ...86 Configure MP menu...
... a directory list...82 Printing the print quality test pages ...82 Canceling a print job...83 Canceling a print job from the printer control panel ...83 Canceling a print job from the computer ...83 Understanding printer menus 85 Menus list...85 Paper menu...86 Default Source menu...86 Paper Size/Type menu ...86 Configure MP menu...

User Guide
Page 5
...Emul menu ...123 PPDS menu...125 HTML menu...127 Image menu...128 Help menu...128 Maintaining the printer 129 Cleaning the exterior of the printer...129 Storing supplies...129 Conserving supplies...129 Checking the status of supplies...130 Checking the status of supplies......131 Replacing the toner cartridge ...131 Replacing the photoconductor kit ...132 Recycling Dell products...135 Moving the printer...135 Before moving the printer ...135 Moving the printer to another location...135 Shipping the printer ...136 Administrative support 137 Using the Embedded Web Server...137 Checking the device...
...Emul menu ...123 PPDS menu...125 HTML menu...127 Image menu...128 Help menu...128 Maintaining the printer 129 Cleaning the exterior of the printer...129 Storing supplies...129 Conserving supplies...129 Checking the status of supplies...130 Checking the status of supplies......131 Replacing the toner cartridge ...131 Replacing the photoconductor kit ...132 Recycling Dell products...135 Moving the printer...135 Before moving the printer ...135 Moving the printer to another location...135 Shipping the printer ...136 Administrative support 137 Using the Embedded Web Server...137 Checking the device...

User Guide
Page 6
... 281 paper jam...151 282 paper jam...151 283 staple jam...152 Troubleshooting 154 Solving basic problems...154 Solving basic printer problems...154 Embedded Web Server does not open...154 Understanding printer messages...155 Change to ...155 Change to ...155 Change to ...155 Change to ...156 Check duplex connection ...156 Check tray...
... 281 paper jam...151 282 paper jam...151 283 staple jam...152 Troubleshooting 154 Solving basic problems...154 Solving basic printer problems...154 Embedded Web Server does not open...154 Understanding printer messages...155 Change to ...155 Change to ...155 Change to ...155 Change to ...156 Check duplex connection ...156 Check tray...

User Guide
Page 8
... low...167 88.yy Replace cartridge ...167 1565 Emulation error, load emulation option...168 Solving printing problems...168 Multiple-language PDFs do not print...168 Printer control panel display is blank or displays only diamonds 168 Jobs do not print...168 Confidential and other held jobs do not print ...169 Job...
... low...167 88.yy Replace cartridge ...167 1565 Emulation error, load emulation option...168 Solving printing problems...168 Multiple-language PDFs do not print...168 Printer control panel display is blank or displays only diamonds 168 Jobs do not print...168 Confidential and other held jobs do not print ...169 Job...

User Guide
Page 11
...Ethernet and telephone system connections) are accessing the system board or installing optional hardware or memory devices sometime after setting up the printer, then turn them off , and unplug the power cord from the wall outlet before touching. If you replace a lithium battery...cords and cables from a hot component, allow the surface to avoid the possibility of lithium battery. CAUTION-POTENTIAL INJURY: The printer weight is not responsible for the use this product or the manufacturer's authorized replacement. Safety information Connect the power cord to the...
...Ethernet and telephone system connections) are accessing the system board or installing optional hardware or memory devices sometime after setting up the printer, then turn them off , and unplug the power cord from the wall outlet before touching. If you replace a lithium battery...cords and cables from a hot component, allow the surface to avoid the possibility of lithium battery. CAUTION-POTENTIAL INJURY: The printer weight is not responsible for the use this product or the manufacturer's authorized replacement. Safety information Connect the power cord to the...

User Guide
Page 12
CAUTION-SHOCK HAZARD: To avoid the risk of electric shock when cleaning the exterior of the printer, unplug the power cord from the wall outlet and disconnect all cables from the printer before proceeding. Safety information 12 Refer service or repairs, other than those described in the user documentation, to a professional service person.
CAUTION-SHOCK HAZARD: To avoid the risk of electric shock when cleaning the exterior of the printer, unplug the power cord from the wall outlet and disconnect all cables from the printer before proceeding. Safety information 12 Refer service or repairs, other than those described in the user documentation, to a professional service person.

User Guide
Page 13
For updates, check our Web site at support.dell.com. Notes: • The Help installs automatically with the printer. Windows or Mac Help-Open a printer software program or application, and then click Help. Dell Support Web site-support.dell.com Support telephone numbers and hours of operation for your operating system. Have the following information ready...
For updates, check our Web site at support.dell.com. Notes: • The Help installs automatically with the printer. Windows or Mac Help-Open a printer software program or application, and then click Help. Dell Support Web site-support.dell.com Support telephone numbers and hours of operation for your operating system. Have the following information ready...
User Guide
Page 14
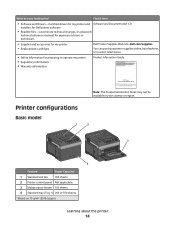
... files-Last-minute technical changes, or advanced technical reference material for experienced users or technicians • Supplies and accessories for my printer • Replacement cartridges Dell Printer Supplies Web site-dell.com/supplies You can purchase printer supplies online, by telephone, or in your country or region. 2 3 4 Feature Paper Capacity1 1 Standard exit bin 350 sheets...
... files-Last-minute technical changes, or advanced technical reference material for experienced users or technicians • Supplies and accessories for my printer • Replacement cartridges Dell Printer Supplies Web site-dell.com/supplies You can purchase printer supplies online, by telephone, or in your country or region. 2 3 4 Feature Paper Capacity1 1 Standard exit bin 350 sheets...

User Guide
Page 15
...sheets 8 Optional 2000-sheet tray (Tray 4) 2000 sheets 9 Caster base Not applicable 1 Based on 75 g/m2 (20 lb.) paper. 2 The printer supports up to three output expander units, two 5-bin mailboxes, one high capacity output expander (not depicted), or one stapler unit (not depicted). ...3 Optional duplex unit available for stability. Learning about the printer 15 Fully configured model CAUTION-TIPPING HAZARD: Floor-mounted configurations require additional furniture for basic model with a 550-sheet standard tray may...
...sheets 8 Optional 2000-sheet tray (Tray 4) 2000 sheets 9 Caster base Not applicable 1 Based on 75 g/m2 (20 lb.) paper. 2 The printer supports up to three output expander units, two 5-bin mailboxes, one high capacity output expander (not depicted), or one stapler unit (not depicted). ...3 Optional duplex unit available for stability. Learning about the printer 15 Fully configured model CAUTION-TIPPING HAZARD: Floor-mounted configurations require additional furniture for basic model with a 550-sheet standard tray may...

User Guide
Page 16
It is important to install any options, leave enough room for them also. Learning about the printer 16 Clean, dry, and free of dust • Allow the following recommended amount of space around the printer for proper ventilation: 5 4 1 3 2 1 Right Side 31 cm (12 in.) 2 Left Side ...ASHRAE 62 standard. • Provide a flat, sturdy, and stable surface. • Keep the printer: - Free from the direct airflow of air conditioners, heaters, or ventilators - Selecting a location for the printer When selecting a location for addition of all output options. If you plan to : •...
It is important to install any options, leave enough room for them also. Learning about the printer 16 Clean, dry, and free of dust • Allow the following recommended amount of space around the printer for proper ventilation: 5 4 1 3 2 1 Right Side 31 cm (12 in.) 2 Left Side ...ASHRAE 62 standard. • Provide a flat, sturdy, and stable surface. • Keep the printer: - Free from the direct airflow of air conditioners, heaters, or ventilators - Selecting a location for the printer When selecting a location for addition of all output options. If you plan to : •...

User Guide
Page 17
... Saves a displayed menu item as the user default setting, it remains in effect until a new setting is on the display. Learning about the printer 17 Understanding the printer control panel 1 23 4 9 8 76 5 Item Description 1 Display Shows messages and pictures that rolls to another screen. 3 Select 4 Keypad ... values or settings. Returns the display to the previous screen 6 Indicator light Indicates the printer status: • Off-The power is off. • Blinking green-The printer is warming up or down arrow buttons to scroll through text that communicate the status of...
... Saves a displayed menu item as the user default setting, it remains in effect until a new setting is on the display. Learning about the printer 17 Understanding the printer control panel 1 23 4 9 8 76 5 Item Description 1 Display Shows messages and pictures that rolls to another screen. 3 Select 4 Keypad ... values or settings. Returns the display to the previous screen 6 Indicator light Indicates the printer status: • Off-The power is off. • Blinking green-The printer is warming up or down arrow buttons to scroll through text that communicate the status of...

User Guide
Page 18
Note: Only the front USB port supports flash drives. Item 7 Stop 8 Menu 9 USB port Description Stops all printer activity A list of the printer to print saved files. Opens the menu index Note: The menus are available only when the printer is offered once Stopped appears on the display. Learning about the printer 18 Insert a flash drive into the front of options is in the Ready state.
Note: Only the front USB port supports flash drives. Item 7 Stop 8 Menu 9 USB port Description Stops all printer activity A list of the printer to print saved files. Opens the menu index Note: The menus are available only when the printer is offered once Stopped appears on the display. Learning about the printer 18 Insert a flash drive into the front of options is in the Ready state.

User Guide
Page 19
...HAZARD: If you are accessing the system board or installing optional hardware or memory devices sometime after setting up the printer, then turn the printer off, and unplug the power cord from the wall outlet before continuing. If you have any other devices attached... to install internal options Note: This task requires a flathead screwdriver. Additional printer setup 19 Additional printer setup Installing internal options CAUTION-SHOCK HAZARD: If you are accessing the system board or installing optional hardware or memory ...
...HAZARD: If you are accessing the system board or installing optional hardware or memory devices sometime after setting up the printer, then turn the printer off, and unplug the power cord from the wall outlet before continuing. If you have any other devices attached... to install internal options Note: This task requires a flathead screwdriver. Additional printer setup 19 Additional printer setup Installing internal options CAUTION-SHOCK HAZARD: If you are accessing the system board or installing optional hardware or memory ...

User Guide
Page 20
Additional printer setup 20 2 Loosen the screws on the printer before touching any system board electronic components or connectors. Touch something metal on the system board cover. 3 Remove the system board cover. 4 Use the illustration below to locate the appropriate connector. Warning-Potential Damage: System board electronic components are easily damaged by static electricity.
Additional printer setup 20 2 Loosen the screws on the printer before touching any system board electronic components or connectors. Touch something metal on the system board cover. 3 Remove the system board cover. 4 Use the illustration below to locate the appropriate connector. Warning-Potential Damage: System board electronic components are easily damaged by static electricity.

User Guide
Page 21
... optional memory card can be purchased separately and attached to the printer, then turn the printer off as well, and unplug any system board electronic components or connectors. Touch something metal on the printer before continuing. CAUTION-SHOCK HAZARD: If you have any other ...board. If you are easily damaged by static electricity. 1 2 3 1 Firmware and flash memory card connectors 2 Memory card connector 3 Printer hard disk connector Installing a memory card Note: This task requires a flathead screwdriver. To install the memory card: 1 Access the system board. 3 2...
... optional memory card can be purchased separately and attached to the printer, then turn the printer off as well, and unplug any system board electronic components or connectors. Touch something metal on the printer before continuing. CAUTION-SHOCK HAZARD: If you have any other ...board. If you are easily damaged by static electricity. 1 2 3 1 Firmware and flash memory card connectors 2 Memory card connector 3 Printer hard disk connector Installing a memory card Note: This task requires a flathead screwdriver. To install the memory card: 1 Access the system board. 3 2...


