User's Guide
Page 1
... trademark of Linus Torvalds in this document to refer to change without the written permission of Adobe Systems Incorporated. Order Dell printer supplies at the bottom of the page. 3. Information in the United States and other countries; SUSE is subject to.... Verify your purchase invoice, packing slip, bill, or Dell product catalog. Microsoft, Windows, and Windows Vista are trademarks or registered trademarks of the U.S. Dell Inc. ™ 5330dn Mono Laser Printer User's Guide Dell™ 5330dn Mono Laser Printer User's Guide Click the links on the left side of...
... trademark of Linus Torvalds in this document to refer to change without the written permission of Adobe Systems Incorporated. Order Dell printer supplies at the bottom of the page. 3. Information in the United States and other countries; SUSE is subject to.... Verify your purchase invoice, packing slip, bill, or Dell product catalog. Microsoft, Windows, and Windows Vista are trademarks or registered trademarks of the U.S. Dell Inc. ™ 5330dn Mono Laser Printer User's Guide Dell™ 5330dn Mono Laser Printer User's Guide Click the links on the left side of...
User's Guide
Page 2
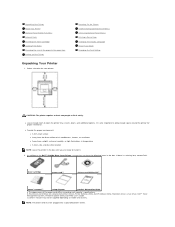
... Display Language Power Save Mode Changing the Font Setting CAUTION: The printer requires at least two people to the Dell™ 5330dn Mono Laser Printer, ensure that you are ready to open the printer tray, covers, doors, and additional options. Unpacking Your Printer About Your Printer Operator Panel Button Functions Internal Fonts Installing the Toner Cartridge Loading...
... Display Language Power Save Mode Changing the Font Setting CAUTION: The printer requires at least two people to the Dell™ 5330dn Mono Laser Printer, ensure that you are ready to open the printer tray, covers, doors, and additional options. Unpacking Your Printer About Your Printer Operator Panel Button Functions Internal Fonts Installing the Toner Cartridge Loading...
User's Guide
Page 3
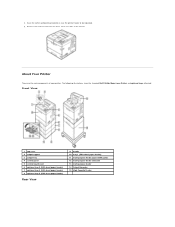
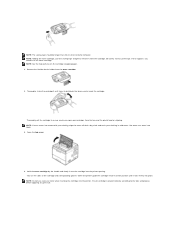
Save the carton and packing material in case the printer needs to be repacked. 4. About Your Printer These are the main components of the printer. Remove the packing tape from the front, back and sides of your printer. The following illustrations show the standard Dell 5330dn Mono Laser Printer and optional trays attached: Front View 1 top cover 2 output...
Save the carton and packing material in case the printer needs to be repacked. 4. About Your Printer These are the main components of the printer. Remove the packing tape from the front, back and sides of your printer. The following illustrations show the standard Dell 5330dn Mono Laser Printer and optional trays attached: Front View 1 top cover 2 output...

User's Guide
Page 4
Confirms screen selection. Goes back to the upper menu level. 1 rear door 2 duplex unit 3 power receptacle 4 network port 5 parallel port 6 USB port 7 power switch Operator Panel Button Functions Button: Discription: Dual Color LED Shows the Printer status. 4-way Scroll, increasing or decreasing values.
Confirms screen selection. Goes back to the upper menu level. 1 rear door 2 duplex unit 3 power receptacle 4 network port 5 parallel port 6 USB port 7 power switch Operator Panel Button Functions Button: Discription: Dual Color LED Shows the Printer status. 4-way Scroll, increasing or decreasing values.

User's Guide
Page 5
...of the cartridge and discard it. CAUTION: To prevent damage, do not expose the toner cartridge to light for further details. Internal Fonts The Dell 5330dn Mono Laser Printer supports PCL and PS fonts. Press Scroll ( to ) to highlight PS Font list and press Select ( ). 4. Please contact your local... Dell sales team in your region for more than a few minutes. 2. Remove the toner cartridge from its bag. Carefully pull the tape completely out ...
...of the cartridge and discard it. CAUTION: To prevent damage, do not expose the toner cartridge to light for further details. Internal Fonts The Dell 5330dn Mono Laser Printer supports PCL and PS fonts. Press Scroll ( to ) to highlight PS Font list and press Select ( ). 4. Please contact your local... Dell sales team in your region for more than a few minutes. 2. Remove the toner cartridge from its bag. Carefully pull the tape completely out ...
User's Guide
Page 6
...placed correctly according to assure maximum copies per cartridge. If this happens, you cannot use excessive force when inserting the cartridge into the printer. NOTE: If toner comes into place. Thoroughly roll the cartridge to the tabs and grooves before applying any pressure. NOTE: The...distribute the toner evenly inside the cartridge. NOTE: See the help pictures on the sides of the cartridge and corresponding grooves within the printer guide the cartridge into the correct position until it from the toner cartridge. 4. NOTE: Do not use the toner cartridge. Thoroughly ...
...placed correctly according to assure maximum copies per cartridge. If this happens, you cannot use excessive force when inserting the cartridge into the printer. NOTE: If toner comes into place. Thoroughly roll the cartridge to the tabs and grooves before applying any pressure. NOTE: The...distribute the toner evenly inside the cartridge. NOTE: See the help pictures on the sides of the cartridge and corresponding grooves within the printer guide the cartridge into the correct position until it from the toner cartridge. 4. NOTE: Do not use the toner cartridge. Thoroughly ...

User's Guide
Page 7
... before the first printed paper comes out. To load a stack of the tray. Pull open tray 1 and remove from the printer. 2. Squeeze the paper width guide and slide it to the printer. It could cause damage to the desired paper size marked at the bottom of A4 or Letter-sized paper: 1. NOTE...
... before the first printed paper comes out. To load a stack of the tray. Pull open tray 1 and remove from the printer. 2. Squeeze the paper width guide and slide it to the printer. It could cause damage to the desired paper size marked at the bottom of A4 or Letter-sized paper: 1. NOTE...

User's Guide
Page 9
Insert and slide tray 1 back into the printer. 8. Squeeze the paper width guide and slide it to Letter or A4 size, depending on country specifications. Push the back plate of the tray outwards ...
Insert and slide tray 1 back into the printer. 8. Squeeze the paper width guide and slide it to Letter or A4 size, depending on country specifications. Push the back plate of the tray outwards ...
User's Guide
Page 10
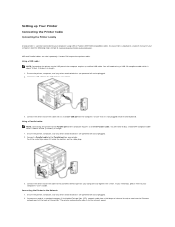
... the other attached devices are powered off and unplugged. 2. Using a USB cable: NOTE: Connecting the printer to the network speed Ensure the printer, computer, and any other end of the computer requires a certified USB cable. If you need to your...sold separately. Ensure the printer, computer, and any other end of the printer. USB and Parallel cables are powered off and unplugged. 2. Setting up Your Printer Connecting the Printer Cable Connecting the Printer Locally A local printer is a printer connected to purchase printer cable. Contact Dell to your computer's ...
... the other attached devices are powered off and unplugged. 2. Using a USB cable: NOTE: Connecting the printer to the network speed Ensure the printer, computer, and any other end of the computer requires a certified USB cable. If you need to your...sold separately. Ensure the printer, computer, and any other end of the printer. USB and Parallel cables are powered off and unplugged. 2. Setting up Your Printer Connecting the Printer Cable Connecting the Printer Locally A local printer is a printer connected to purchase printer cable. Contact Dell to your computer's ...

User's Guide
Page 11
... it is not applicable to configure the network parameters on the operator panel. Dell 5330dn Mono Laser Printer Menu Function Powering On the Printer CAUTION: The fusing area inside your display text in the display depending on . Plug one end of the power cord into the ...avoid injuries or burns, access this area only when the system is powered on the printer. NOTE: After connecting the printer, you an electric shock. To view your printer becomes hot once the printer is now on the printer: 1. NOTE: Some menus may give you need to your machine. The diagram below ...
... it is not applicable to configure the network parameters on the operator panel. Dell 5330dn Mono Laser Printer Menu Function Powering On the Printer CAUTION: The fusing area inside your display text in the display depending on . Plug one end of the power cord into the ...avoid injuries or burns, access this area only when the system is powered on the printer. NOTE: After connecting the printer, you an electric shock. To view your printer becomes hot once the printer is now on the printer: 1. NOTE: Some menus may give you need to your machine. The diagram below ...

User's Guide
Page 12
... the paper size currently loaded in the multi-purpose feeder. Any sources containing the same type and size of paper are automatically linked by the printer if you loaded the same size and type of media loaded into an input tray. Custom Plain Paper* Thick Thin Colored Printed Recycled Bond Letter...
... the paper size currently loaded in the multi-purpose feeder. Any sources containing the same type and size of paper are automatically linked by the printer if you loaded the same size and type of media loaded into an input tray. Custom Plain Paper* Thick Thin Colored Printed Recycled Bond Letter...
User's Guide
Page 14
...25 files from other trays. l Job Meter: Contains the total number of completed print jobs. Values: Link De-Link l Link: The printer continues to print from the latest print jobs. Tray Mode If this menu item is allowed for PostScript emulation. Substitute size set to Off ...full. 2.Report Menu selection: Report Purpose: Values: Menu Map Configuration After selecting each item, the page will print, and the printer will return to check if your printer properly performs printing. l Job History: Shows the list of pages printed by person or group. l Tray Mode: Paper loaded...
...25 files from other trays. l Job Meter: Contains the total number of completed print jobs. Values: Link De-Link l Link: The printer continues to print from the latest print jobs. Tray Mode If this menu item is allowed for PostScript emulation. Substitute size set to Off ...full. 2.Report Menu selection: Report Purpose: Values: Menu Map Configuration After selecting each item, the page will print, and the printer will return to check if your printer properly performs printing. l Job History: Shows the list of pages printed by person or group. l Tray Mode: Paper loaded...
User's Guide
Page 15
.... l Off: If a paper mismatch occurs, an error message remains on your altitude. Jam Recovery On Off Specifies whether the printer reprints jammed pages. l Off: Printer does not reprint jammed pages. Auto CR Allows you to append the LF Refers to determine the current Power Save setting. When ...Higher Select a high value if your paper setting. Espanol FRANCAIS Italiano Power save Specifies the number of minutes after a job is in the printer is printed, and other input ports are examined to see if data exists. 90* is still ready to receive print jobs. Print the...
.... l Off: If a paper mismatch occurs, an error message remains on your altitude. Jam Recovery On Off Specifies whether the printer reprints jammed pages. l Off: Printer does not reprint jammed pages. Auto CR Allows you to append the LF Refers to determine the current Power Save setting. When ...Higher Select a high value if your paper setting. Espanol FRANCAIS Italiano Power save Specifies the number of minutes after a job is in the printer is printed, and other input ports are examined to see if data exists. 90* is still ready to receive print jobs. Print the...
User's Guide
Page 16
... of copies 1 - 999 by changing the toner density setting. Finishing Use this menu selection to change settings that will benefit from 1 to define how the printer delivers the printed output. if HDD is installed) DayLight Saving (Only if HDD is installed) See "Setting Daylight Savings Time". Manual Auto Off Quality Use...
... of copies 1 - 999 by changing the toner density setting. Finishing Use this menu selection to change settings that will benefit from 1 to define how the printer delivers the printed output. if HDD is installed) DayLight Saving (Only if HDD is installed) See "Setting Daylight Savings Time". Manual Auto Off Quality Use...

User's Guide
Page 17
...from 0.0 to 22 mm. Top Margin [0.0-9.9] Left Margin [0.0-9.9] Short Binding [0-22] l Top Margin: Set the top margin, from 0 to print, the printer prints page 1, page 2, page 3, page 1, page 2, page 3. Separator Sheet Inserts blank separator sheets On between jobs, between multiple copies of a job,...) Menu selection: Purpose: Select Form (Only See "Printing using the form files". Set the margins for long binding, from 0.0 to print, the printer prints page 1, page 1, page 2, page 2, page 3, page 3. l Single Form: Does not print application-generated blank pages as part of your...
...from 0.0 to 22 mm. Top Margin [0.0-9.9] Left Margin [0.0-9.9] Short Binding [0-22] l Top Margin: Set the top margin, from 0 to print, the printer prints page 1, page 2, page 3, page 1, page 2, page 3. Separator Sheet Inserts blank separator sheets On between jobs, between multiple copies of a job,...) Menu selection: Purpose: Select Form (Only See "Printing using the form files". Set the margins for long binding, from 0.0 to print, the printer prints page 1, page 1, page 2, page 2, page 3, page 3. l Single Form: Does not print application-generated blank pages as part of your...

User's Guide
Page 18
...and USB Menu l Resource residing in flash memory or on the hard disk NOTE: All downloaded resources (fonts, macros, and symbols sets) in printer memory (RAM) are deleted. 5.Network I/O Ports This menu lets you select Double Form in Form Menu, this menu is deleted. Clear Stored ...jobs currently stored in the hard disk Values: User ID1 User ID2 Job Expiaration Menu selection: Job Expiration Purpose: Limits the amount of printer's memory for Secure print. Values: Do Not Restore Restore Now l Do not Restore: Userdefined settings remain. Factory Defaults Menu selection: Factory ...
...and USB Menu l Resource residing in flash memory or on the hard disk NOTE: All downloaded resources (fonts, macros, and symbols sets) in printer memory (RAM) are deleted. 5.Network I/O Ports This menu lets you select Double Form in Form Menu, this menu is deleted. Clear Stored ...jobs currently stored in the hard disk Values: User ID1 User ID2 Job Expiaration Menu selection: Job Expiration Purpose: Limits the amount of printer's memory for Secure print. Values: Do Not Restore Restore Now l Do not Restore: Userdefined settings remain. Factory Defaults Menu selection: Factory ...

User's Guide
Page 19
... TCP/IP addresses or receive the addresses from the network. Use DHCPv6, as directed by a router. Auto 802.2 802.3 Ethernet II SNAP l Auto: Set the printer to use the SNAP frame type. l SNAP: Select this value to use the Ethernet 2 frame type. Values: On Off l On: Activates the AppleTalk feature. Displays...
... TCP/IP addresses or receive the addresses from the network. Use DHCPv6, as directed by a router. Auto 802.2 802.3 Ethernet II SNAP l Auto: Set the printer to use the SNAP frame type. l SNAP: Select this value to use the Ethernet 2 frame type. Values: On Off l On: Activates the AppleTalk feature. Displays...

User's Guide
Page 20
...Life Purpose: Values: If printouts are blurred, faded, or smeared, correct the problem by printing a cleaning sheet provided with the printer. Values: Enable Disable Parallel Port Menu selection: Parallel Port Purpose: Enable or disable the Parallel port. Wireless(Only if wireless network... interface card installed) Menu selection: WLAN Settings Purpose: Values: You must configure the appropriate network parameters to your printer. View Name Displays the assigned AppleTalk View only name. Search List Custom WLAN Default WLAN Signal Performs a simple reset and ...
...Life Purpose: Values: If printouts are blurred, faded, or smeared, correct the problem by printing a cleaning sheet provided with the printer. Values: Enable Disable Parallel Port Menu selection: Parallel Port Purpose: Enable or disable the Parallel port. Wireless(Only if wireless network... interface card installed) Menu selection: WLAN Settings Purpose: Values: You must configure the appropriate network parameters to your printer. View Name Displays the assigned AppleTalk View only name. Search List Custom WLAN Default WLAN Signal Performs a simple reset and ...

User's Guide
Page 21
...If the setting item has sub menus, repeat step 2. 4. If an error occurs, the job stops processing, the error message prints, and the printer flushes the job. Press Scroll ( to ) to highlight the desired setting and press Select ( ). 3. Available symbol sets vary depending on the Typeface...use. Menu selection: Purpose: Values: PostScript Provides the Print PS Error menu items. Print PS Error On Off Select whether or not your printer prints an error list when a PS error occurs. Menu selection: Purpose: Values: PCL Sets the PCL emulation configuration: font type, symbol type...
...If the setting item has sub menus, repeat step 2. 4. If an error occurs, the job stops processing, the error message prints, and the printer flushes the job. Press Scroll ( to ) to highlight the desired setting and press Select ( ). 3. Available symbol sets vary depending on the Typeface...use. Menu selection: Purpose: Values: PostScript Provides the Print PS Error menu items. Print PS Error On Off Select whether or not your printer prints an error list when a PS error occurs. Menu selection: Purpose: Values: PCL Sets the PCL emulation configuration: font type, symbol type...

User's Guide
Page 22
...). 2. Press Menu ( ). 2. Press Cancel ( ) to return to highlight Reports and press Select ( ). 3. Printing a Demo Page After setting up your printer, print a demo page to ensure that the operator panel displays, follow these steps: 1. Press Scroll ( to ) to Standby mode. Changing the Display Language To ... Select ( ). ) to highlight Power Save and press Select ( ). ) to set how long the printer waits before going to power save the selection. 7. Changing the Font Setting Your printer has preset the font for an extended period of time, power consumption is not in actual use.
...). 2. Press Menu ( ). 2. Press Cancel ( ) to return to highlight Reports and press Select ( ). 3. Printing a Demo Page After setting up your printer, print a demo page to ensure that the operator panel displays, follow these steps: 1. Press Scroll ( to ) to Standby mode. Changing the Display Language To ... Select ( ). ) to highlight Power Save and press Select ( ). ) to set how long the printer waits before going to power save the selection. 7. Changing the Font Setting Your printer has preset the font for an extended period of time, power consumption is not in actual use.


