User Guide
Page 1
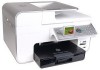
... Operator Installing the Dell 966 Internal Panel Menus Wireless/Ethernet Adapter Loading Paper and Originals Maintenance Printing Troubleshooting Printing From a Memory Card or USB Key Specifications Copying Appendix Scanning Licensing Notice Notes, Notices, and Cautions NOTE: A NOTE indicates important information that helps you have the Dell printer Service Tag available. Trademarks used by the Government is either the entities claiming the marks and names or their products. under license. Dell™ Photo All-In-One Printer 966 User's Guide To order ink...
... Operator Installing the Dell 966 Internal Panel Menus Wireless/Ethernet Adapter Loading Paper and Originals Maintenance Printing Troubleshooting Printing From a Memory Card or USB Key Specifications Copying Appendix Scanning Licensing Notice Notes, Notices, and Cautions NOTE: A NOTE indicates important information that helps you have the Dell printer Service Tag available. Trademarks used by the Government is either the entities claiming the marks and names or their products. under license. Dell™ Photo All-In-One Printer 966 User's Guide To order ink...
User Guide
Page 5
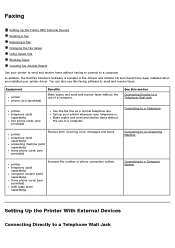
Faxing Setting Up the Printer With External Devices Sending a Fax Receiving a Fax Changing the Fax Setup Using Speed Dial Blocking Faxes Creating Fax Activity Report Use your printer driver. You can also use this section Connecting Directly to a Telephone printer telephone (sold separately) answering machine (sold separately) two phone cords (one provided) Use the fax line as a normal telephone line. See this faxing software to a computer. Set up your printer wherever your telephone is bundled in the Drivers and Utilities CD and should have been installed when...
Faxing Setting Up the Printer With External Devices Sending a Fax Receiving a Fax Changing the Fax Setup Using Speed Dial Blocking Faxes Creating Fax Activity Report Use your printer driver. You can also use this section Connecting Directly to a Telephone printer telephone (sold separately) answering machine (sold separately) two phone cords (one provided) Use the fax line as a normal telephone line. See this faxing software to a computer. Set up your printer wherever your telephone is bundled in the Drivers and Utilities CD and should have been installed when...

User Guide
Page 10
... section, click Fax an image, and follow the instructions on the screen. Faxing Electronic Documents 1. In the Dell All-In-One Center, you should choose Yes, prompt me for each page. With the file open, click File® Print. Make sure your fax, you can enter up or down Arrow button to go to an active telephone line. 2. Click Dell Photo AIO Printer 966. 4. To send a multiple-page fax, click Advanced, select the Scan multiple items before output check box, and...
... section, click Fax an image, and follow the instructions on the screen. Faxing Electronic Documents 1. In the Dell All-In-One Center, you should choose Yes, prompt me for each page. With the file open, click File® Print. Make sure your fax, you can enter up or down Arrow button to go to an active telephone line. 2. Click Dell Photo AIO Printer 966. 4. To send a multiple-page fax, click Advanced, select the Scan multiple items before output check box, and...

User Guide
Page 17
... send settings. Specify a maximum send speed and a print quality for your name. Set the ring volume. Specify a manual answer code. Specify the time when incoming faxes are forwarded. From the main menu, press the up or down Arrow button . Convert the fax automatically to know which faxes are answered automatically. Manage blocked faxes. Speed Dial Cover Page Add to print a footer (date, time, and page number) on your phone line has distinctive ring service activated. Include a short message. Creating a Speed...
... send settings. Specify a maximum send speed and a print quality for your name. Set the ring volume. Specify a manual answer code. Specify the time when incoming faxes are forwarded. From the main menu, press the up or down Arrow button . Convert the fax automatically to know which faxes are answered automatically. Manage blocked faxes. Speed Dial Cover Page Add to print a footer (date, time, and page number) on your phone line has distinctive ring service activated. Include a short message. Creating a Speed...

User Guide
Page 21
... your printer to a computer to print, scan, or use the Save Photos to Computer function or the Print Files mode. You do a variety of blank paper that feeds original documents into the printer. Understanding the Printer Parts Number: Part: 1 Automatic Document Feeder (ADF) 2 Printer unit 3 Operator panel 4 Paper tray 5 Optional paper tray 6 Paper exit tray Description: Part that your computer. Unit you use to make photocopies, send faxes, or print from memory cards or a PictBridge-enabled camera. NOTE: Pull the paper exit tray stop straight out to the ink cartridges...
... your printer to a computer to print, scan, or use the Save Photos to Computer function or the Print Files mode. You do a variety of blank paper that feeds original documents into the printer. Understanding the Printer Parts Number: Part: 1 Automatic Document Feeder (ADF) 2 Printer unit 3 Operator panel 4 Paper tray 5 Optional paper tray 6 Paper exit tray Description: Part that your computer. Unit you use to make photocopies, send faxes, or print from memory cards or a PictBridge-enabled camera. NOTE: Pull the paper exit tray stop straight out to the ink cartridges...

User Guide
Page 22
... PHONE jack connector ( - Remove the blue plug before use. Enter the Express Service Code to use this port for faxing to send and receive faxes. You will not be able to direct your call when contacting technical support. 7 PictBridge The connector you use to connect your PictBridge-enabled digital camera or a USB key to the printer without using a digital line filter. slots NOTE: The LCD only displays JPG files found on the memory card, open the Memory Card...
... PHONE jack connector ( - Remove the blue plug before use. Enter the Express Service Code to use this port for faxing to send and receive faxes. You will not be able to direct your call when contacting technical support. 7 PictBridge The connector you use to connect your PictBridge-enabled digital camera or a USB key to the printer without using a digital line filter. slots NOTE: The LCD only displays JPG files found on the memory card, open the Memory Card...
User Guide
Page 23
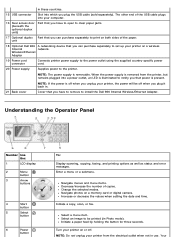
... when setting the date and time. Select an image to clear paper jams. 17 Optional duplex Part that power is present. 21 Back cover NOTE: If the power is removable. unit 18 Optional Dell 966 A networking device that you have to open to be off when you can purchase separately to the printer. Cover that you plug it back in. Understanding the Operator Panel Number Use the: 1 LCD display 2 Menu button 3 Arrow buttons 4 Start button 5 Select button 6 Power button To: Display scanning, copying, faxing, and printing options as well as status and error messages...
... when setting the date and time. Select an image to clear paper jams. 17 Optional duplex Part that power is present. 21 Back cover NOTE: If the power is removable. unit 18 Optional Dell 966 A networking device that you have to open to be off when you can purchase separately to the printer. Cover that you plug it back in. Understanding the Operator Panel Number Use the: 1 LCD display 2 Menu button 3 Arrow buttons 4 Start button 5 Select button 6 Power button To: Display scanning, copying, faxing, and printing options as well as status and error messages...

User Guide
Page 25
... to your memory card or USB memory key to : Scan, copy, fax, and use productivity tools. Using the Dell All-In-One Center The Dell All-In-One Center allows you to display, manage, edit, print, and scan photos from your computer. Access troubleshooting and maintenance information. Understanding the Software Using the Dell All-In-One Center Using the Dell Fax Solutions Software Using Printing Preferences Using Memory Card Manager Dell Ink Management System Removing and Reinstalling Software The printer software includes: Dell All-In-One Center- Preview images you to...
... to your memory card or USB memory key to : Scan, copy, fax, and use productivity tools. Using the Dell All-In-One Center The Dell All-In-One Center allows you to display, manage, edit, print, and scan photos from your computer. Access troubleshooting and maintenance information. Understanding the Software Using the Dell All-In-One Center Using the Dell Fax Solutions Software Using Printing Preferences Using Memory Card Manager Dell Ink Management System Removing and Reinstalling Software The printer software includes: Dell All-In-One Center- Preview images you to...
User Guide
Page 26
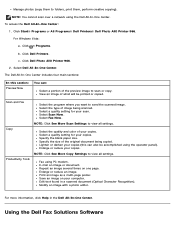
... blank paper size. NOTE: Click See More Copy Settings to scan or copy. Scan and Fax Copy Productivity Tools Select the program where you want to folders, print them, perform creative copying). Lighten or darken your computer. Save an image on one page. Click ® Programs. b. Enlarge or reduce an image. For more information, click Help in a scanned document (Optical Character Recognition). Click Dell Printers. Fax using the Dell All-In-One Center. Manage photos (copy them to send the scanned image. The Dell All-In-One Center...
... blank paper size. NOTE: Click See More Copy Settings to scan or copy. Scan and Fax Copy Productivity Tools Select the program where you want to folders, print them, perform creative copying). Lighten or darken your computer. Save an image on one page. Click ® Programs. b. Enlarge or reduce an image. For more information, click Help in a scanned document (Optical Character Recognition). Click Dell Printers. Fax using the Dell All-In-One Center. Manage photos (copy them to send the scanned image. The Dell All-In-One Center...

User Guide
Page 29
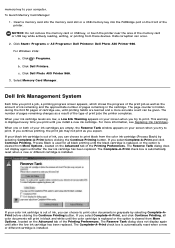
... Program - Select the size of a single print job: Collated, Normal, or Print Last Page First. Select how the document is the fastest option but should not be selected if you to print an envelope. Maintenance Install Ink Cartridges Clean Ink Cartridges Align Ink Cartridges Print a Test Page Network Support Using Memory Card Manager Memory Card Manager allows you to display, manage, edit, print, and save the ink in your status in black and white - You can print using portrait or landscape orientation. You can also view the paper type that the printer...
... Program - Select the size of a single print job: Collated, Normal, or Print Last Page First. Select how the document is the fastest option but should not be selected if you to print an envelope. Maintenance Install Ink Cartridges Clean Ink Cartridges Align Ink Cartridges Print a Test Page Network Support Using Memory Card Manager Memory Card Manager allows you to display, manage, edit, print, and save the ink in your status in black and white - You can print using portrait or landscape orientation. You can also view the paper type that the printer...
User Guide
Page 30
... Continue Printing, Process Black is used for all color documents will print in black and white until you install a new ink cartridge. The Complete-A-Print check box is automatically reset when a new or different cartridge is installed. The number of pages remaining changes as you expect. If your computer. c. Click Start® Programs or All Programs® Dell Printers® Dell Photo AIO Printer 966. This warning is displayed every time you print until the color cartridge is replaced or the option is cleared from these devices. memory key to your color ink cartridge...
... Continue Printing, Process Black is used for all color documents will print in black and white until you install a new ink cartridge. The Complete-A-Print check box is automatically reset when a new or different cartridge is installed. The number of pages remaining changes as you expect. If your computer. c. Click Start® Programs or All Programs® Dell Printers® Dell Photo AIO Printer 966. This warning is displayed every time you print until the color cartridge is replaced or the option is cleared from these devices. memory key to your color ink cartridge...
User Guide
Page 36
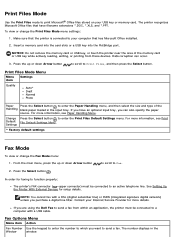
... to Fax. 2. The number displays in the input tray. Change Press the Select button to send a fax. In order for setup details. The printer recognizes Microsoft Office files that has Microsoft Office installed. 2. NOTICE: Do not remove the memory card or USB key, or touch the printer near the area of the Handling blank paper loaded in the Window window. Press the Select button . Print Files Mode Use the Print Files mode to print Microsoft® Office files stored on your Internet Service Provider...
... to Fax. 2. The number displays in the input tray. Change Press the Select button to send a fax. In order for setup details. The printer recognizes Microsoft Office files that has Microsoft Office installed. 2. NOTICE: Do not remove the memory card or USB key, or touch the printer near the area of the Handling blank paper loaded in the Window window. Press the Select button . Print Files Mode Use the Print Files mode to print Microsoft® Office files stored on your Internet Service Provider...
User Guide
Page 42
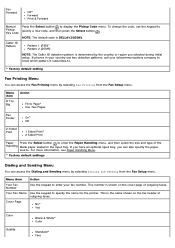
... to Page* Use Two Pages Fax Footer On* Off 2-Sided Print 1 Sided Print* 2 Sided Print Paper Press the Select button to enter the Paper Handling menu, and then select the size and type of the Handling blank paper loaded in your country use the keypad to specify the name for the printer. If you have an optional input tray, you selected during initial setup. If phones in the input tray. Cover Page No* Yes Color Black & White* Color Quality Standard* Fine This number is...
... to Page* Use Two Pages Fax Footer On* Off 2-Sided Print 1 Sided Print* 2 Sided Print Paper Press the Select button to enter the Paper Handling menu, and then select the size and type of the Handling blank paper loaded in your country use the keypad to specify the name for the printer. If you have an optional input tray, you selected during initial setup. If phones in the input tray. Cover Page No* Yes Color Black & White* Color Quality Standard* Fine This number is...
User Guide
Page 46
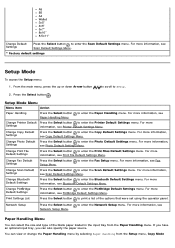
..., see Printer Default Settings Menu. Change Bluetooth Default Settings Press the Select button to enter the Scan Default Settings menu. Print Settings List Press the Select button to enter the Photo Default Settings menu. Change Photo Default Settings Press the Select button to print a list of the blank paper loaded in the input tray from the Setup menu, Copy Mode to enter the Scan Default Settings menu. A5 B5 A4 Wallet 3x5" 4x6" 5x7" 8x10" 8.5x11" Change Default Settings Press the Select button to enter the Network Setup menu. For more information, see Fax Change Scan Default...
..., see Printer Default Settings Menu. Change Bluetooth Default Settings Press the Select button to enter the Scan Default Settings menu. Print Settings List Press the Select button to enter the Photo Default Settings menu. Change Photo Default Settings Press the Select button to print a list of the blank paper loaded in the input tray from the Setup menu, Copy Mode to enter the Scan Default Settings menu. A5 B5 A4 Wallet 3x5" 4x6" 5x7" 8x10" 8.5x11" Change Default Settings Press the Select button to enter the Network Setup menu. For more information, see Fax Change Scan Default...

User Guide
Page 52
... enable or disable the Time NOTE: When Time Server is enabled, the wireless Ethernet card updates the printer's time once a day or every time the printer is powered on. For more information, see Wireless to enter the TCP/IP Menu. NOTE: You cannot change the settings in the Wireless Setup Menu by selecting Network Setup from the Network Setup menu. One Photo Centered 1 per page 2 per page 3 per page 4 per page 6 per page 8 per page 16 per page Quality Auto* Draft Normal Photo Paper Handling Press the Select button Handling Menu. * Factory default setting to print a list...
... enable or disable the Time NOTE: When Time Server is enabled, the wireless Ethernet card updates the printer's time once a day or every time the printer is powered on. For more information, see Wireless to enter the TCP/IP Menu. NOTE: You cannot change the settings in the Wireless Setup Menu by selecting Network Setup from the Network Setup menu. One Photo Centered 1 per page 2 per page 3 per page 4 per page 6 per page 8 per page 16 per page Quality Auto* Draft Normal Photo Paper Handling Press the Select button Handling Menu. * Factory default setting to print a list...
User Guide
Page 59
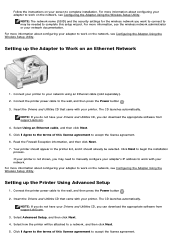
... about configuring your network. NOTE: The network name (SSID) and the security settings for the wireless network you can download the appropriate software from support.dell.com . 4. For more information about configuring your printer. Setting up the Printer Using Advanced Setup 1. Connect your printer to your screen to accept the license agreement. Insert the Drivers and Utilities CD that came with your adapter to the wall, and then press the Power button...
... about configuring your network. NOTE: The network name (SSID) and the security settings for the wireless network you can download the appropriate software from support.dell.com . 4. For more information about configuring your printer. Setting up the Printer Using Advanced Setup 1. Connect your printer to your screen to accept the license agreement. Insert the Drivers and Utilities CD that came with your adapter to the wall, and then press the Power button...
User Guide
Page 86
.... Troubleshooting Setup Problems General Problems Error Messages Improving Print Quality General Guidelines for Selecting or Loading Print Media Avoiding Jams and Misfeeds If the printer does not work, ensure that the printer is firmly connected to your printer and your computer. Check the USB cable. In Windows 2000, double-click My Computer from your computer. Double-click the CD-ROM drive icon, and then double-click setup.exe. 4. When the printer software installation screen appears, click Personal Installation or Network Installation...
.... Troubleshooting Setup Problems General Problems Error Messages Improving Print Quality General Guidelines for Selecting or Loading Print Media Avoiding Jams and Misfeeds If the printer does not work, ensure that the printer is firmly connected to your printer and your computer. Check the USB cable. In Windows 2000, double-click My Computer from your computer. Double-click the CD-ROM drive icon, and then double-click setup.exe. 4. When the printer software installation screen appears, click Personal Installation or Network Installation...

User Guide
Page 98
.... 1. Low Ink Error The ink cartridge is off, and the receiving fax machine does not support color or the resolution of them. Replace the ink cartridge, and align the new cartridges. A paper jam exists in the input tray, and then press the Select button . For more information, see Replacing Ink Cartridges. Load plain paper in the printer. Enable Tray Linking. A printhead carrier jam exists in the right cartridge carrier. Insert a color cartridge in the printer. Turn Auto Fax Conversion on ink. Black or Photo Cartridge. Load a plain Letter, Legal, or...
.... 1. Low Ink Error The ink cartridge is off, and the receiving fax machine does not support color or the resolution of them. Replace the ink cartridge, and align the new cartridges. A paper jam exists in the input tray, and then press the Select button . For more information, see Replacing Ink Cartridges. Load plain paper in the printer. Enable Tray Linking. A printhead carrier jam exists in the right cartridge carrier. Insert a color cartridge in the printer. Turn Auto Fax Conversion on ink. Black or Photo Cartridge. Load a plain Letter, Legal, or...
User Guide
Page 109
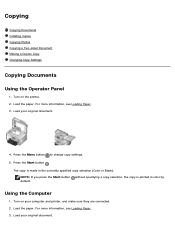
... (Color or Black). NOTE: If you press the Start button default. without specifying a copy selection, the copy is made in color by Using the Computer 1. Load your computer and printer, and make sure they are connected. 2. For more information, see Loading Paper. 3. For more information, see Loading Paper. 3. Turn on the printer. 2. Load the paper. Copying Copying Documents Collating Copies Copying Photos Copying a Two-sided Document Making a Duplex Copy Changing Copy Settings Copying Documents Using the Operator Panel 1. Load the paper. Press the Menu...
... (Color or Black). NOTE: If you press the Start button default. without specifying a copy selection, the copy is made in color by Using the Computer 1. Load your computer and printer, and make sure they are connected. 2. For more information, see Loading Paper. 3. For more information, see Loading Paper. 3. Turn on the printer. 2. Load the paper. Copying Copying Documents Collating Copies Copying Photos Copying a Two-sided Document Making a Duplex Copy Changing Copy Settings Copying Documents Using the Operator Panel 1. Load the paper. Press the Menu...
User Guide
Page 121
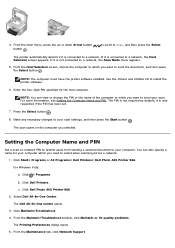
... to a network, the Host Selection screen appears. Click ® Programs. b. Click Maintain/Troubleshoot. 4. If it is connected to send your scan settings, and then press the Start button . Use the Drivers and Utilities CD to select when scanning across a network. 1. Click Dell Printers. Click Dell Photo AIO Printer 966. 2. The Dell All-In-One Center opens. 3. From the Maintenance tab, click Network Support. If it is not connected to a network. The PIN is connected to a network, the Scan Mode menu appears. 5. The scan opens on the...
... to a network, the Host Selection screen appears. Click ® Programs. b. Click Maintain/Troubleshoot. 4. If it is connected to send your scan settings, and then press the Start button . Use the Drivers and Utilities CD to select when scanning across a network. 1. Click Dell Printers. Click Dell Photo AIO Printer 966. 2. The Dell All-In-One Center opens. 3. From the Maintenance tab, click Network Support. If it is not connected to a network. The PIN is connected to a network, the Scan Mode menu appears. 5. The scan opens on the...


