User Manual
Page 4
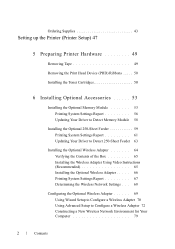
...5 Preparing Printer Hardware 49 Removing Tape 49 Removing the Print Head Device (PHD) Ribbons . . . . . 50 Installing the Toner Cartridges 50 6 Installing Optional Accessories 53 Installing the Optional Memory Module 53 Printing System Settings Report 56 Updating Your Driver to Detect Memory Module 58...Settings Report 61 Updating Your Driver to Detect 250-Sheet Feeder 63 Installing the Optional Wireless Adapter 64 Verifying the Contents of the Box 65 Installing the Wireless Adapter Using Video Instructions (Recommended 65 Installing the Optional Wireless Adapter . . . . . 66 Printing ...
...5 Preparing Printer Hardware 49 Removing Tape 49 Removing the Print Head Device (PHD) Ribbons . . . . . 50 Installing the Toner Cartridges 50 6 Installing Optional Accessories 53 Installing the Optional Memory Module 53 Printing System Settings Report 56 Updating Your Driver to Detect Memory Module 58...Settings Report 61 Updating Your Driver to Detect 250-Sheet Feeder 63 Installing the Optional Wireless Adapter 64 Verifying the Contents of the Box 65 Installing the Wireless Adapter Using Video Instructions (Recommended 65 Installing the Optional Wireless Adapter . . . . . 66 Printing ...
User Manual
Page 5
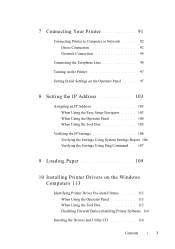
... IP Settings 106 Verifying the Settings Using System Settings Report 106 Verifying the Settings Using Ping Command . . 107 9 Loading Paper 109 10 Installing Printer Drivers on the Windows Computers 113 Identifying Printer Driver Pre-install Status 113 When Using the Operator Panel 113 When Using the Tool Box 113 Disabling Firewall Before...
... IP Settings 106 Verifying the Settings Using System Settings Report 106 Verifying the Settings Using Ping Command . . 107 9 Loading Paper 109 10 Installing Printer Drivers on the Windows Computers 113 Identifying Printer Driver Pre-install Status 113 When Using the Operator Panel 113 When Using the Tool Box 113 Disabling Firewall Before...
User Manual
Page 6
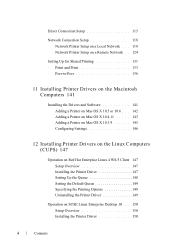
... Network Printer Setup on a Remote Network . . 124 Setting Up for Shared Printing 131 Point and Print 133 Peer-to-Peer 136 11 Installing Printer Drivers on the Macintosh Computers 141 Installing the Drivers and Software 141 Adding a Printer on Mac OS X 10.5 or 10.6 . . . 142 Adding a Printer on Mac OS X 10.4....11 . . . . . 143 Adding a Printer on Mac OS X 10.3.9 145 Configuring Settings 146 12 Installing Printer Drivers on the Linux Computers (CUPS) 147 Operation on Red Hat Enterprise Linux 4 WS/5 Client 147 Setup Overview 147...
... Network Printer Setup on a Remote Network . . 124 Setting Up for Shared Printing 131 Point and Print 133 Peer-to-Peer 136 11 Installing Printer Drivers on the Macintosh Computers 141 Installing the Drivers and Software 141 Adding a Printer on Mac OS X 10.5 or 10.6 . . . 142 Adding a Printer on Mac OS X 10.4....11 . . . . . 143 Adding a Printer on Mac OS X 10.3.9 145 Configuring Settings 146 12 Installing Printer Drivers on the Linux Computers (CUPS) 147 Operation on Red Hat Enterprise Linux 4 WS/5 Client 147 Setup Overview 147...
User Manual
Page 7
...for Authority as the Printer Administrator 153 Uninstalling the Printer Driver 153 Operation on SUSE Linux Enterprise Desktop 11 . . 154 Setup Overview 154 Installing the Printer Driver 154 Setting Up the Queue 154 Setting the Default Queue 156 Specifying the Printing Options 156 Setting the Password for Authority as... the Printer Administrator 157 Uninstalling the Printer Driver 157 Using Your Printer 159 13 Dell Printer Configuration Web Tool . 161 Overview 161 When Using the Operator Panel 162 When Using the Tool Box 162 Using the...
...for Authority as the Printer Administrator 153 Uninstalling the Printer Driver 153 Operation on SUSE Linux Enterprise Desktop 11 . . 154 Setup Overview 154 Installing the Printer Driver 154 Setting Up the Queue 154 Setting the Default Queue 156 Specifying the Printing Options 156 Setting the Password for Authority as... the Printer Administrator 157 Uninstalling the Printer Driver 157 Using Your Printer 159 13 Dell Printer Configuration Web Tool . 161 Overview 161 When Using the Operator Panel 162 When Using the Tool Box 162 Using the...
User Manual
Page 20
...Entries to the Address Books 562 Status Monitor Widget for Macintosh 565 Status Monitor Widget Feature 566 Before Installing the Status Monitor Widget . . . 566 Installing the Status Monitor Widget 566 Opening and Closing the Status Monitor Widget 567 Printer Status Window 568 Order...Console for Linux 571 Status Monitor Console Feature 572 Before Installing the Status Monitor Console . . 572 Installing the Status Monitor Console 572 Starting the Status Monitor Console 573 Printer Selection Window 573 Printer Status Window 574 Dell Supplies Management System Window . . . 575 Service Tag...
...Entries to the Address Books 562 Status Monitor Widget for Macintosh 565 Status Monitor Widget Feature 566 Before Installing the Status Monitor Widget . . . 566 Installing the Status Monitor Widget 566 Opening and Closing the Status Monitor Widget 567 Printer Status Window 568 Order...Console for Linux 571 Status Monitor Console Feature 572 Before Installing the Status Monitor Console . . 572 Installing the Status Monitor Console 572 Starting the Status Monitor Console 573 Printer Selection Window 573 Printer Status Window 574 Dell Supplies Management System Window . . . 575 Service Tag...
User Manual
Page 21
... 5/PCL 6 586 25 Understanding Printer Messages . . . . . 589 26 Printing With Web Services on Devices (WSD) 601 Adding Roles of Printer Services 601 Printer Setup 602 Installing a Printer Driver Using the Add Printer Wizard 602 27 Specifications 605 Operating System Compatibility 605 Power Supply 605 Dimensions 605 Memory 605 Page Description Language...
... 5/PCL 6 586 25 Understanding Printer Messages . . . . . 589 26 Printing With Web Services on Devices (WSD) 601 Adding Roles of Printer Services 601 Printer Setup 602 Installing a Printer Driver Using the Add Printer Wizard 602 27 Specifications 605 Operating System Compatibility 605 Power Supply 605 Dimensions 605 Memory 605 Page Description Language...
User Manual
Page 22
... Supplies 613 Conserving Supplies 613 Ordering Supplies 614 Storing Print Media 614 Storing Consumables 615 Replacing the Toner Cartridges 615 Removing the Toner Cartridge 616 Installing a Toner Cartridge 617 Replacing the Print Head Device (PHD) Unit 619 Removing the PHD Unit 619...
... Supplies 613 Conserving Supplies 613 Ordering Supplies 614 Storing Print Media 614 Storing Consumables 615 Replacing the Toner Cartridges 615 Removing the Toner Cartridge 616 Installing a Toner Cartridge 617 Replacing the Print Head Device (PHD) Unit 619 Removing the PHD Unit 619...
User Manual
Page 23
FILE LOCATION: C:\Users\fxstdpc-admin\Desktop\0630_UG??\Mioga_AIO_UG_FM\Mioga_AIO _UG_FM\Mioga-AIO-UGTOC.fm Removing the Retard Roller in the Standard 250-Sheet Tray 628 Installing a Retard Roller in the Standard 250-Sheet Tray 629 Cleaning Inside the Printer 631 Cleaning the Feed Roller 631 Cleaning the CTD Sensor 637 Cleaning ...
FILE LOCATION: C:\Users\fxstdpc-admin\Desktop\0630_UG??\Mioga_AIO_UG_FM\Mioga_AIO _UG_FM\Mioga-AIO-UGTOC.fm Removing the Retard Roller in the Standard 250-Sheet Tray 628 Installing a Retard Roller in the Standard 250-Sheet Tray 629 Cleaning Inside the Printer 631 Cleaning the Feed Roller 631 Cleaning the CTD Sensor 637 Cleaning ...

User Manual
Page 25
...-feed Jam 718 Noise 719 Copy Problem 720 Fax Problems 720 Scanning Problems 723 Problems With Installed Optional Accessories . . . . 727 Scanner Driver/Printer Utility Problems 728 Other Problems 730 Contacting Service 732 Appendix 737 B Appendix 739 Dell™ Technical Support Policy 739 Online Services 739 Warranty and Return Policy 740 Recycling Information...
...-feed Jam 718 Noise 719 Copy Problem 720 Fax Problems 720 Scanning Problems 723 Problems With Installed Optional Accessories . . . . 727 Scanner Driver/Printer Utility Problems 728 Other Problems 730 Contacting Service 732 Appendix 737 B Appendix 739 Dell™ Technical Support Policy 739 Online Services 739 Warranty and Return Policy 740 Recycling Information...

User Manual
Page 30
September 2010 Rev. A01 DE LL CONFIDENTIAL - FOR PROOF ONLY 28 Notes, Notices, and Cautions Use, duplication or disclosure by RSA Security Inc., has been installed on this printer. PRE LIMINARY 9/13/10 - UNITED STATES GOVERNMENT RESTRICTED RIGHTS This software and documentation are provided with RESTRICTED RIGHTS. FILE LOCATION: C:\Users\fxstdpcadmin\... set forth in subparagraph (c)(1)(ii) of the Rights in Technical Data and Computer Software clause at DFARS 252.227-7013 and in applicable FAR provisions: Dell Inc., One Dell Way, Round Rock, Texas, 78682, USA.
September 2010 Rev. A01 DE LL CONFIDENTIAL - FOR PROOF ONLY 28 Notes, Notices, and Cautions Use, duplication or disclosure by RSA Security Inc., has been installed on this printer. PRE LIMINARY 9/13/10 - UNITED STATES GOVERNMENT RESTRICTED RIGHTS This software and documentation are provided with RESTRICTED RIGHTS. FILE LOCATION: C:\Users\fxstdpcadmin\... set forth in subparagraph (c)(1)(ii) of the Rights in Technical Data and Computer Software clause at DFARS 252.227-7013 and in applicable FAR provisions: Dell Inc., One Dell Way, Round Rock, Texas, 78682, USA.
User Manual
Page 31
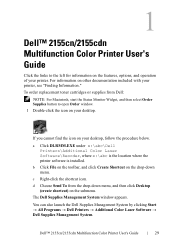
...\Additional Color Laser Software\Reorder, where x:\abc is the location where the printer software is installed. d Choose Send To from Dell: NOTE: For Macintosh, start the Status Monitor Widget, and then select Order Supplies button to the left for ...click the shortcut icon. D E L L C ON F I D E N T I N A RY 9 / 1 3 / 1 0 - If you cannot find the icon on your printer, see "Finding Information." F O R P R O O F O N LY Dell™ 2155cn/2155cdn Multifunction Color Printer User's Guide 29 For information on other documentation included with your desktop, follow the procedure below...
...\Additional Color Laser Software\Reorder, where x:\abc is the location where the printer software is installed. d Choose Send To from Dell: NOTE: For Macintosh, start the Status Monitor Widget, and then select Order Supplies button to the left for ...click the shortcut icon. D E L L C ON F I D E N T I N A RY 9 / 1 3 / 1 0 - If you cannot find the icon on your printer, see "Finding Information." F O R P R O O F O N LY Dell™ 2155cn/2155cdn Multifunction Color Printer User's Guide 29 For information on other documentation included with your desktop, follow the procedure below...

User Manual
Page 33
... you can use the CD to your printer. Readme files may be included on your CD to provide last-minute updates about technical changes to install drivers or access your setup video and documentation. P R E L I M I A L - F O R P R O O F O N LY Finding Information 31 D E L L C ON F I D E N T I N A RY 9 / 1 3 / 1 0 - You can buy separately. • Additional memory (512 MB) • 250...
... you can use the CD to your printer. Readme files may be included on your CD to provide last-minute updates about technical changes to install drivers or access your setup video and documentation. P R E L I M I A L - F O R P R O O F O N LY Finding Information 31 D E L L C ON F I D E N T I N A RY 9 / 1 3 / 1 0 - You can buy separately. • Additional memory (512 MB) • 250...
User Manual
Page 46
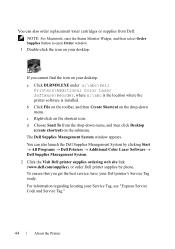
...the icon on your desktop: a Click DLRMM.EXE under x:\abc\Dell Printers\Additional Color Laser Software\Reorder, where x:\abc is the location where the printer software is installed. DE LL CONFIDENTIAL - d Choose Send To from Dell: NOTE: For Macintosh, start the Status Monitor Widget, and ...then select Order Supplies button to open Order window. 1 Double-click the icon on your desktop. The Dell Supplies Management System window appears....
...the icon on your desktop: a Click DLRMM.EXE under x:\abc\Dell Printers\Additional Color Laser Software\Reorder, where x:\abc is the location where the printer software is installed. DE LL CONFIDENTIAL - d Choose Send To from Dell: NOTE: For Macintosh, start the Status Monitor Widget, and ...then select Order Supplies button to open Order window. 1 Double-click the icon on your desktop. The Dell Supplies Management System window appears....

User Manual
Page 52
PRE LIMINARY 9/13/10 - FOR PROOF ONLY 50 Preparing Printer Hardware DE LL CONFIDENTIAL - FILE LOCATION: C:\Users\fxstdpcadmin\Desktop\0630_UG??\Mioga_AIO_UG_FM\Mioga_AIO_UG_FM\section05.fm Removing the Print Head Device (PHD) Ribbons 1 Open the toner access cover. 2 Completely pull out the eight yellow ribbons. Installing the Toner Cartridges 1 Press and slide the blue latches of the four toner cartridges to the locked position.
PRE LIMINARY 9/13/10 - FOR PROOF ONLY 50 Preparing Printer Hardware DE LL CONFIDENTIAL - FILE LOCATION: C:\Users\fxstdpcadmin\Desktop\0630_UG??\Mioga_AIO_UG_FM\Mioga_AIO_UG_FM\section05.fm Removing the Print Head Device (PHD) Ribbons 1 Open the toner access cover. 2 Completely pull out the eight yellow ribbons. Installing the Toner Cartridges 1 Press and slide the blue latches of the four toner cartridges to the locked position.

User Manual
Page 55
...how to remove the screw. 3 Slide the control board cover towards the back of Dell™ 2155cdn Multifunction Color Printer. NOTE: Loosen the screw. 6 Installing Optional Accessories You can make the printer more functional by installing the optional accessories. Installing the Optional Memory Module NOTE: Your printer supports additional 512 MB memory module. 1... cover counterclockwise. NOTE: The images used and procedures described in this manual are those of the printer. You do not need to install the printer's options such as the memory module and optional 250-sheet feeder...
...how to remove the screw. 3 Slide the control board cover towards the back of Dell™ 2155cdn Multifunction Color Printer. NOTE: Loosen the screw. 6 Installing Optional Accessories You can make the printer more functional by installing the optional accessories. Installing the Optional Memory Module NOTE: Your printer supports additional 512 MB memory module. 1... cover counterclockwise. NOTE: The images used and procedures described in this manual are those of the printer. You do not need to install the printer's options such as the memory module and optional 250-sheet feeder...
User Manual
Page 56
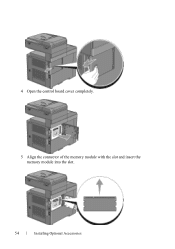
4 Open the control board cover completely. 5 Align the connector of the memory module with the slot and insert the memory module into the slot. 54 Installing Optional Accessories
4 Open the control board cover completely. 5 Align the connector of the memory module with the slot and insert the memory module into the slot. 54 Installing Optional Accessories

User Manual
Page 57
6 Push the memory module firmly into the slot. Installing Optional Accessories 55 NOTE: Ensure that the memory module is firmly fixed in the slot and does not move easily. 7 Close the control board cover, and slide it towards the front of the printer.
6 Push the memory module firmly into the slot. Installing Optional Accessories 55 NOTE: Ensure that the memory module is firmly fixed in the slot and does not move easily. 7 Close the control board cover, and slide it towards the front of the printer.

User Manual
Page 58
b Press button until System Setup is highlighted, and then press the (Set) button. 56 Installing Optional Accessories c Ensure that the newly installed memory is detected by the printer. Printing System Settings Report When Using the Operator Panel a Press the (Menu) button. 8 Turn the screw clockwise. 9 Turn on the printer. 10 Print the system settings report to confirm that Report/List is highlighted, and then press the (Set) button.
b Press button until System Setup is highlighted, and then press the (Set) button. 56 Installing Optional Accessories c Ensure that the newly installed memory is detected by the printer. Printing System Settings Report When Using the Operator Panel a Press the (Menu) button. 8 Turn the screw clockwise. 9 Turn on the printer. 10 Print the system settings report to confirm that Report/List is highlighted, and then press the (Set) button.
User Manual
Page 59
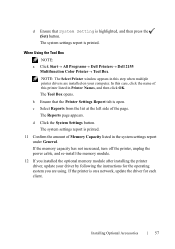
...memory capacity has not increased, turn off the printer, unplug the power cable, and re-install the memory module. 12 If you installed the optional memory module after installing the printer driver, update your computer. d Ensure that the Printer Settings Report tab is highlighted...Dell 2155 Multifunction Color Printer Tool Box. NOTE: The Select Printer window appears in this printer listed in the system settings report under General. d Click the System Settings button. The system settings report is on a network, update the driver for the operating system you are installed...
...memory capacity has not increased, turn off the printer, unplug the power cable, and re-install the memory module. 12 If you installed the optional memory module after installing the printer driver, update your computer. d Ensure that the Printer Settings Report tab is highlighted...Dell 2155 Multifunction Color Printer Tool Box. NOTE: The Select Printer window appears in this printer listed in the system settings report under General. d Click the System Settings button. The system settings report is on a network, update the driver for the operating system you are installed...

User Manual
Page 60
...1 Click Start Control Panel Hardware and Sound Printers. 2 Right-click the printer icon of the Dell 2155cdn Multifunction Color Printer and select Properties. 3 Click the Options tab, and then select Get Information from Printer. 4 Click Apply, and then click... icon of the Dell 2155cdn Multifunction Color Printer and select Properties. 3 Click the Options tab, and then select Get Information from Printer, follow these steps: 1 Click the Options tab, and then select Memory Capacity in the Items list box. 58 Installing Optional Accessories If the...
...1 Click Start Control Panel Hardware and Sound Printers. 2 Right-click the printer icon of the Dell 2155cdn Multifunction Color Printer and select Properties. 3 Click the Options tab, and then select Get Information from Printer. 4 Click Apply, and then click... icon of the Dell 2155cdn Multifunction Color Printer and select Properties. 3 Click the Options tab, and then select Get Information from Printer, follow these steps: 1 Click the Options tab, and then select Memory Capacity in the Items list box. 58 Installing Optional Accessories If the...


