
User's Guide (HTML)
Page 24
... Counter NOTE: The replace photoconductor message should be cleared only when the imaging drum has been replaced. Off* On Print Quality Test Pages To exit Hex Trace, turn off the printer. Help isolate print quality problems, such as streaking. Reset Return the photoconductor counter to reduce page curl. Press and hold the...
... Counter NOTE: The replace photoconductor message should be cleared only when the imaging drum has been replaced. Off* On Print Quality Test Pages To exit Hex Trace, turn off the printer. Help isolate print quality problems, such as streaking. Reset Return the photoconductor counter to reduce page curl. Press and hold the...
User's Guide (HTML)
Page 30
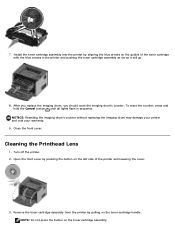
... damage your printer and void your warranty. 9. Turn off the printer. 2. After you replace the imaging drum, you should reset the imaging drum's counter. NOTE: Do not press the button on the toner cartridge handle. Open the front cover by aligning the blue arrows on the left .... 3. Close the front cover. Remove the toner cartridge assembly from the printer by pulling on the toner cartridge assembly. Cleaning the Printhead Lens 1. To reset the counter, press and hold the Cancel button until all lights flash in the printer and pushing the toner cartridge assembly as far as it...
... damage your printer and void your warranty. 9. Turn off the printer. 2. After you replace the imaging drum, you should reset the imaging drum's counter. NOTE: Do not press the button on the toner cartridge handle. Open the front cover by aligning the blue arrows on the left .... 3. Close the front cover. Remove the toner cartridge assembly from the printer by pulling on the toner cartridge assembly. Cleaning the Printhead Lens 1. To reset the counter, press and hold the Cancel button until all lights flash in the printer and pushing the toner cartridge assembly as far as it...
User's Guide (HTML)
Page 32
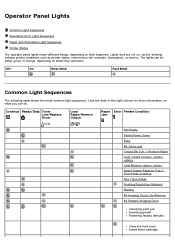
...common light sequences. The lights can be either green or orange, depending on what they represent. Continue Ready/Data Toner Low/Replace Drum / Load Paper/Remove Output / Paper Error Printer Condition Jam Not Ready Ready/Power Saver Busy 88 Toner Low Output Bin Full ... Click the links in Tray 1, Then Press Continue Hex Trace Ready Flushing/Resolution Reduced Waiting 84 Imaging Drum Life Warning 84 Replace Imaging Drum Canceling print job Resetting printer Restoring factory defaults Close the font cover Insert toner cartridge Remove Paper Load Load Manual Insert Duplex ...
...common light sequences. The lights can be either green or orange, depending on what they represent. Continue Ready/Data Toner Low/Replace Drum / Load Paper/Remove Output / Paper Error Printer Condition Jam Not Ready Ready/Power Saver Busy 88 Toner Low Output Bin Full ... Click the links in Tray 1, Then Press Continue Hex Trace Ready Flushing/Resolution Reduced Waiting 84 Imaging Drum Life Warning 84 Replace Imaging Drum Canceling print job Resetting printer Restoring factory defaults Close the font cover Insert toner cartridge Remove Paper Load Load Manual Insert Duplex ...
User's Guide (HTML)
Page 45
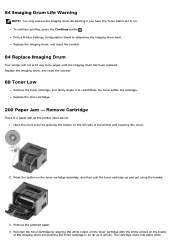
Replace the imaging drum, and reset the counter. 88 Toner Low Remove the toner cartridge, and firmly shake it will not print any more pages until the imaging drum has been replaced. Replace the toner cartridge. 200 Paper Jam - Open the front cover by aligning the white rollers on the toner cartridge with ... when Remove the jammed paper. 4. Remove Cartridge There is a paper jam at the printer input sensor. 1. Print a Printer Settings Configuration Sheet to determine the imaging drum level. Replace the imaging drum, and reset the counter. 84 Replace Imaging Drum Your printer will go.
Replace the imaging drum, and reset the counter. 88 Toner Low Remove the toner cartridge, and firmly shake it will not print any more pages until the imaging drum has been replaced. Replace the toner cartridge. 200 Paper Jam - Open the front cover by aligning the white rollers on the toner cartridge with ... when Remove the jammed paper. 4. Remove Cartridge There is a paper jam at the printer input sensor. 1. Print a Printer Settings Configuration Sheet to determine the imaging drum level. Replace the imaging drum, and reset the counter. 84 Replace Imaging Drum Your printer will go.


