User Guide
Page 7
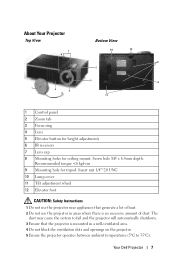
About Your Projector Top View 1 6 Bottom View 10 12 8 2 3 9 7 5 4 11 1 Control panel 2 Zoom tab 3 Focus ring 4 Lens 5 Elevator button for height adjustments 6 IR receivers 7 Lens cap 8 Mounting holes for ceiling mount: Screw hole M3 x 6.5mm depth. Recommended torque
About Your Projector Top View 1 6 Bottom View 10 12 8 2 3 9 7 5 4 11 1 Control panel 2 Zoom tab 3 Focus ring 4 Lens 5 Elevator button for height adjustments 6 IR receivers 7 Lens cap 8 Mounting holes for ceiling mount: Screw hole M3 x 6.5mm depth. Recommended torque
User Guide
Page 8
NOTE: • Do not attempt to ceiling mount the projector yourself. For more information, see the Dell Support website at support.dell.com. • For more information, see the Safety Information that is shipped with your eyes. 8 Do not place any objects near or in front of ... projector is on or immediately after it may cause the object to melt or burn. It should be installed by a qualified technician. • Recommended Projector Ceiling Mount Kit (P/N: C3505). 6 Do not try to touch the ventilation outlet as it can become very hot after the projector has been turned on as the...
NOTE: • Do not attempt to ceiling mount the projector yourself. For more information, see the Dell Support website at support.dell.com. • For more information, see the Safety Information that is shipped with your eyes. 8 Do not place any objects near or in front of ... projector is on or immediately after it may cause the object to melt or burn. It should be installed by a qualified technician. • Recommended Projector Ceiling Mount Kit (P/N: C3505). 6 Do not try to touch the ventilation outlet as it can become very hot after the projector has been turned on as the...
User Guide
Page 39
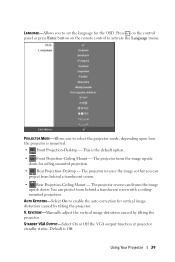
...-Manually adjust the vertical image distortion caused by tilting the projector. Default is the default option. • Front Projection-Ceiling Mount - The projector turns the image upside down . V. This is Off. PROJECTOR MODE-Allows you to set the language for the ...the Language menu. LANGUAGE-Allows you to select the projector mode, depending upon how the projector is mounted. • Front Projection-Desktop - Press on the control panel or press Enter button on the remote control to enable the auto correction for ceiling-mounted projection. • Rear Projection-Desktop -
...-Manually adjust the vertical image distortion caused by tilting the projector. Default is the default option. • Front Projection-Ceiling Mount - The projector turns the image upside down . V. This is Off. PROJECTOR MODE-Allows you to set the language for the ...the Language menu. LANGUAGE-Allows you to select the projector mode, depending upon how the projector is mounted. • Front Projection-Desktop - Press on the control panel or press Enter button on the remote control to enable the auto correction for ceiling-mounted projection. • Rear Projection-Desktop -
User Guide
Page 51
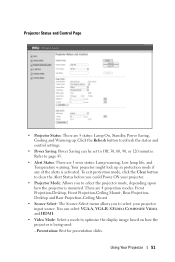
..., Low lamp life, and Temperature warning. Refer to select the projector mode, depending upon how the projector is mounted. There are 4 projection modes: Front Projection-Desktop, Front Projection-Ceiling Mount, Rear ProjectionDesktop and Rear Projection-Ceiling Mount • Source Select: The Source Select menu allows you to select your projector. • Projector Mode: Allows you...
..., Low lamp life, and Temperature warning. Refer to select the projector mode, depending upon how the projector is mounted. There are 4 projection modes: Front Projection-Desktop, Front Projection-Ceiling Mount, Rear ProjectionDesktop and Rear Projection-Ceiling Mount • Source Select: The Source Select menu allows you to select your projector. • Projector Mode: Allows you...


