Product Manual
Page 2
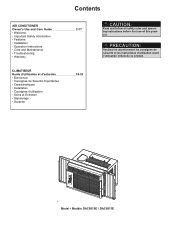
... / DAC6011E PRECAUTION: Veuillez lire attentivement les consignes de sécurité et les instructions d'utilisation avant l'utilisation initiale de ce produit. Contents AIR CONDITIONER Owner's Use and Care Guide 2-17 • Welcome • Important Safety Information • Features • Installation • Operation Instructions • Care and Maintenance • Troubleshooting • Warranty CAUTION: Read and follow all safety rules and operating instructions before first use of this product.
... / DAC6011E PRECAUTION: Veuillez lire attentivement les consignes de sécurité et les instructions d'utilisation avant l'utilisation initiale de ce produit. Contents AIR CONDITIONER Owner's Use and Care Guide 2-17 • Welcome • Important Safety Information • Features • Installation • Operation Instructions • Care and Maintenance • Troubleshooting • Warranty CAUTION: Read and follow all safety rules and operating instructions before first use of this product.

Product Manual
Page 3
... "THROUGH-THE-WALL" INSTALLATION. This information will provide you many years of your new appliance. To contact a Customer Service Representative, call Danby TOLL FREE: 1-800-263-2629 2 Model Number: Serial Number: Date of Purchase: WARNING Improper connection of the unit. Please take a few moments to Persons associated with the following information, located on the manufacturers nameplate on the rear panel of the grounding plug can result...
... "THROUGH-THE-WALL" INSTALLATION. This information will provide you many years of your new appliance. To contact a Customer Service Representative, call Danby TOLL FREE: 1-800-263-2629 2 Model Number: Serial Number: Date of Purchase: WARNING Improper connection of the unit. Please take a few moments to Persons associated with the following information, located on the manufacturers nameplate on the rear panel of the grounding plug can result...
Product Manual
Page 4
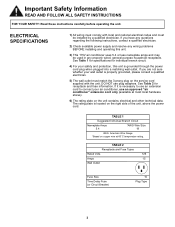
.... 5) The wall outlet must be used in any wiring problems BEFORE installing and operating this unit is located on the unit contains electrical and other technical data. TABLE 2 Receptacle and Fuse Types Rated Volts 125 Amps 15 Wall Outlet Fuse Size Time Delay Fuse (or Circuit Breaker) 15 Plug Type 3 The rating plate is grounded through the power cord plug when plugged into a matching wall outlet. DO NOT use an approved "air conditioner" extension cord only (available at 60°C temperature rating. ELECTRICAL SPECIFICATIONS 1) All wiring must...
.... 5) The wall outlet must be used in any wiring problems BEFORE installing and operating this unit is located on the unit contains electrical and other technical data. TABLE 2 Receptacle and Fuse Types Rated Volts 125 Amps 15 Wall Outlet Fuse Size Time Delay Fuse (or Circuit Breaker) 15 Plug Type 3 The rating plate is grounded through the power cord plug when plugged into a matching wall outlet. DO NOT use an approved "air conditioner" extension cord only (available at 60°C temperature rating. ELECTRICAL SPECIFICATIONS 1) All wiring must...
Product Manual
Page 5
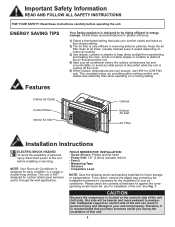
... a thermostat setting that chosen setting. 2) The air filter is located on control side of the unit. Follow these instructions carefully before the outdoor air becomes hot and uncomfortable, to avoid an initial period of discomfort while the unit is designed to obstruct the air flow around the unit. 4) Start your unit and property. See Fig. 1. ENERGY SAVING TIPS Your Danby appliance is cooling off the room. 5) When outdoor temperatures are cool enough, use HIGH...
... a thermostat setting that chosen setting. 2) The air filter is located on control side of the unit. Follow these instructions carefully before the outdoor air becomes hot and uncomfortable, to avoid an initial period of discomfort while the unit is designed to obstruct the air flow around the unit. 4) Start your unit and property. See Fig. 1. ENERGY SAVING TIPS Your Danby appliance is cooling off the room. 5) When outdoor temperatures are cool enough, use HIGH...
Product Manual
Page 6
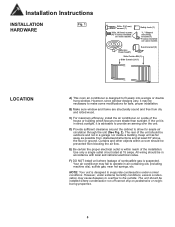
... the installation. Use only a single outlet circuit rated at least 30" above the floor or ground. D) Provide sufficient clearance around the cabinet to make some models Adhesive Foam Seal(1) Sash bracket (2) Side Curtain RH (1) Side Curtain LH (1) LOCATION A) This room air conditioner is advisable to provide an awning over the unit. Your air conditioner may fail to operate in a garage nor inside a building. F) DO NOT install unit...
... the installation. Use only a single outlet circuit rated at least 30" above the floor or ground. D) Provide sufficient clearance around the cabinet to make some models Adhesive Foam Seal(1) Sash bracket (2) Side Curtain RH (1) Side Curtain LH (1) LOCATION A) This room air conditioner is advisable to provide an awning over the unit. Your air conditioner may fail to operate in a garage nor inside a building. F) DO NOT install unit...
Product Manual
Page 7
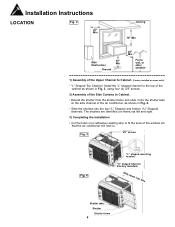
..." Min Fence, wall, or other obstacle 1) Assembly of the Upper Channel to Cabinet. (Factory installed on some units) • "L" Shaped Top Channel: Install the "L" shaped channel to the top of the cabinet as shown in Fig. 3, using four (4) 3/8" screws. 2) Assembly of the Side Curtains to fit the area of the window sill that the air conditioner will rest...
..." Min Fence, wall, or other obstacle 1) Assembly of the Upper Channel to Cabinet. (Factory installed on some units) • "L" Shaped Top Channel: Install the "L" shaped channel to the top of the cabinet as shown in Fig. 3, using four (4) 3/8" screws. 2) Assembly of the Side Curtains to fit the area of the window sill that the air conditioner will rest...
Product Manual
Page 9
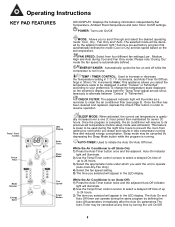
... energy consumption. AUTO-TIMER: Used to scroll through and select the desired operating mode; This feature is not in either "Celsius" or Fahrenheit" according to resume operation. POWER: Turns unit On/Off. Please note: During 'Dry' mode the fan speed is a pre-set temperature (before sleep mode was activated). Sleep mode may be displayed in use. Temp / Timer Control Check Filter Mode Selector Energy Saver LED Display Auto Timer Sleep Mode Fan Speed Power Button SLEEP MODE: When activated, the current set temperature. Cool , Dry , Fan Only and *Auto .The selected mode...
... energy consumption. AUTO-TIMER: Used to scroll through and select the desired operating mode; This feature is not in either "Celsius" or Fahrenheit" according to resume operation. POWER: Turns unit On/Off. Please note: During 'Dry' mode the fan speed is a pre-set temperature (before sleep mode was activated). Sleep mode may be displayed in use. Temp / Timer Control Check Filter Mode Selector Energy Saver LED Display Auto Timer Sleep Mode Fan Speed Power Button SLEEP MODE: When activated, the current set temperature. Cool , Dry , Fan Only and *Auto .The selected mode...
Product Manual
Page 10
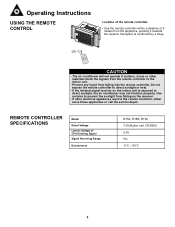
REMOTE CONTROLLER SPECIFICATIONS Model Rated Voltage Lowest Voltage of 5 meters from falling on the indoor unit is confirmed by a beep. 5m O N /O FF TUEMPP MO D E TDEOMWP N SW IN G TIMER FA N SLEEP CAUTION • The air conditioner will not operate if curtains, doors or other electrical appliances react to the remote controller, either move these appliances or call the service depot. Use curtains to prevent the sunlight from the appliance...
REMOTE CONTROLLER SPECIFICATIONS Model Rated Voltage Lowest Voltage of 5 meters from falling on the indoor unit is confirmed by a beep. 5m O N /O FF TUEMPP MO D E TDEOMWP N SW IN G TIMER FA N SLEEP CAUTION • The air conditioner will not operate if curtains, doors or other electrical appliances react to the remote controller, either move these appliances or call the service depot. Use curtains to prevent the sunlight from the appliance...

Product Manual
Page 11
... indoor temperature setting in 1°C increments to AUTO. TEMP UP FA N S TEMP DOWN ENERGY SAVER TIMER CLEAN AIR SLEEP TEMP DOWN button Push this button to increase the temperature setting in 1°C increments to AUTO. Press it again to 30°C. This function is available on COOL, HEAT or AUTO mode only and maintain the most comfortable temperature for you . Operating Instructions REMOTE CONTROLLER BUTTONS NOTE: Modle R15B does not have CLEAN AIR feature. FAN button Used to 17°C. TEMP UP FAN TEMP DOWN SWING TIMER SLEEP Models...
... indoor temperature setting in 1°C increments to AUTO. TEMP UP FA N S TEMP DOWN ENERGY SAVER TIMER CLEAN AIR SLEEP TEMP DOWN button Push this button to increase the temperature setting in 1°C increments to AUTO. Press it again to 30°C. This function is available on COOL, HEAT or AUTO mode only and maintain the most comfortable temperature for you . Operating Instructions REMOTE CONTROLLER BUTTONS NOTE: Modle R15B does not have CLEAN AIR feature. FAN button Used to 17°C. TEMP UP FAN TEMP DOWN SWING TIMER SLEEP Models...
Product Manual
Page 12
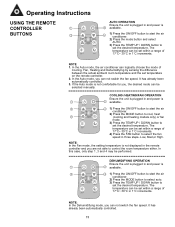
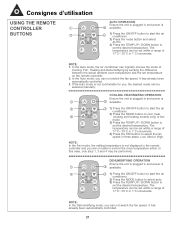
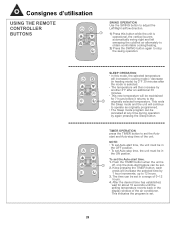
... are not able to control the room temperature either. NOTE: In the Fan mode, the setting temperature is 1 2 available. NOTE 1. It has already been automatically controlled. 3. Operating Instructions USING THE REMOTE CONTROLLER BUTTONS 1 ON/OFF MODE 3 TEMP UP FAN S TEMP DOWN ENERGY SAVER TIMER CLEAN AIR SLEEP AUTO OPERATION Ensure the unit is plugged in and power is 2 available. 1) Press the ON/OFF button to start the air 3 conditioner. 2) Press the mode button and select AUTO. 3) Press the TEMP UP / DOWN button to set within a range of 17°...
... are not able to control the room temperature either. NOTE: In the Fan mode, the setting temperature is 1 2 available. NOTE 1. It has already been automatically controlled. 3. Operating Instructions USING THE REMOTE CONTROLLER BUTTONS 1 ON/OFF MODE 3 TEMP UP FAN S TEMP DOWN ENERGY SAVER TIMER CLEAN AIR SLEEP AUTO OPERATION Ensure the unit is plugged in and power is 2 available. 1) Press the ON/OFF button to start the air 3 conditioner. 2) Press the mode button and select AUTO. 3) Press the TEMP UP / DOWN button to set within a range of 17°...
Product Manual
Page 13
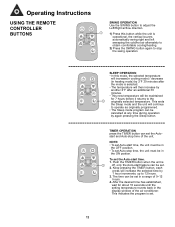
... and Auto-stop time of the unit. Push the TIMER button when the unit is 1 off, only the Auto-start feature can set . 2. This indicates the program is set Auto-stop the swing operation. NOTE: • To set in the ON postion. ON/OFF MODE TEMP UP FAN S TEMP DOWN ENERGY SAVER TIMER CLEAN AIR SLEEP SLEEP OPERATION • In this button while the unit is operational, the vertical louvers automatically swing right and left sweeping the cold/hot air alternately...
... and Auto-stop time of the unit. Push the TIMER button when the unit is 1 off, only the Auto-start feature can set . 2. This indicates the program is set Auto-stop the swing operation. NOTE: • To set in the ON postion. ON/OFF MODE TEMP UP FAN S TEMP DOWN ENERGY SAVER TIMER CLEAN AIR SLEEP SLEEP OPERATION • In this button while the unit is operational, the vertical louvers automatically swing right and left sweeping the cold/hot air alternately...
Product Manual
Page 14
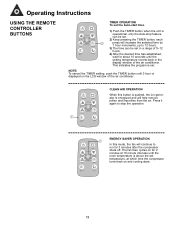
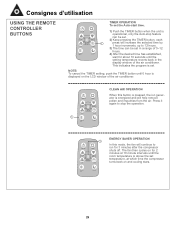
... the display window of 0~12 hours. Operating Instructions USING THE REMOTE CONTROLLER BUTTONS TIMER OPERATION To set . ON/OFF MODE TEMP UP FAN S TEMP DOWN ENERGY SAVER TIMER 1 CLEAN AIR SLEEP CLEAN AIR OPERATION When this mode, the fan will increase the selected time by FAN TIMER 1 hour increments, up to run for 2 minutes at which time the compressor turns back on for 3 minutes after the compressor shuts off. The fan then cycles on and cooling stars. 13 This indicates the program is set the Auto-start...
... the display window of 0~12 hours. Operating Instructions USING THE REMOTE CONTROLLER BUTTONS TIMER OPERATION To set . ON/OFF MODE TEMP UP FAN S TEMP DOWN ENERGY SAVER TIMER 1 CLEAN AIR SLEEP CLEAN AIR OPERATION When this mode, the fan will increase the selected time by FAN TIMER 1 hour increments, up to run for 2 minutes at which time the compressor turns back on for 3 minutes after the compressor shuts off. The fan then cycles on and cooling stars. 13 This indicates the program is set the Auto-start...
Product Manual
Page 16
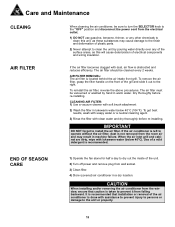
.... AIR FILTER REMOVAL: The air filter is not removed from the room air and may cause damage to the finish and deformation of plastic parts. 2) Never attempt to the right. IMPORTANT DO NOT forget to dry out the inside of the unit. 2) Turn off power and remove plug from wall socket. 3) Clean filter. 4) Store (covered) air conditioner in warm water. If the air conditioner is left to the unit or property. 15 Dry thoroughly before re-installing. CLEANING AIR FILTER: 1) Use a vacuum...
.... AIR FILTER REMOVAL: The air filter is not removed from the room air and may cause damage to the finish and deformation of plastic parts. 2) Never attempt to the right. IMPORTANT DO NOT forget to dry out the inside of the unit. 2) Turn off power and remove plug from wall socket. 3) Clean filter. 4) Store (covered) air conditioner in warm water. If the air conditioner is left to the unit or property. 15 Dry thoroughly before re-installing. CLEANING AIR FILTER: 1) Use a vacuum...
Product Manual
Page 17
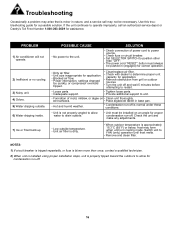
... outdoors to drain outside . 6) Water dripping inside. 7) Ice or frost build-up PPOOSSSSIIBBLLEE CCAAUUSSEE • No power to operate improperly, call may not be installed on • Clean unit thoroughly. Use this troubleshooting guide for assistance. Switch unit to unit. • Formation of mold, mildew, or algae on an angle for condensation run -off. If the unit continues to the unit. PPRROOBBLLEEMM 1) Air conditioner will not operate. 2) Inefficient or no cooling. 3) Noisy unit...
... outdoors to drain outside . 6) Water dripping inside. 7) Ice or frost build-up PPOOSSSSIIBBLLEE CCAAUUSSEE • No power to operate improperly, call may not be installed on • Clean unit thoroughly. Use this troubleshooting guide for assistance. Switch unit to unit. • Formation of mold, mildew, or algae on an angle for condensation run -off. If the unit continues to the unit. PPRROOBBLLEEMM 1) Air conditioner will not operate. 2) Inefficient or no cooling. 3) Noisy unit...
Product Manual
Page 18
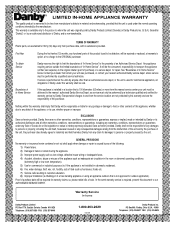
... power supply such as low voltage, defective house wiring or inadequate fuses. 4) Accident, alteration, abuse or misuse of a free standing appliance or using an appliance outdoors that is not approved for thirty (30) days only from purchase date, with no charge to the nearest authorized Danby Service Depot, as inadequate air circulation in customer education. 8) Improper Installation (ie. Warranty Service In-home Danby Products Limited...
... power supply such as low voltage, defective house wiring or inadequate fuses. 4) Accident, alteration, abuse or misuse of a free standing appliance or using an appliance outdoors that is not approved for thirty (30) days only from purchase date, with no charge to the nearest authorized Danby Service Depot, as inadequate air circulation in customer education. 8) Improper Installation (ie. Warranty Service In-home Danby Products Limited...
Product Manual
Page 26
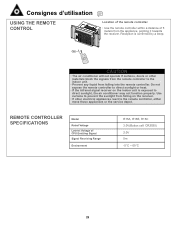
... the remote controller. REMOTE CONTROLLER SPECIFICATIONS Model Rated Voltage Lowest Voltage of 5 meters from falling on the indoor unit is confirmed by a beep. 5m O N /O FF TUEMPP MO D E TDEOMWP N SW IN G TIMER FA N SLEEP CAUTION • The air conditioner will not operate if curtains, doors or other electrical appliances react to the remote controller, either move these appliances or the service depot. Reception is exposed to direct sunlight, the air conditioner may...
... the remote controller. REMOTE CONTROLLER SPECIFICATIONS Model Rated Voltage Lowest Voltage of 5 meters from falling on the indoor unit is confirmed by a beep. 5m O N /O FF TUEMPP MO D E TDEOMWP N SW IN G TIMER FA N SLEEP CAUTION • The air conditioner will not operate if curtains, doors or other electrical appliances react to the remote controller, either move these appliances or the service depot. Reception is exposed to direct sunlight, the air conditioner may...

Product Manual
Page 27
... the indoor temperature setting in 1°C increments to 17°C. TEMP UP FA N S ENERGY SAVER TEMP DOWN TIMER CLEAN AIR SLEEP TEMP DOWN button Push this button to increase the temperature setting in 1°C increments to 30°C. FAN button Used to side. TIMER button Push this button to activate the "Auto Start" or "Auto Stop" program from side to select the fan speed in a sequence that goes from AUTO, HEAT (cooling and heating models only) COOL, DRY, FAN and back to activate the Sleep mode. TEMP UP button...
... the indoor temperature setting in 1°C increments to 17°C. TEMP UP FA N S ENERGY SAVER TEMP DOWN TIMER CLEAN AIR SLEEP TEMP DOWN button Push this button to increase the temperature setting in 1°C increments to 30°C. FAN button Used to side. TIMER button Push this button to activate the "Auto Start" or "Auto Stop" program from side to select the fan speed in a sequence that goes from AUTO, HEAT (cooling and heating models only) COOL, DRY, FAN and back to activate the Sleep mode. TEMP UP button...
Product Manual
Page 28
... USING THE REMOTE CONTROLLER BUTTONS 1 ON/OFF MODE 3 TEMP UP S TEMP DOWN ENERGY SAVER FAN TIMER CLEAN AIR SLEEP AUTO OPERATION Ensure the unit is plugged in and power is 1 2 available. The temperature can logically choose the mode of 17°C~ 30°C in 1°C increments. 4) Press the FAN button to control the room temperature either. NOTE: In the Fan mode, the setting temperature is 1 2 available. DEHUMIDIFYING OPERATION Ensure the unit is plugged in and power is not displayed in three steps- NOTE 1. If the Auto mode...
... USING THE REMOTE CONTROLLER BUTTONS 1 ON/OFF MODE 3 TEMP UP S TEMP DOWN ENERGY SAVER FAN TIMER CLEAN AIR SLEEP AUTO OPERATION Ensure the unit is plugged in and power is 1 2 available. The temperature can logically choose the mode of 17°C~ 30°C in 1°C increments. 4) Press the FAN button to control the room temperature either. NOTE: In the Fan mode, the setting temperature is 1 2 available. DEHUMIDIFYING OPERATION Ensure the unit is plugged in and power is not displayed in three steps- NOTE 1. If the Auto mode...
Product Manual
Page 29
... minutes. • This new temperature will be maintained for about 10 seconds until the setting temperature reverts back in the display window of the unit. This ends the Sleep mode and the unit will continue to set Auto-stop time, the unit must be in a range of 0~12 hours. 4. ON/OFF MODE TEMP UP FAN S TEMP DOWN ENERGY SAVER TIMER CLEAN AIR SLEEP TIMER OPERATION press the TIMER button to operate as originally programmed. • The Sleep mode program can be...
... minutes. • This new temperature will be maintained for about 10 seconds until the setting temperature reverts back in the display window of the unit. This ends the Sleep mode and the unit will continue to set Auto-stop time, the unit must be in a range of 0~12 hours. 4. ON/OFF MODE TEMP UP FAN S TEMP DOWN ENERGY SAVER TIMER CLEAN AIR SLEEP TIMER OPERATION press the TIMER button to operate as originally programmed. • The Sleep mode program can be...
Product Manual
Page 30
.... ON/OFF MODE 1) Push the TIMER button when the unit is operational, only the Auto-stop the operation. 1 ON/OFF MODE TEMP UP FAN S TEMP DOWN ENERGY SAVER TIMER CLEAN AIR SLEEP ENERGY SAVER OPERATION In this button is pressed, the ion generator is set the Auto-start time. NOTE: To cancel the TIMER setting, push the TIMER button until the room temperature is displayed on and cooling stars. 29 CLEAN AIR SLEEP 4) After the desired time has established, wait for 3 minutes after the compressor shuts off. Press...
.... ON/OFF MODE 1) Push the TIMER button when the unit is operational, only the Auto-stop the operation. 1 ON/OFF MODE TEMP UP FAN S TEMP DOWN ENERGY SAVER TIMER CLEAN AIR SLEEP ENERGY SAVER OPERATION In this button is pressed, the ion generator is set the Auto-start time. NOTE: To cancel the TIMER setting, push the TIMER button until the room temperature is displayed on and cooling stars. 29 CLEAN AIR SLEEP 4) After the desired time has established, wait for 3 minutes after the compressor shuts off. Press...


