Product Manual
Page 5
... or LOW FAN only. NOTE: Your Room Air Conditioner is recommended that chosen setting. 2) The air filter is NOT designed for vertical (slider type) windows and/or through-the-wall applications. See Fig. 1. Therefore, it is designed for future storage or transportation. ENERGY SAVING TIPS Your Danby appliance is located on control side of the...
... or LOW FAN only. NOTE: Your Room Air Conditioner is recommended that chosen setting. 2) The air filter is NOT designed for vertical (slider type) windows and/or through-the-wall applications. See Fig. 1. Therefore, it is designed for future storage or transportation. ENERGY SAVING TIPS Your Danby appliance is located on control side of the...
Product Manual
Page 6
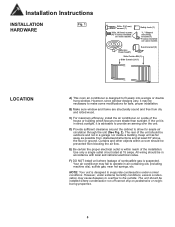
... or ground. Curtains and other objects within reach of combustible gas is designed to fit easily into a single or double hung window. However, under normal conditions. C) For maximum efficiency, install the air conditioner on pedestrains or neighboring properties. 5 Keep unit as far away as possible from dry and rotted wood. The unit should...
... or ground. Curtains and other objects within reach of combustible gas is designed to fit easily into a single or double hung window. However, under normal conditions. C) For maximum efficiency, install the air conditioner on pedestrains or neighboring properties. 5 Keep unit as far away as possible from dry and rotted wood. The unit should...
Product Manual
Page 7
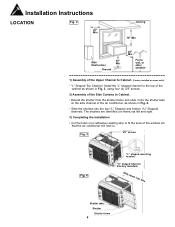
...frame) as left and right. 3) Completing the Installation • Cut the foam (non adhesive) sealing strip to fit the area of the window sill that the air conditioner will rest on the side channel of the Side Curtains to the top of the cabinet as shown in Fig. 3, using four (4) 3/8" ...screws. 2) Assembly of the air conditioner, as shown in Fig. 4. • Slide the shutters into the top ("L" Shaped) and bottom ("U" Shaped) channels. Installation Instructions LOCATION Fig. 2 20"...
...frame) as left and right. 3) Completing the Installation • Cut the foam (non adhesive) sealing strip to fit the area of the window sill that the air conditioner will rest on the side channel of the Side Curtains to the top of the cabinet as shown in Fig. 3, using four (4) 3/8" ...screws. 2) Assembly of the air conditioner, as shown in Fig. 4. • Slide the shutters into the top ("L" Shaped) and bottom ("U" Shaped) channels. Installation Instructions LOCATION Fig. 2 20"...

Product Manual
Page 8
... second foam sealing strip to fit the opening between the inside and outside windows, then attach the safety lock to window sill using one in a variety of different styles. Installation Instructions 3) Completing the Installation (cont'd) • Carefully place the air conditioner into the window with the "L" shaped mounting bracket (on the "recessed" portion of the...
... second foam sealing strip to fit the opening between the inside and outside windows, then attach the safety lock to window sill using one in a variety of different styles. Installation Instructions 3) Completing the Installation (cont'd) • Carefully place the air conditioner into the window with the "L" shaped mounting bracket (on the "recessed" portion of the...
Product Manual
Page 13
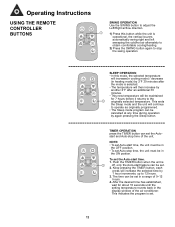
...of the unit. Push the TIMER button when the unit is 1 off, only the Auto-start time, the unit must be set in the display window of 0~12 hours. 4. After the desired time has established, wait for 7 hours before it returns to the 1 originally selected temperature. ON/OFF ...the Autostart and Auto-stop time, the unit must be maintained for about 10 seconds until the setting temperature reverts back in a range of the air conditioner. The time can be set . 2. Operating Instructions USING THE REMOTE CONTROLLER BUTTONS ON/OFF MODE 1 TEMP UP FAN TEMP DOWN SWING TIMER ...
...of the unit. Push the TIMER button when the unit is 1 off, only the Auto-start time, the unit must be set in the display window of 0~12 hours. 4. After the desired time has established, wait for 7 hours before it returns to the 1 originally selected temperature. ON/OFF ...the Autostart and Auto-stop time, the unit must be maintained for about 10 seconds until the setting temperature reverts back in a range of the air conditioner. The time can be set . 2. Operating Instructions USING THE REMOTE CONTROLLER BUTTONS ON/OFF MODE 1 TEMP UP FAN TEMP DOWN SWING TIMER ...
Product Manual
Page 14
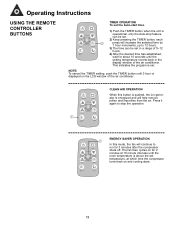
...for 3 minutes after the compressor shuts off. Press it again to 12 hours. 3) The time can be set in the display window of the air conditioner. CLEAN AIR SLEEP 4) After the desired time has established, wait for 2 minutes at 10 minute intervals until the setting temperature reverts back in ...a range of the air conditioner. ON/OFF MODE 1) Push the TIMER button when the unit is operational, only the Auto-stop the operation. 1 ON/OFF MODE TEMP...
...for 3 minutes after the compressor shuts off. Press it again to 12 hours. 3) The time can be set in the display window of the air conditioner. CLEAN AIR SLEEP 4) After the desired time has established, wait for 2 minutes at 10 minute intervals until the setting temperature reverts back in ...a range of the air conditioner. ON/OFF MODE 1) Push the TIMER button when the unit is operational, only the Auto-stop the operation. 1 ON/OFF MODE TEMP...
Product Manual
Page 16
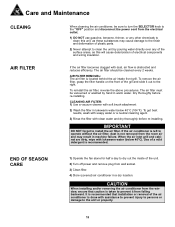
... and deformation of plastic parts. 2) Never attempt to install the air filter. CAUTION When installing and/or removing the air conditioner from the window, ensure that installation or removal of the air conditioner is obstructed and reduces efficiency. Care and Maintenance CLEAING When cleaning the air conditioner, be sure to turn the SELECTOR knob to the "OFF" position...
... and deformation of plastic parts. 2) Never attempt to install the air filter. CAUTION When installing and/or removing the air conditioner from the window, ensure that installation or removal of the air conditioner is obstructed and reduces efficiency. Care and Maintenance CLEAING When cleaning the air conditioner, be sure to turn the SELECTOR knob to the "OFF" position...
Product Manual
Page 29
.... • This new temperature will be maintained for about 10 seconds until the setting temperature reverts back in the display window of the air conditioner. This indicates the program is operational, the vertical louvers automatically swing right and left sweeping the cold/hot... air alternately to obtain comfortable cooling/heating. 2) Press the SWING button again to operate as originally programmed. • The Sleep mode program can...
.... • This new temperature will be maintained for about 10 seconds until the setting temperature reverts back in the display window of the air conditioner. This indicates the program is operational, the vertical louvers automatically swing right and left sweeping the cold/hot... air alternately to obtain comfortable cooling/heating. 2) Press the SWING button again to operate as originally programmed. • The Sleep mode program can...
Product Manual
Page 30
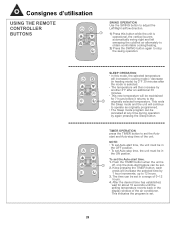
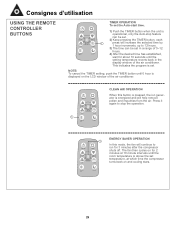
... 0~12 hours. The fan then cycles on for 2 minutes at which time the compressor turns back on the LCD window of the air conditioner. TEMP UP S TEMP DOWN 2) Keep pressing the TIMER button, each ENERGY SAVER 1 press will increase the selected time by FAN ...the TIMER setting, push the TIMER button until the setting temperature reverts back in a range of the air conditioner. Consignes d'utilisation USING THE REMOTE CONTROLLER BUTTONS TIMER OPERATION To set . CLEAN AIR SLEEP 4) After the desired time has established, wait for 3 minutes after the compressor shuts off....
... 0~12 hours. The fan then cycles on for 2 minutes at which time the compressor turns back on the LCD window of the air conditioner. TEMP UP S TEMP DOWN 2) Keep pressing the TIMER button, each ENERGY SAVER 1 press will increase the selected time by FAN ...the TIMER setting, push the TIMER button until the setting temperature reverts back in a range of the air conditioner. Consignes d'utilisation USING THE REMOTE CONTROLLER BUTTONS TIMER OPERATION To set . CLEAN AIR SLEEP 4) After the desired time has established, wait for 3 minutes after the compressor shuts off....


