
Product Manual
Page 15
A CR 2025 B 14 The above step 1 and 2 should be done simultaneously to the arrow marked at the back of the remote controller. 1 1. Operating Instructions CHANGING THE BATTERIES ON THE REMOTE The remote controller is powered by one button cell housed in the rear part and protected by your CR2025 forefinger. 2 2. Remove the button cell according to slide the button cell out. Press "B" position and pull it according to the number 1 arrow direction by your thumb. 2 1 +2 1 1 + 2 3. Slightly press "A" position according to the number 2 arrow direction by a cover.
A CR 2025 B 14 The above step 1 and 2 should be done simultaneously to the arrow marked at the back of the remote controller. 1 1. Operating Instructions CHANGING THE BATTERIES ON THE REMOTE The remote controller is powered by one button cell housed in the rear part and protected by your CR2025 forefinger. 2 2. Remove the button cell according to slide the button cell out. Press "B" position and pull it according to the number 1 arrow direction by your thumb. 2 1 +2 1 1 + 2 3. Slightly press "A" position according to the number 2 arrow direction by a cover.
Product Manual
Page 16
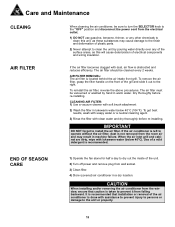
... and wiring insulation. Use of the gril and slide it from the room air and may cause damage to the finish and deformation of plastic parts. 2) Never attempt to clean the unit by hand in warm water. Dry thoroughly before re-installing. END OF SEASON CARE 1) Operate the fan alone for...
... and wiring insulation. Use of the gril and slide it from the room air and may cause damage to the finish and deformation of plastic parts. 2) Never attempt to clean the unit by hand in warm water. Dry thoroughly before re-installing. END OF SEASON CARE 1) Operate the fan alone for...
Product Manual
Page 17
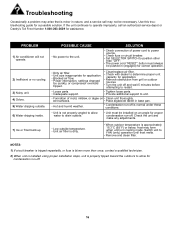
...for condensation run -off and wait 5 minutes before attempting to restart. • Loose parts. • Inadequate support. • Tighten loose parts. • Provide additional support to the unit. Switch unit to operate improperly, call ...may not be installed on • Clean unit thoroughly. Use this troubleshooting guide for a possible solution. Troubleshooting Occasionally a problem may arise that is minor in nature, and a service call an authorized service depot or Danby...
...for condensation run -off and wait 5 minutes before attempting to restart. • Loose parts. • Inadequate support. • Tighten loose parts. • Provide additional support to the unit. Switch unit to operate improperly, call ...may not be installed on • Clean unit thoroughly. Use this troubleshooting guide for a possible solution. Troubleshooting Occasionally a problem may arise that is minor in nature, and a service call an authorized service depot or Danby...
Product Manual
Page 18
... Canada N1H 6Z9 Telephone: (519) 837-0920 FAX: (519) 837-0449 1-800-263-2629 04/09 Danby Products Inc. TERMS OF WARRANTY Plastic parts, are no extensions provided. Danby reserves the right to limit the boundaries of "In Home Service" to the original retailer (point of God ... unit was purchased, or contact your unit was originally sold by Danby Products Limited (Canada) or Danby Products Inc. (U.S.A.) (hereafter "Danby") or by the manufacturer. In the event warranty service is used under any functional parts of the purchaser. Nothing within this warranty shall be void. See...
... Canada N1H 6Z9 Telephone: (519) 837-0920 FAX: (519) 837-0449 1-800-263-2629 04/09 Danby Products Inc. TERMS OF WARRANTY Plastic parts, are no extensions provided. Danby reserves the right to limit the boundaries of "In Home Service" to the original retailer (point of God ... unit was purchased, or contact your unit was originally sold by Danby Products Limited (Canada) or Danby Products Inc. (U.S.A.) (hereafter "Danby") or by the manufacturer. In the event warranty service is used under any functional parts of the purchaser. Nothing within this warranty shall be void. See...

Product Manual
Page 31
A CR 2025 B 30 Slightly press "A" position according to the number 2 arrow direction by your CR2025 forefinger. 2 2. The above step 1 and 2 should be done simultaneously to the arrow marked at the back of the remote controller. 1 1. Remove the button cell according to slide the button cell out. Consignes d'utilisation CHANGING THE BATTERIES ON THE REMOTE The remote controller is powered by one button cell housed in the rear part and protected by your thumb. 2 1 +2 1 1 + 2 3. Press "B" position and pull it according to the number 1 arrow direction by a cover.
A CR 2025 B 30 Slightly press "A" position according to the number 2 arrow direction by your CR2025 forefinger. 2 2. The above step 1 and 2 should be done simultaneously to the arrow marked at the back of the remote controller. 1 1. Remove the button cell according to slide the button cell out. Consignes d'utilisation CHANGING THE BATTERIES ON THE REMOTE The remote controller is powered by one button cell housed in the rear part and protected by your thumb. 2 1 +2 1 1 + 2 3. Press "B" position and pull it according to the number 1 arrow direction by a cover.


