Product Manual
Page 2
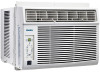
... Sécurité Importantes • Caractéristiques • Installation • Consignes d'utilisation • Soins et Entretien • Dépannage • Garantie Model • Modèle DAC6010E / DAC6011E PRECAUTION: Veuillez lire attentivement les consignes de sécurité et les instructions d'utilisation avant l'utilisation initiale de ce produit. Contents AIR CONDITIONER...
... Sécurité Importantes • Caractéristiques • Installation • Consignes d'utilisation • Soins et Entretien • Dépannage • Garantie Model • Modèle DAC6010E / DAC6011E PRECAUTION: Veuillez lire attentivement les consignes de sécurité et les instructions d'utilisation avant l'utilisation initiale de ce produit. Contents AIR CONDITIONER...

Product Manual
Page 3
... To contact a Customer Service Representative, call Danby TOLL FREE: 1-800-263-2629 2 Please take a few moments to read the instructions thoroughly and familiarize yourself with all of the "Home Comfort" requirements of your home, cottage, or office. Model Number: Serial Number: Date of Purchase: ... with valuable information necessary for the proper care and maintenance of your new appliance. This information will be necessary if your Danby appliance will provide you with a qualified service representative if in risk of Fire, Electric Shock and/or injury to Persons associated...
... To contact a Customer Service Representative, call Danby TOLL FREE: 1-800-263-2629 2 Please take a few moments to read the instructions thoroughly and familiarize yourself with all of the "Home Comfort" requirements of your home, cottage, or office. Model Number: Serial Number: Date of Purchase: ... with valuable information necessary for the proper care and maintenance of your new appliance. This information will be necessary if your Danby appliance will provide you with a qualified service representative if in risk of Fire, Electric Shock and/or injury to Persons associated...
Product Manual
Page 5
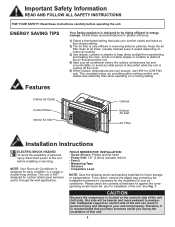
...comfort, and utilizes less electricity than when operating on a cooling setting. Please check the contents of hardware kit against the corresponding model check list, prior to installation of personal injury, disconnect power to the unit before installing or servicing. NOTE: Your Room Air ... See Fig. 1. Inadequate support on control side of the unit can result in removing airborne particles. ENERGY SAVING TIPS Your Danby appliance is designed to be heavier and more awkward to manipulate. Follow these instructions carefully before operating the unit. Important Safety ...
...comfort, and utilizes less electricity than when operating on a cooling setting. Please check the contents of hardware kit against the corresponding model check list, prior to installation of personal injury, disconnect power to the unit before installing or servicing. NOTE: Your Room Air ... See Fig. 1. Inadequate support on control side of the unit can result in removing airborne particles. ENERGY SAVING TIPS Your Danby appliance is designed to be heavier and more awkward to manipulate. Follow these instructions carefully before operating the unit. Important Safety ...
Product Manual
Page 6
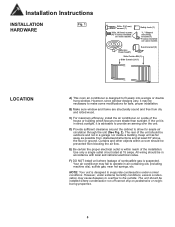
...The unit should be installed where condensation run-off cannot drip on a side of combustible gas is advisable to make some models Adhesive Foam Seal(1) Sash bracket (2) Side Curtain RH (1) Side Curtain LH (1) LOCATION A) This room air conditioner is designed... springs, etc. Installation Instructions INSTALLATION Fig. 1 HARDWARE 3/4in. (19.1mm) screws (7) 3/8in. (9.5mm) screws (4) *Factory installed on some models Safety Lock (1) "L" Shaped mounting bracket (1) * Factory installed on some modifications for ample air circulation through the unit (See Fig. 2). D) Provide ...
...The unit should be installed where condensation run-off cannot drip on a side of combustible gas is advisable to make some models Adhesive Foam Seal(1) Sash bracket (2) Side Curtain RH (1) Side Curtain LH (1) LOCATION A) This room air conditioner is designed... springs, etc. Installation Instructions INSTALLATION Fig. 1 HARDWARE 3/4in. (19.1mm) screws (7) 3/8in. (9.5mm) screws (4) *Factory installed on some models Safety Lock (1) "L" Shaped mounting bracket (1) * Factory installed on some modifications for ample air circulation through the unit (See Fig. 2). D) Provide ...
Product Manual
Page 10
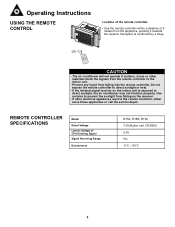
..., doors or other electrical appliances react to the indoor unit. • Prevent any liquid from the appliance, pointing it towards the receiver. REMOTE CONTROLLER SPECIFICATIONS Model Rated Voltage Lowest Voltage of 5 meters from falling into the remote controller. Operating Instructions USING THE REMOTE CONTROL Location of the remote controller. • Use...
..., doors or other electrical appliances react to the indoor unit. • Prevent any liquid from the appliance, pointing it towards the receiver. REMOTE CONTROLLER SPECIFICATIONS Model Rated Voltage Lowest Voltage of 5 meters from falling into the remote controller. Operating Instructions USING THE REMOTE CONTROL Location of the remote controller. • Use...

Product Manual
Page 11
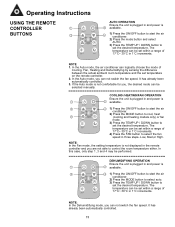
...the function. Press it again to stop the funtion. This function is energized and will swing automatically from 0-12 hours (1 hour increments) Models: R15A R15B SLEEP button Press this button to 30°C. This function is pressed again. Operating Instructions REMOTE CONTROLLER BUTTONS NOTE: Modle R15B ... starts when this button, a mode is pressed, the vertical louvres will help remove pollen and impurities from AUTO, HEAT (cooling and heating models only) COOL, DRY, FAN and back to 17°C. FAN button Used to AUTO. TEMP UP button Push this button to 30°...
...the function. Press it again to stop the funtion. This function is energized and will swing automatically from 0-12 hours (1 hour increments) Models: R15A R15B SLEEP button Press this button to 30°C. This function is pressed again. Operating Instructions REMOTE CONTROLLER BUTTONS NOTE: Modle R15B ... starts when this button, a mode is pressed, the vertical louvres will help remove pollen and impurities from AUTO, HEAT (cooling and heating models only) COOL, DRY, FAN and back to 17°C. FAN button Used to AUTO. TEMP UP button Push this button to 30°...
Product Manual
Page 12
... the ON/OFF button to start the air TEMP UP S TEMP DOWN conditioner. 2) Press the MODE button to cool, heat 4 ENERGY SAVER (cooling and heating models only) or fan FAN TIMER mode. 3) Press the TEMP UP / DOWN button to set within a range of CLEAN AIR SLEEP 17°C~ 30°C in...
... the ON/OFF button to start the air TEMP UP S TEMP DOWN conditioner. 2) Press the MODE button to cool, heat 4 ENERGY SAVER (cooling and heating models only) or fan FAN TIMER mode. 3) Press the TEMP UP / DOWN button to set within a range of CLEAN AIR SLEEP 17°C~ 30°C in...
Product Manual
Page 26
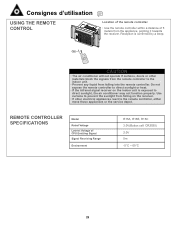
... conditioner will not operate if curtains, doors or other electrical appliances react to direct sunlight, the air conditioner may not function properly. REMOTE CONTROLLER SPECIFICATIONS Model Rated Voltage Lowest Voltage of 5 meters from falling into the remote controller. Reception is exposed to the remote controller, either move these appliances or the...
... conditioner will not operate if curtains, doors or other electrical appliances react to direct sunlight, the air conditioner may not function properly. REMOTE CONTROLLER SPECIFICATIONS Model Rated Voltage Lowest Voltage of 5 meters from falling into the remote controller. Reception is exposed to the remote controller, either move these appliances or the...

Product Manual
Page 27
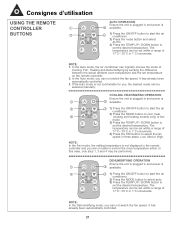
...: R15A R15B SLEEP button Press this button to select the fan speed in a sequence that goes from the air. This function is available on some models) When button is pushed, the ion generator is selected in three steps: LOW MED HIGH CLEAN AIR button (on COOL, HEAT or AUTO mode only... button Each time you press this button, a mode is pressed, the vertical louvres will help remove pollen and impurities from AUTO, HEAT (cooling and heating models only) COOL, DRY, FAN and back to 17°C. Press it again to AUTO. TIMER button Push this button is pressed and stops when the...
...: R15A R15B SLEEP button Press this button to select the fan speed in a sequence that goes from the air. This function is available on some models) When button is pushed, the ion generator is selected in three steps: LOW MED HIGH CLEAN AIR button (on COOL, HEAT or AUTO mode only... button Each time you press this button, a mode is pressed, the vertical louvres will help remove pollen and impurities from AUTO, HEAT (cooling and heating models only) COOL, DRY, FAN and back to 17°C. Press it again to AUTO. TIMER button Push this button is pressed and stops when the...
Product Manual
Page 28
... the ON/OFF button to start the air TEMP UP S TEMP DOWN conditioner. 2) Press the MODE button to cool, heat 4 ENERGY SAVER (cooling and heating models only) or fan FAN TIMER mode. 3) Press the TEMP UP / DOWN button to CLEAN AIR SLEEP set the desired temperature. COOLING /HEATING/FAN OPERATION Ensure...
... the ON/OFF button to start the air TEMP UP S TEMP DOWN conditioner. 2) Press the MODE button to cool, heat 4 ENERGY SAVER (cooling and heating models only) or fan FAN TIMER mode. 3) Press the TEMP UP / DOWN button to CLEAN AIR SLEEP set the desired temperature. COOLING /HEATING/FAN OPERATION Ensure...

