User Guide
Page 2
... SIP ACCOUNT SETTINGS 24 2 RESTORE FACTORY SETTING 19 7.4 MANAGEMENT SETTING - STATIC IP 21 7.8 SIP SETTING - DHCP 20 7.6 NETWORK SETTING - TABLE OF CONTENTS 1.0 INTRODUCTION...4 2.0 PACKAGE CONTENT...4 3.0 LIST OF FIGURES ...5 4.0 SUMMARY OF KEY FUNCTIONS 6 5.0 CONNECTING THE IP PHONE 7 6.0 IP PHONE SETUP ...8 6.1 MENU SUMMARY...8 6.2 DISPLAY NAME...10 6.3 ADSL DIALUP...10 6.4 DHCP (DYNAMIC HOST CONFIGURATION...
... SIP ACCOUNT SETTINGS 24 2 RESTORE FACTORY SETTING 19 7.4 MANAGEMENT SETTING - STATIC IP 21 7.8 SIP SETTING - DHCP 20 7.6 NETWORK SETTING - TABLE OF CONTENTS 1.0 INTRODUCTION...4 2.0 PACKAGE CONTENT...4 3.0 LIST OF FIGURES ...5 4.0 SUMMARY OF KEY FUNCTIONS 6 5.0 CONNECTING THE IP PHONE 7 6.0 IP PHONE SETUP ...8 6.1 MENU SUMMARY...8 6.2 DISPLAY NAME...10 6.3 ADSL DIALUP...10 6.4 DHCP (DYNAMIC HOST CONFIGURATION...
User Guide
Page 4
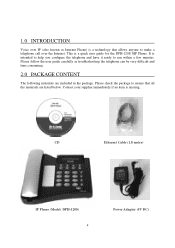
This is missing. CD Ethernet Cable (1.8 metre) IP Phone (Model: DPH-120S) 4 Power Adaptor (5V DC) It is intended to help you configure the telephone and have it ready to ensure that allows anyone to make a telephone ... in the package. Please check the package to run within a few minutes. Contact your supplier immediately if an item is a quick user guide for the DPH-120S SIP Phone. 1.0 INTRODUCTION Voice over IP (also known as troubleshooting the telephone can be very difficult and time consuming. 2.0 PACKAGE CONTENT The following materials are...
This is missing. CD Ethernet Cable (1.8 metre) IP Phone (Model: DPH-120S) 4 Power Adaptor (5V DC) It is intended to help you configure the telephone and have it ready to ensure that allows anyone to make a telephone ... in the package. Please check the package to run within a few minutes. Contact your supplier immediately if an item is a quick user guide for the DPH-120S SIP Phone. 1.0 INTRODUCTION Voice over IP (also known as troubleshooting the telephone can be very difficult and time consuming. 2.0 PACKAGE CONTENT The following materials are...
User Guide
Page 5
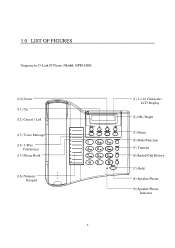
3.0 LIST OF FIGURES Diagram for D-Link IP Phone (Model: DPH-120S) (10) Down (11) Up (12) Cancel / Left (13) Voice Message (14) 3-Way Conference (15) Phone Book (16) Numeric Keypad 5 (1) 2 x 16 Characters LCD Display (2) OK / Right (3) Menu (4) Mute/Function (5) Transfer (6) Redial/Call History (7) Hold (8) Speaker Phone (9) Speaker Phone Indicator
3.0 LIST OF FIGURES Diagram for D-Link IP Phone (Model: DPH-120S) (10) Down (11) Up (12) Cancel / Left (13) Voice Message (14) 3-Way Conference (15) Phone Book (16) Numeric Keypad 5 (1) 2 x 16 Characters LCD Display (2) OK / Right (3) Menu (4) Mute/Function (5) Transfer (6) Redial/Call History (7) Hold (8) Speaker Phone (9) Speaker Phone Indicator
User Guide
Page 29
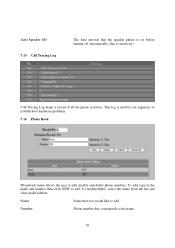
... allows the user to add, modify and delete phone numbers. Number Phone number that corresponds to add. To modify/delete, select the name from the list and click modify/delete. To add, type in the name and number then click NEW to the name. 29 This log is on before turning...
... allows the user to add, modify and delete phone numbers. Number Phone number that corresponds to add. To modify/delete, select the name from the list and click modify/delete. To add, type in the name and number then click NEW to the name. 29 This log is on before turning...
User Guide
Page 33
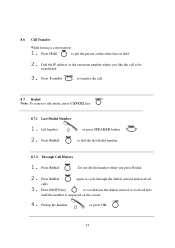
... press OK 33 Do not lift the handset when you like the call . 8.7 Redial Note: To return to scroll down the dialed, missed or received lists until the number is displayed on hold. 2. Press DOWN key to idle mode, press CANCEL key 8.7.1 Last Dialed Number 1. Press Hold to be transferred. 3. Press...
... press OK 33 Do not lift the handset when you like the call . 8.7 Redial Note: To return to scroll down the dialed, missed or received lists until the number is displayed on hold. 2. Press DOWN key to idle mode, press CANCEL key 8.7.1 Last Dialed Number 1. Press Hold to be transferred. 3. Press...
User Guide
Page 35
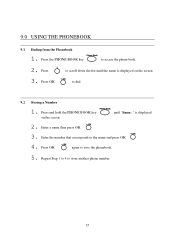
Repeat Step 1 to 4 to dial. 9.2 Storing a Number 1. Press OK to store another phone number. 35 until the name is displayed 2. Press to the name and press OK 4. Enter a name then press OK 3. 9.0 USING THE PHONEBOOK 9.1 Dialing from the Phonebook 1. Press OK again to access the phone book. 2. Press and hold the PHONE BOOK key on the screen. 3. Press the PHONE BOOK key to save the phonebook. 5. Enter the number that corresponds to scroll down the list until "Name:" is displayed on the screen.
Repeat Step 1 to 4 to dial. 9.2 Storing a Number 1. Press OK to store another phone number. 35 until the name is displayed 2. Press to the name and press OK 4. Enter a name then press OK 3. 9.0 USING THE PHONEBOOK 9.1 Dialing from the Phonebook 1. Press OK again to access the phone book. 2. Press and hold the PHONE BOOK key on the screen. 3. Press the PHONE BOOK key to save the phonebook. 5. Enter the number that corresponds to scroll down the list until "Name:" is displayed on the screen.
User Guide
Page 36
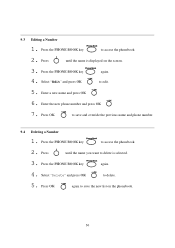
... the phonebook. 36 Press until the name is selected. 3. Enter the new phone number and press OK 7. Press OK to edit. 5. to save the new list on the screen. 3. 9.3 Editing a Number 1. Press until the name you want to access the phonebook. 2. Enter a new name and press OK 6. Press OK again to...
... the phonebook. 36 Press until the name is selected. 3. Enter the new phone number and press OK 7. Press OK to edit. 5. to save the new list on the screen. 3. 9.3 Editing a Number 1. Press until the name you want to access the phonebook. 2. Enter a new name and press OK 6. Press OK again to...