
Manual
Page 2
DNS-G120 User's Manual Table of Contents Table of Contents Package Contents 3 Introduction 4 Features and Benefits 5 Hardware Overview 6 Getting Started 8 Hardware Installation 9 Installation Considerations 10 ... 41 Download Scheduling 42 Scheduling Status 45 Networking Basics 46 Troubleshooting 52 Technical Specifications 53 Contacting Technical Support 55 Warranty 56 Registration 59 D-Link Systems, Inc. 2
DNS-G120 User's Manual Table of Contents Table of Contents Package Contents 3 Introduction 4 Features and Benefits 5 Hardware Overview 6 Getting Started 8 Hardware Installation 9 Installation Considerations 10 ... 41 Download Scheduling 42 Scheduling Status 45 Networking Basics 46 Troubleshooting 52 Technical Specifications 53 Contacting Technical Support 55 Warranty 56 Registration 59 D-Link Systems, Inc. 2

Manual
Page 3
... Package Contents Package Contents D-Link DNS-G120 Wireless Network Storage Adapter CD-ROM with Manual and Software Ethernet (CAT5 UTP/Straight-Through) Cable 5V 2.5A Power Supply Note: Using a ... than the one included with Windows XP or 2000 Internet Explorer version 6.0 or Netscape Navigator version 7.0 and above items are missing, please contact your DNS-G120. D-Link Systems, Inc. 3 If any of the above USB Hard Drive An 802.11g/b Wireless Network An available Ethernet port on the network...
... Package Contents Package Contents D-Link DNS-G120 Wireless Network Storage Adapter CD-ROM with Manual and Software Ethernet (CAT5 UTP/Straight-Through) Cable 5V 2.5A Power Supply Note: Using a ... than the one included with Windows XP or 2000 Internet Explorer version 6.0 or Netscape Navigator version 7.0 and above items are missing, please contact your DNS-G120. D-Link Systems, Inc. 3 If any of the above USB Hard Drive An 802.11g/b Wireless Network An available Ethernet port on the network...
Manual
Page 4
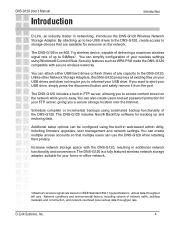
...PSK make the DNS-G120 compatible with the DNS-G120, resulting in FTP server, allowing you 're away. The DNS-G120 includes a built-in additional network functionality and convenience. You can use the DNS-G120 while retaining their privacy. DNS-G120 User's Manual Introduction Introduction D-Link, an industry ...ce network. * Maximum wireless signal rate based on the network while you to 54Mbps*. D-Link Systems, Inc. 4 Unlike other Network Storage Adapters, the DNS-G120 preserves all existing files on the network. Schedule complete or incremental backups using the ...
...PSK make the DNS-G120 compatible with the DNS-G120, resulting in FTP server, allowing you 're away. The DNS-G120 includes a built-in additional network functionality and convenience. You can use the DNS-G120 while retaining their privacy. DNS-G120 User's Manual Introduction Introduction D-Link, an industry ...ce network. * Maximum wireless signal rate based on the network while you to 54Mbps*. D-Link Systems, Inc. 4 Unlike other Network Storage Adapters, the DNS-G120 preserves all existing files on the network. Schedule complete or incremental backups using the ...
Manual
Page 5
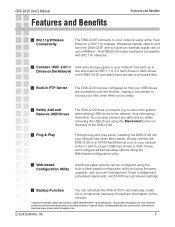
... not require you 're away. Built-in FTP Server The DNS-G120 can schedule the DNS-G120 to all stored files. Network conditions and environmental factors, including volume of important information on the network. * Maximum wireless signal rate based on your network! D-Link Systems, Inc. 5 Backup Function You can be configured using...
... not require you 're away. Built-in FTP Server The DNS-G120 can schedule the DNS-G120 to all stored files. Network conditions and environmental factors, including volume of important information on the network. * Maximum wireless signal rate based on your network! D-Link Systems, Inc. 5 Backup Function You can be configured using...

Manual
Page 6
D-Link Systems, Inc. 6 Solid green indicates the USB drive is initially connected to the DNS-G120. Wireless LED Indicates that the DNS-G120 is being transmitted. Antenna Wirelessly connect to a wireless network and blinks when data is properly connected to WiFi networks. USB LED Blinking green... drive is ready for use. Blinking green indicates activity on the Ethernet network. Power LED Solid green indicates a good power source connection. DNS-G120 User's Manual Hardware Overview Front Panel Hardware Overview Ethernet LED Solid green indicates an Ethernet connection.
D-Link Systems, Inc. 6 Solid green indicates the USB drive is initially connected to the DNS-G120. Wireless LED Indicates that the DNS-G120 is being transmitted. Antenna Wirelessly connect to a wireless network and blinks when data is properly connected to WiFi networks. USB LED Blinking green... drive is ready for use. Blinking green indicates activity on the Ethernet network. Power LED Solid green indicates a good power source connection. DNS-G120 User's Manual Hardware Overview Front Panel Hardware Overview Ethernet LED Solid green indicates an Ethernet connection.

Manual
Page 7
Reset Button This button will restore the factory default settings. Disconnect Button Press this button to the DNS-G120. USB Ports Connects your router or switch using the included Ethernet cable. Power Receptor Receptor for the provided power adapter. D-Link Systems, Inc. 7 DNS-G120 User's Manual Hardware Overview Rear Panel Hardware Overview Ethernet Port Connects to your USB 1.1 or 2.0 drives to safely disconnect USB drives from the DNS-G120.
Reset Button This button will restore the factory default settings. Disconnect Button Press this button to the DNS-G120. USB Ports Connects your router or switch using the included Ethernet cable. Power Receptor Receptor for the provided power adapter. D-Link Systems, Inc. 7 DNS-G120 User's Manual Hardware Overview Rear Panel Hardware Overview Ethernet Port Connects to your USB 1.1 or 2.0 drives to safely disconnect USB drives from the DNS-G120.

Manual
Page 8
DNS-G120 User's Manual Getting Started Getting Started When you have completed the steps in this Quick Installation Guide, your connected network may look similar to this: D-Link Systems, Inc. 8
DNS-G120 User's Manual Getting Started Getting Started When you have completed the steps in this Quick Installation Guide, your connected network may look similar to this: D-Link Systems, Inc. 8

Manual
Page 9
Plug the other end of the Ethernet cable to the USB port(s) on the front panel will blink until the drive has been installed. D-Link Systems, Inc. 9 The USB LED on the rear panel of the device. Once the USB LED is solid green, your wireless network. 1 Attach ... adapter into the receptor located on the back of the DNS-G120. Once your wireless configuration is set, you may disconnect the Ethernet cable and reboot the DNS-G120 to connect to your USB drive is used during initial setup. DNS-G120 User's Manual Hardware Installation Hardware Installation It is required that...
Plug the other end of the Ethernet cable to the USB port(s) on the front panel will blink until the drive has been installed. D-Link Systems, Inc. 9 The USB LED on the rear panel of the device. Once the USB LED is solid green, your wireless network. 1 Attach ... adapter into the receptor located on the back of the DNS-G120. Once your wireless configuration is set, you may disconnect the Ethernet cable and reboot the DNS-G120 to connect to your USB drive is used during initial setup. DNS-G120 User's Manual Hardware Installation Hardware Installation It is required that...

Manual
Page 10
... Materials and objects such as ceiling fans, lights, and home security systems), your wireless connection may degrade dramatically or drop completely. D-Link Systems, Inc. 10 Keep in mind, however, that the number, thickness and location of at a 45-degree angle appears to...mirrors, file cabinets, brick, and concrete will travel straight through drywall or open doorways. DNS-G120 User's Manual Wireless Basics Wireless Installation Considerations The DNS-G120 lets you are using a wireless connection from virtually anywhere within the operating range of walls and ...
... Materials and objects such as ceiling fans, lights, and home security systems), your wireless connection may degrade dramatically or drop completely. D-Link Systems, Inc. 10 Keep in mind, however, that the number, thickness and location of at a 45-degree angle appears to...mirrors, file cabinets, brick, and concrete will travel straight through drywall or open doorways. DNS-G120 User's Manual Wireless Basics Wireless Installation Considerations The DNS-G120 lets you are using a wireless connection from virtually anywhere within the operating range of walls and ...

Manual
Page 11
... Network Setup Wizard to easily and securely set up the DNS-G120 on the DNS-G120. If you will learn how to use WCN to setup your DNS-G120, click Add new computers or devices to the 'Wireless Network' network and skip to page 13 to continue. D-Link Systems, Inc. 11 Click Next. Click Start > Accessories > Communications...
... Network Setup Wizard to easily and securely set up the DNS-G120 on the DNS-G120. If you will learn how to use WCN to setup your DNS-G120, click Add new computers or devices to the 'Wireless Network' network and skip to page 13 to continue. D-Link Systems, Inc. 11 Click Next. Click Start > Accessories > Communications...
Manual
Page 12
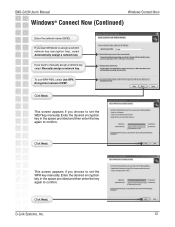
... assign a random network key (encryption key), select Automatically assign a network key. If you want Windows to manually assign a network key select Manually assign a network key. DNS-G120 User's Manual Windows Connect Now Windows® Connect Now (Continued) Enter the network name (SSID...
... assign a random network key (encryption key), select Automatically assign a network key. If you want Windows to manually assign a network key select Manually assign a network key. DNS-G120 User's Manual Windows Connect Now Windows® Connect Now (Continued) Enter the network name (SSID...
Manual
Page 13
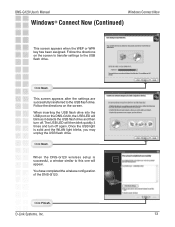
... Windows® Connect Now (Continued) This screen appears when the WEP or WPA key has been assigned. Click Next. Click Finish. When the DNS-G120 wireless setup is solid and the WLAN light blinks, you may unplug the USB flash drive. The USB LED will appear. Once the... settings to this one will then blink quickly 3 times and turn off again. You have completed the wireless configuration of the DNS-G120. D-Link Systems, Inc. 13 Follow the directions on the screen. This screen appears after the settings are successfully transferred to the USB flash drive...
... Windows® Connect Now (Continued) This screen appears when the WEP or WPA key has been assigned. Click Next. Click Finish. When the DNS-G120 wireless setup is solid and the WLAN light blinks, you may unplug the USB flash drive. The USB LED will appear. Once the... settings to this one will then blink quickly 3 times and turn off again. You have completed the wireless configuration of the DNS-G120. D-Link Systems, Inc. 13 Follow the directions on the screen. This screen appears after the settings are successfully transferred to the USB flash drive...

Manual
Page 14
Open your Web browser and type http://DNS-G120 into the URL address box and then press the Enter or Return key. The logon screen will appear. Click Config Next, click Wireless on the left side. Click Enabled Click Site Survey D-Link Systems, Inc. 14 Type admin for the username and leave the password field blank. DNS-G120 User's Manual Connecting to a Wireless Network Connecting to a Wireless Network If you have configured the wireless settings using Windows® Connect Now (WCN), you may skip this section and continue to page 16.
Open your Web browser and type http://DNS-G120 into the URL address box and then press the Enter or Return key. The logon screen will appear. Click Config Next, click Wireless on the left side. Click Enabled Click Site Survey D-Link Systems, Inc. 14 Type admin for the username and leave the password field blank. DNS-G120 User's Manual Connecting to a Wireless Network Connecting to a Wireless Network If you have configured the wireless settings using Windows® Connect Now (WCN), you may skip this section and continue to page 16.

Manual
Page 15
Click Connect If the wireless network you've selected has any wireless security enabled, you will be prompted to a Wireless Network (continued) Select an available wireless network by clicking on the radio button under Join. Your wireless connection setup is now complete! DNS-G120 User's Manual Connecting to a Wireless Network Connecting to enter the WEP or WPA-PSK information. D-Link Systems, Inc. 15 Click Apply Note: Allow up to 30 seconds for the DNS-G120 to pages 26-27 for more information regarding encryption. Refer to connect wirelessly.
Click Connect If the wireless network you've selected has any wireless security enabled, you will be prompted to a Wireless Network (continued) Select an available wireless network by clicking on the radio button under Join. Your wireless connection setup is now complete! DNS-G120 User's Manual Connecting to a Wireless Network Connecting to enter the WEP or WPA-PSK information. D-Link Systems, Inc. 15 Click Apply Note: Allow up to 30 seconds for the DNS-G120 to pages 26-27 for more information regarding encryption. Refer to connect wirelessly.

Manual
Page 16
...then double-click your mapped drive to your computer. DNS-G120 User's Manual Mapping a Drive Mapping a Drive You can use the D-Link Easy Search Utility to map drives to access the files and folders. Highlight an available DNS-G120. Highlight the share you want to remove the ...selected mapped drive. D-Link Systems, Inc. 16 Available shares will appear in My Computer. Click Disconnect to map. Insert the DNS-G120 CD into your mapped drive(s) will be displayed under Link Info. Select an available...
...then double-click your mapped drive to your computer. DNS-G120 User's Manual Mapping a Drive Mapping a Drive You can use the D-Link Easy Search Utility to map drives to access the files and folders. Highlight an available DNS-G120. Highlight the share you want to remove the ...selected mapped drive. D-Link Systems, Inc. 16 Available shares will appear in My Computer. Click Disconnect to map. Insert the DNS-G120 CD into your mapped drive(s) will be displayed under Link Info. Select an available...

Manual
Page 17
...screen. Right-click Start and click Explore. DNS-G120 User's Manual Mapping a Drive Mapping a Drive (continued) As an alternate method, you entered into the Setup Wizard or in the Home>LAN screen in Windows. Click Finish D-Link Systems, Inc. \\DNS-G120\Shared folder 17 Please see the following instructions... for mapping a USB drive so that you can access the DNS-G120's USB drive(s) by mapping the shared folders as drives in the ...
...screen. Right-click Start and click Explore. DNS-G120 User's Manual Mapping a Drive Mapping a Drive (continued) As an alternate method, you entered into the Setup Wizard or in the Home>LAN screen in Windows. Click Finish D-Link Systems, Inc. \\DNS-G120\Shared folder 17 Please see the following instructions... for mapping a USB drive so that you can access the DNS-G120's USB drive(s) by mapping the shared folders as drives in the ...
Manual
Page 18
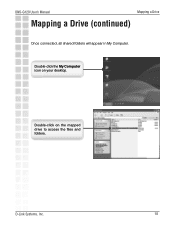
DNS-G120 User's Manual Mapping a Drive Mapping a Drive (continued) Once connected, all shared folders will appear in My Computer. D-Link Systems, Inc. 18 Double-click on your desktop. Double-click the My Computer icon on the mapped drive to access the files and folders.
DNS-G120 User's Manual Mapping a Drive Mapping a Drive (continued) Once connected, all shared folders will appear in My Computer. D-Link Systems, Inc. 18 Double-click on your desktop. Double-click the My Computer icon on the mapped drive to access the files and folders.

Manual
Page 19
...Apply to page 16 for Mapping a Drive instructions. Refer to save the settings. D-Link Systems, Inc. 19 DNS-G120 User's Manual Using the Easy Search Utility Using the Easy Search Utility The D-Link Easy Search utility will allow you to connect to the web-based configuration ... settings to the DNS-G120, and map drives to access the web-based utility. Enter the new IP address and network settings. Highlight an available DNS-G120 and click Configuration to your CD-ROM drive. Click Lauch D-Link Easy Search Utility. Insert the DNS-G120 CD into your computer...
...Apply to page 16 for Mapping a Drive instructions. Refer to save the settings. D-Link Systems, Inc. 19 DNS-G120 User's Manual Using the Easy Search Utility Using the Easy Search Utility The D-Link Easy Search utility will allow you to connect to the web-based configuration ... settings to the DNS-G120, and map drives to access the web-based utility. Enter the new IP address and network settings. Highlight an available DNS-G120 and click Configuration to your CD-ROM drive. Click Lauch D-Link Easy Search Utility. Insert the DNS-G120 CD into your computer...

Installation Guide
Page 2
... is required that an Ethernet cable is set, you may disconnect the Ethernet cable and reboot the DNS-G120 to connect to your wireless network. Once your wireless configuration is used during initial setup. Package Contents D-Link DNS-G120 Wireless Storage Adapter Manual and Software on CD Ethernet Cable 2 5V 2.5A Power Supply...
... is required that an Ethernet cable is set, you may disconnect the Ethernet cable and reboot the DNS-G120 to connect to your wireless network. Once your wireless configuration is used during initial setup. Package Contents D-Link DNS-G120 Wireless Storage Adapter Manual and Software on CD Ethernet Cable 2 5V 2.5A Power Supply...

Installation Guide
Page 17
D-Link Systems, Inc. 17 Insert the D-Link DNS-G120 CD into your DNS-G120. Highlight an available DNS-G120. DNS-G120 Install Guide Mapping Drives Mapping Drives You can assign a drive letter (e.g. Highlight the share you want to your CD drive. Select an available drive letter from the drop-down menu and click Connect. Click Launch D-Link Easy Search Utility. Available shares will be displayed. E:) to a specific folder on your USB drive(s) that are connected to map.
D-Link Systems, Inc. 17 Insert the D-Link DNS-G120 CD into your DNS-G120. Highlight an available DNS-G120. DNS-G120 Install Guide Mapping Drives Mapping Drives You can assign a drive letter (e.g. Highlight the share you want to your CD drive. Select an available drive letter from the drop-down menu and click Connect. Click Launch D-Link Easy Search Utility. Available shares will be displayed. E:) to a specific folder on your USB drive(s) that are connected to map.

