User Manual
Page 16
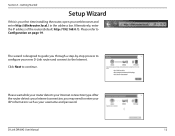
...dlinkrouter.local./ in the address bar. Click Next to Configuration on page 19. Please wait while your router detects your new D-Link router and connect to configure your Internet connection type. Alternatively, enter the IP address of the router (default: http://192.168.0.1).... The wizard is your first time installing the router, open your username and password. Please refer to continue. After the router detects your Internet connection, you through a step-by-step process to the Internet. D-Link DIR-842 User Manual 12 Section 3 -
...dlinkrouter.local./ in the address bar. Click Next to Configuration on page 19. Please wait while your router detects your new D-Link router and connect to configure your Internet connection type. Alternatively, enter the IP address of the router (default: http://192.168.0.1).... The wizard is your first time installing the router, open your username and password. Please refer to continue. After the router detects your Internet connection, you through a step-by-step process to the Internet. D-Link DIR-842 User Manual 12 Section 3 -

User Manual
Page 17
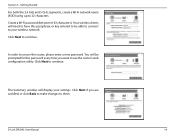
... be obtained from your computer. If the router detected or you selected Static, enter the IP and DNS settings supplied by your PPPoE username and password and click Next to continue. Click Next to choose from your Internet service provider) and click Next to continue. If the router detected or you... remove it from will not work through a router. Getting Started If the router does not detect a valid Internet connection, a list of connection types to continue. D-Link DIR-842 User Manual 13
... be obtained from your computer. If the router detected or you selected Static, enter the IP and DNS settings supplied by your PPPoE username and password and click Next to continue. Click Next to choose from your Internet service provider) and click Next to continue. If the router detected or you... remove it from will not work through a router. Getting Started If the router does not detect a valid Internet connection, a list of connection types to continue. D-Link DIR-842 User Manual 13
User Manual
Page 18
... For both the 2.4 GHz and 5 GHz segments, create a Wi-Fi network name (SSID) using up to secure the router, please enter a new password. In order to 32 characters. D-Link DIR-842 User Manual 14 Click Next to continue. Click Next if you want to your settings. Section 3 - Click Next to continue. The Summary window...
... For both the 2.4 GHz and 5 GHz segments, create a Wi-Fi network name (SSID) using up to secure the router, please enter a new password. In order to 32 characters. D-Link DIR-842 User Manual 14 Click Next to continue. Click Next if you want to your settings. Section 3 - Click Next to continue. The Summary window...
User Manual
Page 19
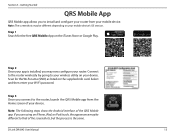
... free QRS Mobile App on the supplied info card. Step 3 Once you may now configure your Wi-Fi password. If you to that of the QRS Mobile app. Select and then enter your router. D-Link DIR-842 User Manual 15 Step 2 Once your app is the same. Note: The screenshots may be different depending...
... free QRS Mobile App on the supplied info card. Step 3 Once you may now configure your Wi-Fi password. If you to that of the QRS Mobile app. Select and then enter your router. D-Link DIR-842 User Manual 15 Step 2 Once your app is the same. Note: The screenshots may be different depending...
User Manual
Page 20
Section 3 - Plug one end of the provided Ethernet cable into your device password and tap Log In. D-Link DIR-842 User Manual 16 Step 5 At this point, please ensure that your Internet connection and proceed to a modem. Tap Next to automatically detect your the router is connected to the next step. Getting Started Step 4 You will see the welcome screen. Tap Next once the Operation Mode screen appears. Tap Start to proceed, then enter your DSL or cable modem, and plug the other end into the port marked INTERNET on the DIR-842.
Section 3 - Plug one end of the provided Ethernet cable into your device password and tap Log In. D-Link DIR-842 User Manual 16 Step 5 At this point, please ensure that your Internet connection and proceed to a modem. Tap Next to automatically detect your the router is connected to the next step. Getting Started Step 4 You will see the welcome screen. Tap Next once the Operation Mode screen appears. Tap Start to proceed, then enter your DSL or cable modem, and plug the other end into the port marked INTERNET on the DIR-842.
User Manual
Page 21
...Link DIR-842 User Manual 17 Section 3 - Getting Started Step 6 Firstly, enter a network name (SSID) of your choice, or leave it connects. Repeat step 6 and tap Next to proceed. Finally, tap Next to proceed. See Configuration on page 19 for your 5 GHz network. Tap Next to configure the router. Secondly, choose a Wi-Fi password... of when this password is only required when you need to enter a SSID and password for details of at least 8 characters. Unlike the Wi-Fi password, this password the first time it unchanged to accept ...
...Link DIR-842 User Manual 17 Section 3 - Getting Started Step 6 Firstly, enter a network name (SSID) of your choice, or leave it connects. Repeat step 6 and tap Next to proceed. Finally, tap Next to proceed. See Configuration on page 19 for your 5 GHz network. Tap Next to configure the router. Secondly, choose a Wi-Fi password... of when this password is only required when you need to enter a SSID and password for details of at least 8 characters. Unlike the Wi-Fi password, this password the first time it unchanged to accept ...
User Manual
Page 23
Otherwise, leave the password blank. Click Log In to its current connection status. D-Link DIR-842 User Manual 19 You may also connect by typing the IP address of the router (by default this is http://192.168.0.1) in , press and ... default settings. The bar at any time. If you previously followed the setup wizard (see Connections on page 12, please use the admin password you cannot remember your password. The router's home page will automatically log out after a period of the page has quick access to Settings and Management functions. Enter your...
Otherwise, leave the password blank. Click Log In to its current connection status. D-Link DIR-842 User Manual 19 You may also connect by typing the IP address of the router (by default this is http://192.168.0.1) in , press and ... default settings. The bar at any time. If you previously followed the setup wizard (see Connections on page 12, please use the admin password you cannot remember your password. The router's home page will automatically log out after a period of the page has quick access to Settings and Management functions. Enter your...
User Manual
Page 30
... This information is Time: maintained during which the Internet connection is provided by your Internet connection requires you may need to enter a username and password. In most cases, select Dynamic IP. Primary DNS Enter the primary DNS server IP address assigned by your ISP. you to change the MTU ...: Maximum Idle Enter a maximum idle time during inactivity. Configuration PPPoE Select PPPoE if your ISP. Service Name: Enter the ISP service name (optional). D-Link DIR-842 User Manual 26 Section 4 - Reconnect Select either Always-on, On-Demand, or Manual.
... This information is Time: maintained during which the Internet connection is provided by your Internet connection requires you may need to enter a username and password. In most cases, select Dynamic IP. Primary DNS Enter the primary DNS server IP address assigned by your ISP. you to change the MTU ...: Maximum Idle Enter a maximum idle time during inactivity. Configuration PPPoE Select PPPoE if your ISP. Service Name: Enter the ISP service name (optional). D-Link DIR-842 User Manual 26 Section 4 - Reconnect Select either Always-on, On-Demand, or Manual.

User Manual
Page 31
... you the IP address, subnet mask, gateway, and DNS server addresses. Password: Enter the password provided by your ISP (Static IP only). Mask: PPTP Gateway Enter the gateway IP address provided by your Internet Service Provider (ISP) uses a PPTP connection. Server: D-Link DIR-842 User Manual 27 Configuration PPTP Choose PPTP (Point-to-Point-Tunneling... Always-on, On-Demand, or Manual. In most cases, select Dynamic IP. Address Mode: Select Static IP if your ISP assigned you with a username and password.
... you the IP address, subnet mask, gateway, and DNS server addresses. Password: Enter the password provided by your ISP (Static IP only). Mask: PPTP Gateway Enter the gateway IP address provided by your Internet Service Provider (ISP) uses a PPTP connection. Server: D-Link DIR-842 User Manual 27 Configuration PPTP Choose PPTP (Point-to-Point-Tunneling... Always-on, On-Demand, or Manual. In most cases, select Dynamic IP. Address Mode: Select Static IP if your ISP assigned you with a username and password.
User Manual
Page 33
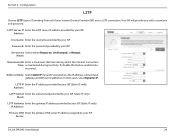
...). To disable this feature, enable Autoreconnect. Configuration L2TP Choose L2TP (Layer 2 Tunneling Protocol) if your ISP (Static IP only). Password: Enter the password provided by your ISP assigned you with a username and password. Reconnect Select either Always-on, On-Demand, or Manual. In most cases, select Dynamic IP. L2TP IP Enter the IP... Idle Enter a maximum idle time during which the Internet connection Time: is maintained during inactivity. Section 4 - Address Mode: Select Static IP if your ISP. Server: D-Link DIR-842 User Manual 29
...). To disable this feature, enable Autoreconnect. Configuration L2TP Choose L2TP (Layer 2 Tunneling Protocol) if your ISP (Static IP only). Password: Enter the password provided by your ISP assigned you with a username and password. Reconnect Select either Always-on, On-Demand, or Manual. In most cases, select Dynamic IP. L2TP IP Enter the IP... Idle Enter a maximum idle time during which the Internet connection Time: is maintained during inactivity. Section 4 - Address Mode: Select Static IP if your ISP. Server: D-Link DIR-842 User Manual 29
User Manual
Page 43
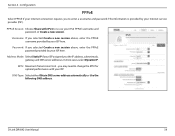
...your ISP assigned you selected Create a new session above , enter the PPPoE password provided by your IPv4 PPPoE username and password, or Create a new session. you may need to enter a username and password. DNS Type: Select either Obtain DNS server address automatically or Use the ...username provided by your ISP here. Password: If you to change the MTU for optimal performance with IPv4 to re-use your ISP here. MTU: Maximum Transmission Unit - PPPoE Session: Choose Share with your Internet service provider (ISP). D-Link DIR-842 User Manual 39 In most cases, ...
...your ISP assigned you selected Create a new session above , enter the PPPoE password provided by your IPv4 PPPoE username and password, or Create a new session. you may need to enter a username and password. DNS Type: Select either Obtain DNS server address automatically or Use the ...username provided by your ISP here. Password: If you to change the MTU for optimal performance with IPv4 to re-use your ISP here. MTU: Maximum Transmission Unit - PPPoE Session: Choose Share with your Internet service provider (ISP). D-Link DIR-842 User Manual 39 In most cases, ...
User Manual
Page 51
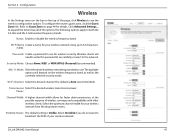
.... Wi-Fi Name Create a name for your wireless network using up to 32 characters. (SSID): Password: Create a password to see all of the options. D-Link DIR-842 User Manual 47 To configure the router's guest zone, click the Guest Zone link. Wi-Fi Channel: Select the desired channel. Select Invisible if you do not want to...
.... Wi-Fi Name Create a name for your wireless network using up to 32 characters. (SSID): Password: Create a password to see all of the options. D-Link DIR-842 User Manual 47 To configure the router's guest zone, click the Guest Zone link. Wi-Fi Channel: Select the desired channel. Select Invisible if you do not want to...
User Manual
Page 53
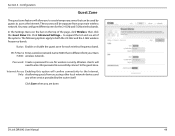
... The following options apply to expand the list and see all of the page, click Wireless, then click the Guest Zone link. D-Link DIR-842 User Manual 49 Click Advanced Settings... Configuration Guest Zone The guest zone feature will be used by the router itself. to both... the 2.4 GHz and the 5 GHz wireless frequency bands: Status: Enable or disable the guest zone for wireless security. Password: Create a password to the Internet, Only: disallowing guests from your main wireless network. Wireless clients will confine connectivity to use for each wireless ...
... The following options apply to expand the list and see all of the page, click Wireless, then click the Guest Zone link. D-Link DIR-842 User Manual 49 Click Advanced Settings... Configuration Guest Zone The guest zone feature will be used by the router itself. to both... the 2.4 GHz and the 5 GHz wireless frequency bands: Status: Enable or disable the guest zone for wireless security. Password: Create a password to the Internet, Only: disallowing guests from your main wireless network. Wireless clients will confine connectivity to use for each wireless ...

User Manual
Page 65
... your dynamic DNS username. At the bottom of the page, click Dynamic DNS. Click Save when you registered with your dynamic DNS password. Enable Enabling dynamic DNS will reveal further configuration options. User Name: Enter your dynamic DNS server, or select one from the drop...-down menu. Dynamic DNS: Status: Displays the current dynamic DNS connection status. Section 4 - Password: Enter your dynamic DNS service provider. To configure an IPv6 dynamic DNS host, refer to your server no matter what your domain name in hours). D-Link DIR-842 User Manual 61
... your dynamic DNS username. At the bottom of the page, click Dynamic DNS. Click Save when you registered with your dynamic DNS password. Enable Enabling dynamic DNS will reveal further configuration options. User Name: Enter your dynamic DNS server, or select one from the drop...-down menu. Dynamic DNS: Status: Displays the current dynamic DNS connection status. Section 4 - Password: Enter your dynamic DNS service provider. To configure an IPv6 dynamic DNS host, refer to your server no matter what your domain name in hours). D-Link DIR-842 User Manual 61
User Manual
Page 70
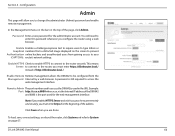
... to your (CAPTCHA): router's network settings. Configuration Admin This page will need to enter this password whenever you must enter https://dlinkrouter.local./ instead of the DIR-842 and 8080 is the Internet IP address of http://dlinkrouter.local./ Enable Remote Remote management allows the... change the administrator (Admin) password and enable remote management. You will allow you are done. Example: Port: http://x.x.x.x:8080 where x.x.x.x is the port used in the URL. In the Management menu on the bar on page 67. D-Link DIR-842 User Manual 66 Enable HTTPS ...
... to your (CAPTCHA): router's network settings. Configuration Admin This page will need to enter this password whenever you must enter https://dlinkrouter.local./ instead of the DIR-842 and 8080 is the Internet IP address of http://dlinkrouter.local./ Enable Remote Remote management allows the... change the administrator (Admin) password and enable remote management. You will allow you are done. Example: Port: http://x.x.x.x:8080 where x.x.x.x is the port used in the URL. In the Management menu on the bar on page 67. D-Link DIR-842 User Manual 66 Enable HTTPS ...
User Manual
Page 75
..., you will need to the time display. Select the desired network by clicking on this icon will display a list of your wireless adapter. Wireless Icon D-Link DIR-842 User Manual 71 To join an existing network, locate the wireless network icon in the taskbar, next to know the security key (Wi-Fi...
..., you will need to the time display. Select the desired network by clicking on this icon will display a list of your wireless adapter. Wireless Icon D-Link DIR-842 User Manual 71 To join an existing network, locate the wireless network icon in the taskbar, next to know the security key (Wi-Fi...

User Manual
Page 76
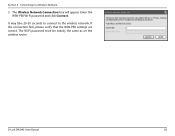
Enter the password into the box and click Next. When you have established a successful connection a wireless network, the word Connected will then be prompted to the router, you are connected. D-Link DIR-842 User Manual 72 If you wish to use Wi-Fi Protected Setup (WPS) to connect to enter the network security key (WiFi password) for the wireless network. Connecting to a Wireless Network You will appear next to the name of the network to which you can also press the WPS button on your router at the point to enable the WPS function. Section 4 -
Enter the password into the box and click Next. When you have established a successful connection a wireless network, the word Connected will then be prompted to the router, you are connected. D-Link DIR-842 User Manual 72 If you wish to use Wi-Fi Protected Setup (WPS) to connect to enter the network security key (WiFi password) for the wireless network. Connecting to a Wireless Network You will appear next to the name of the network to which you can also press the WPS button on your router at the point to enable the WPS function. Section 4 -
User Manual
Page 79
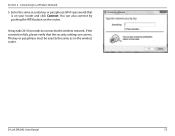
D-Link DIR-842 User Manual 75 It may take 20-30 seconds to connect to a Wireless Network 5. The key or passphrase must be exactly the same as on the router. You can also connect by pushing the WPS button on the wireless router. Enter the same security key or passphrase (Wi-Fi password) that the security settings are correct. If the connection fails, please verify that is on your router and click Connect. Connecting to the wireless network. Section 4 -
D-Link DIR-842 User Manual 75 It may take 20-30 seconds to connect to a Wireless Network 5. The key or passphrase must be exactly the same as on the router. You can also connect by pushing the WPS button on the wireless router. Enter the same security key or passphrase (Wi-Fi password) that the security settings are correct. If the connection fails, please verify that is on your router and click Connect. Connecting to the wireless network. Section 4 -
User Manual
Page 86
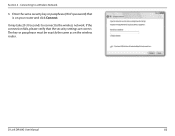
Connecting to the wireless network. The key or passphrase must be exactly the same as on your router and click Connect. If the connection fails, please verify that is on the wireless router. It may take 20-30 seconds to connect to a Wireless Network 3. Section 4 - Enter the same security key or passphrase (Wi-Fi password) that the security settings are correct. D-Link DIR-842 User Manual 82
Connecting to the wireless network. The key or passphrase must be exactly the same as on your router and click Connect. If the connection fails, please verify that is on the wireless router. It may take 20-30 seconds to connect to a Wireless Network 3. Section 4 - Enter the same security key or passphrase (Wi-Fi password) that the security settings are correct. D-Link DIR-842 User Manual 82
User Manual
Page 89
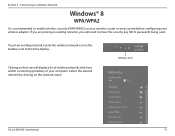
Enter the WPA-PSK Wi-Fi password and click Connect. It may take 20-30 seconds to connect to a Wireless Network 3. If the connection fails, please verify that the WPA-PSK settings are correct. Connecting to the wireless network. The Wi-Fi password must be exactly the same as on the wireless router. Section 4 - The Wireless Network Connection box will appear. D-Link DIR-842 User Manual 85
Enter the WPA-PSK Wi-Fi password and click Connect. It may take 20-30 seconds to connect to a Wireless Network 3. If the connection fails, please verify that the WPA-PSK settings are correct. Connecting to the wireless network. The Wi-Fi password must be exactly the same as on the wireless router. Section 4 - The Wireless Network Connection box will appear. D-Link DIR-842 User Manual 85


