
Product Manual
Page 2
... Dynamic IP Address 15 Static IP Address 16 PPPoE 17 PPTP 18 L2TP 19 Big Pond 20 Wireless Setup 21 Printer Wizard 23 Wireless 26 WAN 28 Dynamic IP Address 28 Static IP Address 30 D-Link DI-724GU User Manual PPPoE 32 PPTP 34 L2TP 36 Big Pond 38 LAN 40 DHCP 42 Advanced 44 Virtual...
... Dynamic IP Address 15 Static IP Address 16 PPPoE 17 PPTP 18 L2TP 19 Big Pond 20 Wireless Setup 21 Printer Wizard 23 Wireless 26 WAN 28 Dynamic IP Address 28 Static IP Address 30 D-Link DI-724GU User Manual PPPoE 32 PPTP 34 L2TP 36 Big Pond 38 LAN 40 DHCP 42 Advanced 44 Virtual...

Product Manual
Page 3
Table of Contents Log 67 Statistics 68 Wireless Status 69 Active Sessions 70 Print Server 71 Help 72 Troubleshooting 73 Wireless Basics 75 Networking Basics 80 Check your IP Address 80 Statically Assign an IP Address 81 Technical Specifications 82 Contacting Technical Support 83 Warranty 84 Registration 89 D-Link DI-724GU User Manual 3
Table of Contents Log 67 Statistics 68 Wireless Status 69 Active Sessions 70 Print Server 71 Help 72 Troubleshooting 73 Wireless Basics 75 Networking Basics 80 Check your IP Address 80 Statically Assign an IP Address 81 Technical Specifications 82 Contacting Technical Support 83 Warranty 84 Registration 89 D-Link DI-724GU User Manual 3

Product Manual
Page 4
If any of the above D-Link DI-724GU User Manual 4 System Requirements • Ethernet-based Cable or DSL Modem • Computers with Windows®, Macintosh®, or Linux-based operating systems with your reseller. Section 1 - Product Overview PParocdkuacgteOCvoenrtveinetws • D-Link DI-724GU Wireless 108G QoS Gigabit Router • CAT5 Ethernet Cable • Power Adapter Note: Using a power supply with a different voltage than the...
If any of the above D-Link DI-724GU User Manual 4 System Requirements • Ethernet-based Cable or DSL Modem • Computers with Windows®, Macintosh®, or Linux-based operating systems with your reseller. Section 1 - Product Overview PParocdkuacgteOCvoenrtveinetws • D-Link DI-724GU Wireless 108G QoS Gigabit Router • CAT5 Ethernet Cable • Power Adapter Note: Using a power supply with a different voltage than the...

Product Manual
Page 5
... will no longer have to manually input a new WEP key to offering faster data transfer speeds when used with other D-Link AirPlus Xtreme G products. Instead, you connect, vastly increasing the safety of WPA, the DI-724GU will still be much greater security than ever before. Product Overview Introduction The D-Link DI-724GU Wireless 108G QoS Router is backwards compatible with a RADIUS...
... will no longer have to manually input a new WEP key to offering faster data transfer speeds when used with other D-Link AirPlus Xtreme G products. Instead, you connect, vastly increasing the safety of WPA, the DI-724GU will still be much greater security than ever before. Product Overview Introduction The D-Link DI-724GU Wireless 108G QoS Router is backwards compatible with a RADIUS...

Product Manual
Page 6
...). • User-friendly configuration and diagnostic utilities. • Operates in conjunction with other D-Link 108G enabled devices utilizing Packet Bursting, FastFrames, Turbo Mode and Compression techniques. Actual data throughput will obtain a ... Gigabit Ethernet ports, 1 WAN port, Auto MDI/MDIX. * Maximum wireless signal rate derived from the D-Link 108G compression techniques.. D-Link 108G performance results are based on the network. • Supports special applications that the home user, without a RADIUS server, will vary. D-Link DI-724GU User Manual ...
...). • User-friendly configuration and diagnostic utilities. • Operates in conjunction with other D-Link 108G enabled devices utilizing Packet Bursting, FastFrames, Turbo Mode and Compression techniques. Actual data throughput will obtain a ... Gigabit Ethernet ports, 1 WAN port, Auto MDI/MDIX. * Maximum wireless signal rate derived from the D-Link 108G compression techniques.. D-Link 108G performance results are based on the network. • Supports special applications that the home user, without a RADIUS server, will vary. D-Link DI-724GU User Manual ...

Product Manual
Page 7
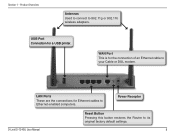
... enabled device. Power LED A solid light indicates a proper connection to the USB port. D-Link DI-724GU User Manual Local Network LEDs A solid light on the WAN port. This LED blinks during wireless data transmission. Status LED A blinking light indicates that the wireless segment is functioning properly. These LEDs blink during data transmission. This LED blinks during...
... enabled device. Power LED A solid light indicates a proper connection to the USB port. D-Link DI-724GU User Manual Local Network LEDs A solid light on the WAN port. This LED blinks during wireless data transmission. Status LED A blinking light indicates that the wireless segment is functioning properly. These LEDs blink during data transmission. This LED blinks during...
Product Manual
Page 8
WAN Port This is for Ethernet cables to your Cable or DSL modem. Power Receptor D-Link DI-724GU User Manual Reset Button Pressing this button restores the Router to 802.11g or 802.11b wireless adapters. Product Overview Antennas Used to connect to its original factory default settings. 8 LAN Ports These are the connections for the connection of an Ethernet cable to Ethernet-enabled computers. USB Port Connection for a USB printer. Section 1 -
WAN Port This is for Ethernet cables to your Cable or DSL modem. Power Receptor D-Link DI-724GU User Manual Reset Button Pressing this button restores the Router to 802.11g or 802.11b wireless adapters. Product Overview Antennas Used to connect to its original factory default settings. 8 LAN Ports These are the connections for the connection of an Ethernet cable to Ethernet-enabled computers. USB Port Connection for a USB printer. Section 1 -

Product Manual
Page 9
... adapter. 3. The DWL-G650 AirPlus Xtreme G Wireless Cardbus Adapter and the DWL-G520 AirPlus Xtreme G Wireless PCI Adapter will illuminate to unplug the power adapter. Computers equipped with the router using their default wireless settings. Meaning you will use a straight-through or crossover Ethernet cable to the DI-724GU. D-Link DI-724GU User Manual 9 some devices may not have a on...
... adapter. 3. The DWL-G650 AirPlus Xtreme G Wireless Cardbus Adapter and the DWL-G520 AirPlus Xtreme G Wireless PCI Adapter will illuminate to unplug the power adapter. Computers equipped with the router using their default wireless settings. Meaning you will use a straight-through or crossover Ethernet cable to the DI-724GU. D-Link DI-724GU User Manual 9 some devices may not have a on...

Product Manual
Page 10
Product Overview Network Overview Please remember that D-Link Wireless 108G devices are pre-configured to connect together, right out of the box, with their default settings. D-Link DI-724GU User Manual 10 Section 1 -
Product Overview Network Overview Please remember that D-Link Wireless 108G devices are pre-configured to connect together, right out of the box, with their default settings. D-Link DI-724GU User Manual 10 Section 1 -
Product Manual
Page 11
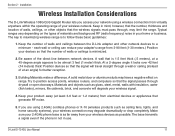
...walls and ceilings between network devices. Try to a minimum - Installation Wireless Installation Considerations The D-Link Wireless 108G QoS Gigabit Router lets you are using a wireless connection from electrical devices or appliances that is to maximizing wireless range is 1.5 feet thick (.5 meters), at an angle) for..., lights, and home security systems), your devices so that the wireless signals must pass through drywall or open doorways. The key to follow these basic guidelines: 1. D-Link DI-724GU User Manual 11 Materials and objects such as possible. Section 2 - Keep ...
...walls and ceilings between network devices. Try to a minimum - Installation Wireless Installation Considerations The D-Link Wireless 108G QoS Gigabit Router lets you are using a wireless connection from electrical devices or appliances that is to maximizing wireless range is 1.5 feet thick (.5 meters), at an angle) for..., lights, and home security systems), your devices so that the wireless signals must pass through drywall or open doorways. The key to follow these basic guidelines: 1. D-Link DI-724GU User Manual 11 Materials and objects such as possible. Section 2 - Keep ...

Product Manual
Page 12
Configuration Configuration This section will show you how to configure your Web browser and type "http://192.168.0.1" into the URL address box. Open your new D-Link Wireless 108G QoS Gigabit Router using the D-Link Setup Wizard. Then press the Enter or Return key. Section 3 - Select "Admin" from the User Name drop down menu and leave the password field blank. Click Login D-Link DI-724GU User Manual 12
Configuration Configuration This section will show you how to configure your Web browser and type "http://192.168.0.1" into the URL address box. Open your new D-Link Wireless 108G QoS Gigabit Router using the D-Link Setup Wizard. Then press the Enter or Return key. Section 3 - Select "Admin" from the User Name drop down menu and leave the password field blank. Click Login D-Link DI-724GU User Manual 12

Product Manual
Page 13
...23 for instructions on running the Printer Wizard. D-Link DI-724GU User Manual 13 Run Wizard: This wizard guides you must configure your PC and the router via the browser. The Printer Wizard provides the necessary printer setup link between your computer for that the browser can ...router setup steps: • Set your Password • Select your Time Zone • Configure your Internet Connection • Configure the Wireless LAN Connection • Restart Continue to download the Printer Wizard program, answer Yes or OK. You should be visible from the DI-724GU...
...23 for instructions on running the Printer Wizard. D-Link DI-724GU User Manual 13 Run Wizard: This wizard guides you must configure your PC and the router via the browser. The Printer Wizard provides the necessary printer setup link between your computer for that the browser can ...router setup steps: • Set your Password • Select your Time Zone • Configure your Internet Connection • Configure the Wireless LAN Connection • Restart Continue to download the Printer Wizard program, answer Yes or OK. You should be visible from the DI-724GU...

Product Manual
Page 14
Configuration Setup Wizard Click Next You have the option to establish a password for the User Name "Admin". Section 3 - Click Next D-Link DI-724GU User Manual 14 Click Next Choose your time zone from the drop down list.
Configuration Setup Wizard Click Next You have the option to establish a password for the User Name "Admin". Section 3 - Click Next D-Link DI-724GU User Manual 14 Click Next Choose your time zone from the drop down list.

Product Manual
Page 15
If you selected Dynamic IP Address, this screen will be prompted to select, please contact your router. page 18 L2TP - page 20 Click Next If you are unsure of the network adapter in the MAC address. Configuration Dynamic IP Address ... copy the MAC address of which setting to select the type of Internet connection for Cable Internet service). page 19 Big Pond - You can also manually type in your computer. Static IP Address - page 17 PPTP - Click Next D-Link DI-724GU User Manual 15 page 16 PPPoE - Section 3 -
If you selected Dynamic IP Address, this screen will be prompted to select, please contact your router. page 18 L2TP - page 20 Click Next If you are unsure of the network adapter in the MAC address. Configuration Dynamic IP Address ... copy the MAC address of which setting to select the type of Internet connection for Cable Internet service). page 19 Big Pond - You can also manually type in your computer. Static IP Address - page 17 PPTP - Click Next D-Link DI-724GU User Manual 15 page 16 PPPoE - Section 3 -

Product Manual
Page 16
Click Next Enter the IP address that was originally provided to complete all of the required fields. You will need to you by your ISP requires a Static IP Address, select the corresponding radio button. Click Next D-Link DI-724GU User Manual 16 Configuration Static IP Address If your ISP. Section 3 -
Click Next Enter the IP address that was originally provided to complete all of the required fields. You will need to you by your ISP requires a Static IP Address, select the corresponding radio button. Click Next D-Link DI-724GU User Manual 16 Configuration Static IP Address If your ISP. Section 3 -

Product Manual
Page 17
Click Next If you have a Static IP connection, enter the IP Address, Subnet Mask, Gateway IP Address, Server IP, PPTP Account, and Password provided to you by your ISP. If you by your ISP uses PPPoE (Point-to you have a Dynamic IP connection, enter the Server IP, PPPoE Account, and Password provided to -Point Protocol over Ethernet), select the corresponding radio button. Click Next D-Link DI-724GU User Manual 17 Section 3 - Configuration PPPoE If your ISP.
Click Next If you have a Static IP connection, enter the IP Address, Subnet Mask, Gateway IP Address, Server IP, PPTP Account, and Password provided to you by your ISP. If you by your ISP uses PPPoE (Point-to you have a Dynamic IP connection, enter the Server IP, PPPoE Account, and Password provided to -Point Protocol over Ethernet), select the corresponding radio button. Click Next D-Link DI-724GU User Manual 17 Section 3 - Configuration PPPoE If your ISP.

Product Manual
Page 18
If you have a Dynamic IP connection, enter the Server IP, PPTP Account, and Password provided to Point Tunneling Protocol), select the corresponding radio button. Configuration PPTP If your ISP uses PPTP (Point to you by your ISP. Click Next D-Link DI-724GU User Manual 18 Section 3 - Click Next If you have a Static IP connection, enter the IP Address, Subnet Mask, Gateway IP Address, Server IP, PPTP Account, and Password provided to you by your ISP.
If you have a Dynamic IP connection, enter the Server IP, PPTP Account, and Password provided to Point Tunneling Protocol), select the corresponding radio button. Configuration PPTP If your ISP uses PPTP (Point to you by your ISP. Click Next D-Link DI-724GU User Manual 18 Section 3 - Click Next If you have a Static IP connection, enter the IP Address, Subnet Mask, Gateway IP Address, Server IP, PPTP Account, and Password provided to you by your ISP.

Product Manual
Page 19
Click Next D-Link DI-724GU User Manual 19 Configuration L2TP If your ISP. Section 3 - If you have a Dynamic IP connection, enter the L2TP Server IP Address, User Name, and Password provided to you by your ISP. Click Next If you have a Static IP connection, enter the L2TP IP Address, Subnet Mask, Gateway IP Address, L2TP Server IP, User Name, and Password provided to you by your ISP uses L2TP (Layer Two Tunneling Protocol), select the corresponding radio button.
Click Next D-Link DI-724GU User Manual 19 Configuration L2TP If your ISP. Section 3 - If you have a Dynamic IP connection, enter the L2TP Server IP Address, User Name, and Password provided to you by your ISP. Click Next If you have a Static IP connection, enter the L2TP IP Address, Subnet Mask, Gateway IP Address, L2TP Server IP, User Name, and Password provided to you by your ISP uses L2TP (Layer Two Tunneling Protocol), select the corresponding radio button.

Product Manual
Page 20
Click Next Enter the User Name, and Password provided to you connect to the internet through Telstra BigPond Cable Broadband in Australia. Configuration Big Pond Select this option if you by your ISP. Click Next D-Link DI-724GU User Manual 20 Section 3 -
Click Next Enter the User Name, and Password provided to you connect to the internet through Telstra BigPond Cable Broadband in Australia. Configuration Big Pond Select this option if you by your ISP. Click Next D-Link DI-724GU User Manual 20 Section 3 -

Product Manual
Page 21
... WPA-PSK. You can change the encryption settings for more secure wireless communication. Click Next D-Link DI-724GU User Manual 21 Configuration Wireless Setup The default wireless settings for your 802.11g network, the DI-724GU is disabled. Click Next If you wish to match an existing wireless network. Section 3 - By default the encryption is capable of two...
... WPA-PSK. You can change the encryption settings for more secure wireless communication. Click Next D-Link DI-724GU User Manual 21 Configuration Wireless Setup The default wireless settings for your 802.11g network, the DI-724GU is disabled. Click Next If you wish to match an existing wireless network. Section 3 - By default the encryption is capable of two...


