Product Manual
Page 3
Table of Contents Table of Contents Preface 2 Manual Revisions 2 Trademarks 2 Product Overview 4 Package Contents 4 System Requirements 4 Introduction 5 Features 5 Hardware Overview 6 LEDs 6 Connection 7 Hardware Installation 8 Push Button Security 9 Using the Setup Wizard 10 Configuration 11 Security 13 Troubleshooting 15 Technical Specifications 16 Contacting Technical Support 17 Warranty 18 Registration 23 D-Link DHP-306AV User Manual 3
Table of Contents Table of Contents Preface 2 Manual Revisions 2 Trademarks 2 Product Overview 4 Package Contents 4 System Requirements 4 Introduction 5 Features 5 Hardware Overview 6 LEDs 6 Connection 7 Hardware Installation 8 Push Button Security 9 Using the Setup Wizard 10 Configuration 11 Security 13 Troubleshooting 15 Technical Specifications 16 Contacting Technical Support 17 Warranty 18 Registration 23 D-Link DHP-306AV User Manual 3
Product Manual
Page 5
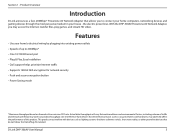
...connect your home computers, networking devices and gaming devices through the most pervasive medium in your home's electrical wiring by plugging into existing power outlets • Speeds of traffic and network overhead, may access the Internet, transfer files, play games, and stream HD video. Features • Use your house - D-Link DHP-306AV... User Manual 5 Actual data throughput will vary. With the DHP-306AV PowerLine AV Network Adapter, you to 200Mbps* • One 10/100 Ethernet port &#...
...connect your home computers, networking devices and gaming devices through the most pervasive medium in your home's electrical wiring by plugging into existing power outlets • Speeds of traffic and network overhead, may access the Internet, transfer files, play games, and stream HD video. Features • Use your house - D-Link DHP-306AV... User Manual 5 Actual data throughput will vary. With the DHP-306AV PowerLine AV Network Adapter, you to 200Mbps* • One 10/100 Ethernet port &#...
Product Manual
Page 6
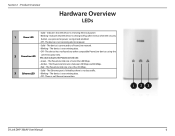
... any other compatible PowerLine devices using the 2 PowerLine LED 1 same encryption key. The PowerLine link rate is no data traffic. 3 Ethernet LED • Blinking - Indicates that the device is no Ethernet connection. 1 23 D-Link DHP-306AV User Manual 6 The PowerLine link rate is setting itself up after reset or when the security button was pressed or...
... any other compatible PowerLine devices using the 2 PowerLine LED 1 same encryption key. The PowerLine link rate is no data traffic. 3 Ethernet LED • Blinking - Indicates that the device is no Ethernet connection. 1 23 D-Link DHP-306AV User Manual 6 The PowerLine link rate is setting itself up after reset or when the security button was pressed or...
Product Manual
Page 7
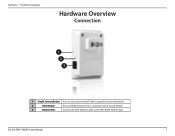
D-Link DHP-306AV User Manual 7 Product Overview Hardware Overview Connection 1 2 3 1 Simple Connect Button Press to the DHP-306AV Ethernet port. Refer to page 9 for more information. 2 Reset Button Press and hold the button for 1 second to reset to factory default. 3 Ethernet Port Connect the CAT5 Ethernet cable to secure your network. Section 1 -
D-Link DHP-306AV User Manual 7 Product Overview Hardware Overview Connection 1 2 3 1 Simple Connect Button Press to the DHP-306AV Ethernet port. Refer to page 9 for more information. 2 Reset Button Press and hold the button for 1 second to reset to factory default. 3 Ethernet Port Connect the CAT5 Ethernet cable to secure your network. Section 1 -
Product Manual
Page 8
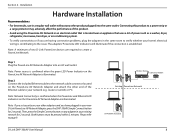
... Modem 1 2 LAN 3 4 RESET INTERNET USB 5V - - - 3A INTERNET Existing PowerLine Network DHP-306AV (Included) D-Link DHP-306AV User Manual 8 Installation Hardware Installation Recommendations • For best results, use in a regular wall outlet without any adapter in an electrical outlet that is established. Step 2 Connect the included Ethernet cable to create a PowerLine Network. Both buttons must be...
... Modem 1 2 LAN 3 4 RESET INTERNET USB 5V - - - 3A INTERNET Existing PowerLine Network DHP-306AV (Included) D-Link DHP-306AV User Manual 8 Installation Hardware Installation Recommendations • For best results, use in a regular wall outlet without any adapter in an electrical outlet that is established. Step 2 Connect the included Ethernet cable to create a PowerLine Network. Both buttons must be...
Product Manual
Page 9
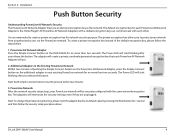
...encryption key allows you release the button. To create a private encryption key instead of pushing the Simple Connect button on the PowerLine AV Network Adapter, press the Simple Connect button on the DHP-306AV for no more than two seconds. It is the HomePlugAV. The Power LED will memorize the security ...encryption key, please reset the adapter back to create a private encryption key for 1 second and then follow the steps below 1. Note: Both Simple Connect buttons must use . 2. D-Link DHP-306AV User Manual 9 Section 2 - The default encryption key for each other.
...encryption key allows you release the button. To create a private encryption key instead of pushing the Simple Connect button on the PowerLine AV Network Adapter, press the Simple Connect button on the DHP-306AV for no more than two seconds. It is the HomePlugAV. The Power LED will memorize the security ...encryption key, please reset the adapter back to create a private encryption key for 1 second and then follow the steps below 1. Note: Both Simple Connect buttons must use . 2. D-Link DHP-306AV User Manual 9 Section 2 - The default encryption key for each other.
Product Manual
Page 11
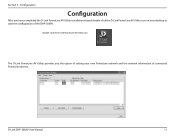
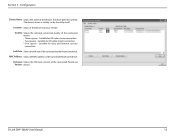
Configuration Configuration After you the option of setting your desktop to start the configuration of connected PowerLine devices. D-Link DHP-306AV User Manual 11 Double-click the D-Link PowerLine AV Utility icon The D-Link PowerLine AV Utility provides you have completed the D-Link PowerLine AV Utility installation wizard, double-click the D-Link PowerLine AV Utility icon on your own PowerLine network and the network information of the DHP-306AV. Section 3 -
Configuration Configuration After you the option of setting your desktop to start the configuration of connected PowerLine devices. D-Link DHP-306AV User Manual 11 Double-click the D-Link PowerLine AV Utility icon The D-Link PowerLine AV Utility provides you have completed the D-Link PowerLine AV Utility installation wizard, double-click the D-Link PowerLine AV Utility icon on your own PowerLine network and the network information of the DHP-306AV. Section 3 -
Product Manual
Page 12
Section 3 - Suitable for HD video stream connection. • Two squares - Link Rate: Shows the link rate of the connected PowerLine device. MAC Address: Shows the MAC address of the connected to the PowerLine device. D-Link DHP-306AV User Manual 12 The device's name is local or remote Quality: Shows the network connection quality of the devices that have been discovered...
Section 3 - Suitable for HD video stream connection. • Two squares - Link Rate: Shows the link rate of the connected PowerLine device. MAC Address: Shows the MAC address of the connected to the PowerLine device. D-Link DHP-306AV User Manual 12 The device's name is local or remote Quality: Shows the network connection quality of the devices that have been discovered...
Product Manual
Page 15
... have not unplugged the PowerLine AV Network Adapter while configuring it : Please make sure your PowerLine AV Network Adapter is correctly plugged and connected to the computer or network device. • I 'm having a lot of problems configuring my network: If you are having problems ...and now the utility does not work correctly: Please restart the utility each time you disconnect the connection cable. • I can't configure any parameter of the adapters and configure them again. D-Link DHP-306AV User Manual 15 Section 3 - To test whether the electrical wiring is shown when I try to...
... have not unplugged the PowerLine AV Network Adapter while configuring it : Please make sure your PowerLine AV Network Adapter is correctly plugged and connected to the computer or network device. • I 'm having a lot of problems configuring my network: If you are having problems ...and now the utility does not work correctly: Please restart the utility each time you disconnect the connection cable. • I can't configure any parameter of the adapters and configure them again. D-Link DHP-306AV User Manual 15 Section 3 - To test whether the electrical wiring is shown when I try to...
Product Manual
Page 21
..., FAILURE OF OTHER EQUIPMENT OR COMPUTER PROGRAMS TO WHICH D-LINK'S PRODUCT IS CONNECTED WITH, LOSS OF INFORMATION OR DATA CONTAINED IN, STORED ON, OR INTEGRATED WITH ANY PRODUCT RETURNED TO D-LINK FOR WARRANTY SERVICE) RESULTING FROM THE USE OF THE PRODUCT...Link is a Class B product. In a domestic environment, this product may not apply. THE SOLE REMEDY FOR A BREACH OF THE FOREGOING LIMITED WARRANTY IS REPAIR, REPLACEMENT OR REFUND OF THE DEFECTIVE OR NONCONFORMING PRODUCT. Some states do not allow exclusion or limitation of D-Link Systems, Inc. All rights reserved. D-Link DHP-306AV...
..., FAILURE OF OTHER EQUIPMENT OR COMPUTER PROGRAMS TO WHICH D-LINK'S PRODUCT IS CONNECTED WITH, LOSS OF INFORMATION OR DATA CONTAINED IN, STORED ON, OR INTEGRATED WITH ANY PRODUCT RETURNED TO D-LINK FOR WARRANTY SERVICE) RESULTING FROM THE USE OF THE PRODUCT...Link is a Class B product. In a domestic environment, this product may not apply. THE SOLE REMEDY FOR A BREACH OF THE FOREGOING LIMITED WARRANTY IS REPAIR, REPLACEMENT OR REFUND OF THE DEFECTIVE OR NONCONFORMING PRODUCT. Some states do not allow exclusion or limitation of D-Link Systems, Inc. All rights reserved. D-Link DHP-306AV...

Product Manual
Page 22
.... If this equipment does cause harmful interference to radio communication. D-Link DHP-306AV User Manual 22 This equipment generates, uses, and can be determined by turning the equipment off and on, the user is connected. • Consult the dealer or an experienced radio/TV technician ... measures: • Reorient or relocate the receiving antenna. • Increase the separation between the equipment and receiver. • Connect the equipment into an outlet on a circuit different from that interference will not occur in a particular installation. For detailed warranty information...
.... If this equipment does cause harmful interference to radio communication. D-Link DHP-306AV User Manual 22 This equipment generates, uses, and can be determined by turning the equipment off and on, the user is connected. • Consult the dealer or an experienced radio/TV technician ... measures: • Reorient or relocate the receiving antenna. • Increase the separation between the equipment and receiver. • Connect the equipment into an outlet on a circuit different from that interference will not occur in a particular installation. For detailed warranty information...


