Product Manual
Page 5
Configuration 18 Installing the Web Management Utility 18 Discovery List 20 Monitor List 21 Device Setting 23 Toolbar 25 Configuring the Switch 26 Login 27 Setup Menu 30 Configuring Setup Setting 31 Port Settings 31 VLAN Settings (Virtual Local Area Network 33 Trunk Setting 35 Mirror Setting 36 PoE Setting 37 Device Status 39 Statistic 40 System Setting 42 Trap Setting 43 Set Password 44 Backup Setting 45 Reset Setting 46 Logout 46 Technical Specifications 48 5
Configuration 18 Installing the Web Management Utility 18 Discovery List 20 Monitor List 21 Device Setting 23 Toolbar 25 Configuring the Switch 26 Login 27 Setup Menu 30 Configuring Setup Setting 31 Port Settings 31 VLAN Settings (Virtual Local Area Network 33 Trunk Setting 35 Mirror Setting 36 PoE Setting 37 Device Status 39 Statistic 40 System Setting 42 Trap Setting 43 Set Password 44 Backup Setting 45 Reset Setting 46 Logout 46 Technical Specifications 48 5
Product Manual
Page 15
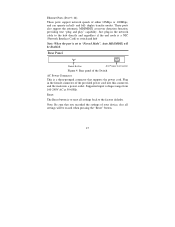
... AC Power Connector Figure 4. Note: Be sure that supports the power cord. Rear panel of the Switch AC Power Connector: This is to reset all settings will be erased when pressing the "Reset" button. 15 Supported input voltages range from 100-240V AC at 50-60Hz. Ethernet Ports (Port 9~16...in the female connector of the provided power cord into this connector, and the male into a power outlet. Plug in half- and full- Reset: The Reset button is a three-pronged connector that you recorded the settings of your device, else all settings back to "Forced Mode", Auto MDI/MDIX...
... AC Power Connector Figure 4. Note: Be sure that supports the power cord. Rear panel of the Switch AC Power Connector: This is to reset all settings will be erased when pressing the "Reset" button. 15 Supported input voltages range from 100-240V AC at 50-60Hz. Ethernet Ports (Port 9~16...in the female connector of the provided power cord into this connector, and the male into a power outlet. Plug in half- and full- Reset: The Reset button is a three-pronged connector that you recorded the settings of your device, else all settings back to "Forced Mode", Auto MDI/MDIX...

Product Manual
Page 30
There are eleven options: Port Settings, VLAN Settings, Trunk Settings, Mirror Settings,PoE Settings, Device Status, Statistic, System Settings, Trap Setting, Password Settings, Backup Settings, and Reset Settings as shown in the Main Menu screen. Figure 15. Setup menu 30 Click on the left side of the screen (Figure 15). Setup Menu When the main page appears, find the Setup menu on the setup item that you want to configure.
There are eleven options: Port Settings, VLAN Settings, Trunk Settings, Mirror Settings,PoE Settings, Device Status, Statistic, System Settings, Trap Setting, Password Settings, Backup Settings, and Reset Settings as shown in the Main Menu screen. Figure 15. Setup menu 30 Click on the left side of the screen (Figure 15). Setup Menu When the main page appears, find the Setup menu on the setup item that you want to configure.

Product Manual
Page 45
If you forget the password, press the "Reset" button in the rear panel of the recorded file. 45 Figure 29. Once you to process the setting of the Switch. will be lost and the Switch will be restored to save the setting. The current setting includes VLAN, Port Setting... To restore a current setting file to the device, you must specify the backup file and press the "Restore" button to backup the current setting of the Switch. etc. Set Password Backup Setting The backup tools help you need to backup the setting, press the "Backup" button to the default setting.
If you forget the password, press the "Reset" button in the rear panel of the recorded file. 45 Figure 29. Once you to process the setting of the Switch. will be lost and the Switch will be restored to save the setting. The current setting includes VLAN, Port Setting... To restore a current setting file to the device, you must specify the backup file and press the "Restore" button to backup the current setting of the Switch. etc. Set Password Backup Setting The backup tools help you need to backup the setting, press the "Backup" button to the default setting.

Product Manual
Page 46
Reset Setting The Factory Reset button helps you select this function, the Web configuration will be set to the default setting of 192.168.0.1. Be aware that the entire configuration will log out and return to the default setting from the factory. Reset Setting Logout When you to reset the device back to first Login page. 46 Figure 31. the IP address of the device will not be erased. Backup Setting Note: When restoring a recorded file, the current password will be reset; Figure 30.
Reset Setting The Factory Reset button helps you select this function, the Web configuration will be set to the default setting of 192.168.0.1. Be aware that the entire configuration will log out and return to the default setting from the factory. Reset Setting Logout When you to reset the device back to first Login page. 46 Figure 31. the IP address of the device will not be erased. Backup Setting Note: When restoring a recorded file, the current password will be reset; Figure 30.


