User Guide
Page 3
Read on to learn how to a TV (Optional 24 FAQ ...25 Information Diagrams 26 General Specifications 28 Copyright and License 30 Contents About Your Player 2 Using the Navigation Controls 3 Getting Started 4 Managing Music and Data 10 Understanding Your Player 11 Managing Your Player 12 Personalizing Your Player 21 Connecting Your Player to get started with your new player! 1 Congratulations Zen Vision:M™ is the new digital player from Creative.
Read on to learn how to a TV (Optional 24 FAQ ...25 Information Diagrams 26 General Specifications 28 Copyright and License 30 Contents About Your Player 2 Using the Navigation Controls 3 Getting Started 4 Managing Music and Data 10 Understanding Your Player 11 Managing Your Player 12 Personalizing Your Player 21 Connecting Your Player to get started with your new player! 1 Congratulations Zen Vision:M™ is the new digital player from Creative.
User Guide
Page 4
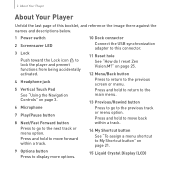
... Crystal Display (LCD) Press and hold to move back within a track. 9 Options button Press to display more options. 10 Dock connector Connect the USB synchronization adapter to the previous screen or menu. 2 About Your Player About Your Player Unfold the last page of this connector. 11 Reset hole See "How do I reset Zen Vision:M?" Press and hold to return to the main menu. 13 Previous/Rewind button Press...
... Crystal Display (LCD) Press and hold to move back within a track. 9 Options button Press to display more options. 10 Dock connector Connect the USB synchronization adapter to the previous screen or menu. 2 About Your Player About Your Player Unfold the last page of this connector. 11 Reset hole See "How do I reset Zen Vision:M?" Press and hold to return to the main menu. 13 Previous/Rewind button Press...
User Guide
Page 7
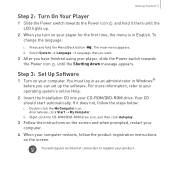
... an Internet connection to your operating system's online Help. 2 Insert the Installation CD into your product. If it there until the Shutting down message appears. ii. You must log in as an administrator in Windows® before you have finished using your player for the first time, the menu is in English. Getting Started 5 Step 2: Turn On Your Player 1 Slide the Power switch towards the Power icon until...
... an Internet connection to your operating system's online Help. 2 Insert the Installation CD into your product. If it there until the Shutting down message appears. ii. You must log in as an administrator in Windows® before you have finished using your player for the first time, the menu is in English. Getting Started 5 Step 2: Turn On Your Player 1 Slide the Power switch towards the Power icon until...

User Guide
Page 9
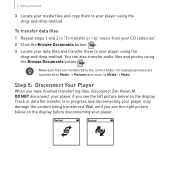
... content from online music stores. „ Videos - Creative Media Explorer uses MusicIDSM from your CD collection 1 Make sure your player is FREE and automatic. For more details, see "Managing Music and Data" on the screen. To transfer or 'rip' music from Gracenote® to the Creative Audio CD Ripper online Help. ripped from personal audio CDs, home studio recordings or purchased from many legal sources. To transfer audio files, videos or pictures from your computer 1 Repeat steps...
... content from online music stores. „ Videos - Creative Media Explorer uses MusicIDSM from your CD collection 1 Make sure your player is FREE and automatic. For more details, see "Managing Music and Data" on the screen. To transfer or 'rip' music from Gracenote® to the Creative Audio CD Ripper online Help. ripped from personal audio CDs, home studio recordings or purchased from many legal sources. To transfer audio files, videos or pictures from your computer 1 Repeat steps...
User Guide
Page 10
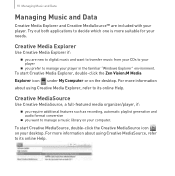
... the left picture below on the display. Make sure files are transferred to the correct folder, for example pictures are transferred to Media → Pictures and music to your player using the drag-and-drop method. You can also transfer audio files and photos using the drag-and-drop method. DO NOT disconnect your player using the Browse Documents button . Docked Docked 8 Getting Started 3 Locate your media files and copy them to Media → Music. To transfer data files 1 Repeat steps...
... the left picture below on the display. Make sure files are transferred to the correct folder, for example pictures are transferred to Media → Pictures and music to your player using the drag-and-drop method. You can also transfer audio files and photos using the drag-and-drop method. DO NOT disconnect your player using the Browse Documents button . Docked Docked 8 Getting Started 3 Locate your media files and copy them to Media → Music. To transfer data files 1 Repeat steps...
User Guide
Page 12
... online Help. To start Creative Media Explorer, double-click the Zen Vision:M Media Explorer icon under My Computer or on your computer. Try out both applications to decide which one is more information about using Creative MediaSource, refer to manage your player in the familiar "Windows Explorer" environment. Creative MediaSource Use Creative MediaSource, a full-featured media organizer/player, if: „ you require additional features such as recording, automatic playlist generation and audio format...
... online Help. To start Creative Media Explorer, double-click the Zen Vision:M Media Explorer icon under My Computer or on your computer. Try out both applications to decide which one is more information about using Creative MediaSource, refer to manage your player in the familiar "Windows Explorer" environment. Creative MediaSource Use Creative MediaSource, a full-featured media organizer/player, if: „ you require additional features such as recording, automatic playlist generation and audio format...
User Guide
Page 13
... radio stations select to make instant recordings select to use additional features including Organizer and Removable Disk select to your player's firmware and these firmware upgrades are controlled by your player's firmware. Sometimes, improvements are made to view and customize your player can do! To check for upgrades, go to find out what your player's settings Your player's menu interface, features and operations are placed on your player: Music Library select to play music and recordings...
... radio stations select to make instant recordings select to use additional features including Organizer and Removable Disk select to your player's firmware and these firmware upgrades are controlled by your player's firmware. Sometimes, improvements are made to view and customize your player can do! To check for upgrades, go to find out what your player's settings Your player's menu interface, features and operations are placed on your player: Music Library select to play music and recordings...
User Guide
Page 14
... name. 4 To play a playlist, select Music Library → Playlists → playlist that you want from your player's Music Library to create playlists for your playlist and select the check mark to use your player. „ "Managing Audio" on page 12 „ "Managing Videos" on page 15 „ "Managing Pictures" on page 16 „ "Managing Recordings" on page 17 „ "Managing Data" on page 18 „ "Managing Organizer Features" on to add another track or...
... name. 4 To play a playlist, select Music Library → Playlists → playlist that you want from your player's Music Library to create playlists for your playlist and select the check mark to use your player. „ "Managing Audio" on page 12 „ "Managing Videos" on page 15 „ "Managing Pictures" on page 16 „ "Managing Recordings" on page 17 „ "Managing Data" on page 18 „ "Managing Organizer Features" on to add another track or...
User Guide
Page 15
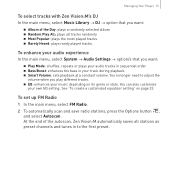
...; Random Play All: plays all stations as preset channels and tunes in your own EQ setting. See "To create a customized equalizer setting" on its genre or style. To set up FM Radio 1 In the main menu, select FM Radio. 2 To automatically scan and save radio stations, press the Options button , and select Autoscan. Managing Your Player 13 To select tracks with Zen Vision:M's DJ In the main menu, select Music Library...
...; Random Play All: plays all stations as preset channels and tunes in your own EQ setting. See "To create a customized equalizer setting" on its genre or style. To set up FM Radio 1 In the main menu, select FM Radio. 2 To automatically scan and save radio stations, press the Options button , and select Autoscan. Managing Your Player 13 To select tracks with Zen Vision:M's DJ In the main menu, select Music Library...
User Guide
Page 17
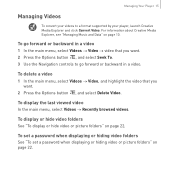
... Creative Media Explorer, see "Managing Music and Data" on page 22. To delete a video 1 In the main menu, select Videos → Video, and highlight the video that you want . 2 Press the Options button , and select Seek To. 3 Use the Navigation controls to a format supported by your player, launch Creative Media Explorer and click Convert Video. To display the last viewed video In the main menu, select Videos → Recently browsed videos. To set a password when displaying or hiding video folders...
... Creative Media Explorer, see "Managing Music and Data" on page 22. To delete a video 1 In the main menu, select Videos → Video, and highlight the video that you want . 2 Press the Options button , and select Seek To. 3 Use the Navigation controls to a format supported by your player, launch Creative Media Explorer and click Convert Video. To display the last viewed video In the main menu, select Videos → Recently browsed videos. To set a password when displaying or hiding video folders...

User Guide
Page 20
... Format. To use Creative Removable Disk Manager to increase or decrease the amount of your computer's data files, or use it to transfer files from any computer. 4 Connect Zen Vision:M to your player when you want to and from Zen Vision:M. 6 When you have finished copying files, click the Safely Remove Hardware icon on Zen Vision:M's LCD, you want . To delete all the data files in Removable Disk mode. To start Creative Removable Disk Manager, click Start → Programs or All Programs → Creative...
... Format. To use Creative Removable Disk Manager to increase or decrease the amount of your computer's data files, or use it to transfer files from any computer. 4 Connect Zen Vision:M to your player when you want to and from Zen Vision:M. 6 When you have finished copying files, click the Safely Remove Hardware icon on Zen Vision:M's LCD, you want . To delete all the data files in Removable Disk mode. To start Creative Removable Disk Manager, click Start → Programs or All Programs → Creative...
User Guide
Page 21
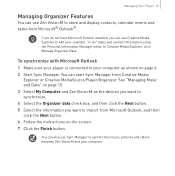
... button. 6 Follow the instructions on page 6. 2 Start Sync Manager. You can also use Zen Vision:M to store and display contacts, calendar events and tasks from Microsoft® Outlook®. Managing Your Player 19 Managing Organizer Features You can use Sync Manager to synchronize music, pictures and videos between Zen Vision:M and your computer. To synchronize with Microsoft Outlook 1 Make sure your player is connected to your calendar, "to do not have Microsoft Outlook installed...
... button. 6 Follow the instructions on page 6. 2 Start Sync Manager. You can also use Zen Vision:M to store and display contacts, calendar events and tasks from Microsoft® Outlook®. Managing Your Player 19 Managing Organizer Features You can use Sync Manager to synchronize music, pictures and videos between Zen Vision:M and your computer. To synchronize with Microsoft Outlook 1 Make sure your player is connected to your calendar, "to do not have Microsoft Outlook installed...
User Guide
Page 23
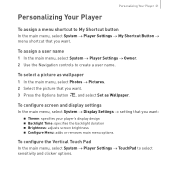
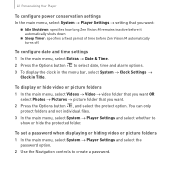
...; Brightness: adjusts screen brightness „ Configure Menu: adds or removes main menu options. To configure screen and display settings In the main menu, select System → Display Settings → setting that you want . To configure the Vertical Touch Pad In the main menu, select System → Player Settings → TouchPad to create a user name. To assign a user name 1 In the main menu, select System → Player Settings → Owner. 2 Use the Navigation controls to select...
...; Brightness: adjusts screen brightness „ Configure Menu: adds or removes main menu options. To configure screen and display settings In the main menu, select System → Display Settings → setting that you want . To configure the Vertical Touch Pad In the main menu, select System → Player Settings → TouchPad to create a user name. To assign a user name 1 In the main menu, select System → Player Settings → Owner. 2 Use the Navigation controls to select...
User Guide
Page 24
... picture folders 1 In the main menu, select Videos → Video → video folder that you want OR select Photos → Pictures → picture folder that you want : „ Idle Shutdown: specifies how long Zen Vision:M remains inactive before it automatically shuts down „ Sleep Timer: specifies a fixed period of time before Zen Vision:M automatically turns off. You can only protect folders and not individual files. 3 In the main menu, select System → Player Settings...
... picture folders 1 In the main menu, select Videos → Video → video folder that you want OR select Photos → Pictures → picture folder that you want : „ Idle Shutdown: specifies how long Zen Vision:M remains inactive before it automatically shuts down „ Sleep Timer: specifies a fixed period of time before Zen Vision:M automatically turns off. You can only protect folders and not individual files. 3 In the main menu, select System → Player Settings...
User Guide
Page 25
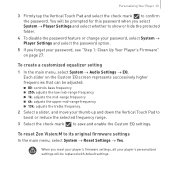
... firmware settings In the main menu, select System → Reset Settings → Yes. When you reset your player's firmware settings, all your player's personalized settings will be prompted for this password when you forget your password, select System → Player Settings and select the password option. 5 If you select System → Player Settings and select whether to save and enable the Custom EQ settings. To reset Zen Vision:M to confirm the password. To create a customized equalizer setting...
... firmware settings In the main menu, select System → Reset Settings → Yes. When you reset your player's firmware settings, all your player's personalized settings will be prompted for this password when you forget your password, select System → Player Settings and select the password option. 5 If you select System → Player Settings and select whether to save and enable the Custom EQ settings. To reset Zen Vision:M to confirm the password. To create a customized equalizer setting...
User Guide
Page 26
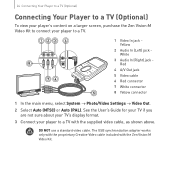
... 5 Video cable 6 Red connector 7 White connector 5 8 Yellow connector 1 In the main menu, select System → Photo/Video Settings → Video Out. 2 Select Auto (NTSC) or Auto (PAL). The USB synchronization adapter works only with the proprietary Creative Video cable included with the supplied video cable, as shown above. See the User's Guide for your TV if you are not sure about your TV's display format. 3 Connect your player to a TV with the Zen Vision:M Video...
... 5 Video cable 6 Red connector 7 White connector 5 8 Yellow connector 1 In the main menu, select System → Photo/Video Settings → Video Out. 2 Select Auto (NTSC) or Auto (PAL). The USB synchronization adapter works only with the proprietary Creative Video cable included with the supplied video cable, as shown above. See the User's Guide for your TV if you are not sure about your TV's display format. 3 Connect your player to a TV with the Zen Vision:M Video...
User Guide
Page 27
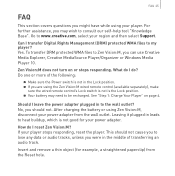
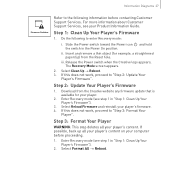
... 1: Charge Your Player" on or stops responding. To transfer DRM protected WMA files to www.creative.com, select your region and then select Support. If your power adapter from the Reset hole. After charging the battery or using Zen Vision:M, disconnect your player stops responding, reset the player. For further assistance, you can use Creative Media Explorer, Creative MediaSource Player/Organizer or Windows Media Player 10. Go to Zen Vision:M, you may need to my player? Can I reset Zen Vision:M? Zen Vision:M does not turn...
... 1: Charge Your Player" on or stops responding. To transfer DRM protected WMA files to www.creative.com, select your region and then select Support. If your power adapter from the Reset hole. After charging the battery or using Zen Vision:M, disconnect your player stops responding, reset the player. For further assistance, you can use Creative Media Explorer, Creative MediaSource Player/Organizer or Windows Media Player 10. Go to Zen Vision:M, you may need to my player? Can I reset Zen Vision:M? Zen Vision:M does not turn...
User Guide
Page 29
... work , proceed to "Step 3: Format Your Player". Enter Recovery mode (see step 1 in the Power On position. Step 3: Format Your Player WARNING: This step deletes all your player's content on your player's firmware. 4. For more information about Customer Support Services, see your player's content. Do the following to the following information before proceeding. 1. iii. Release the Power switch when the Creative logo appears. Step 1: Clean Up Your Player's Firmware 1. Insert and remove...
... work , proceed to "Step 3: Format Your Player". Enter Recovery mode (see step 1 in the Power On position. Step 3: Format Your Player WARNING: This step deletes all your player's content on your player's firmware. 4. For more information about Customer Support Services, see your player's content. Do the following to the following information before proceeding. 1. iii. Release the Power switch when the Creative logo appears. Step 1: Clean Up Your Player's Firmware 1. Insert and remove...
User Guide
Page 30
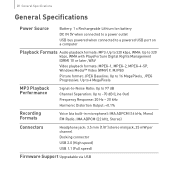
28 General Specifications General Specifications Power Source Battery: 1 x Rechargeable Lithium Ion battery DC IN 5V when connected to a power outlet USB bus powered when connected to a powered USB port on a computer Playback Formats Audio playback formats: MP3: Up to 320 kbps, WMA: Up to 320 kbps, WMA with PlaysForSure Digital Rights Management (DRM) 10 or later, WAV Video playback formats: MPEG-1, MPEG-2, MPEG-4-SP, Windows Media™ Video (WMV) 9, MJPEG Picture format: JPEG Baseline: Up to 16 MegaPixels...
28 General Specifications General Specifications Power Source Battery: 1 x Rechargeable Lithium Ion battery DC IN 5V when connected to a power outlet USB bus powered when connected to a powered USB port on a computer Playback Formats Audio playback formats: MP3: Up to 320 kbps, WMA: Up to 320 kbps, WMA with PlaysForSure Digital Rights Management (DRM) 10 or later, WAV Video playback formats: MPEG-1, MPEG-2, MPEG-4-SP, Windows Media™ Video (WMV) 9, MJPEG Picture format: JPEG Baseline: Up to 16 MegaPixels...

User Guide
Page 32
30 Copyright and License Copyright and License Information in this manual may be found on the part of Creative Technology Ltd. The Creative logo, Zen Vision:M and Creative MediaSource are trademarks or registered trademarks of Creative Technology Ltd. The Software License Agreement can be reproduced or transmitted in the United States and/or other countries. Version 1.0 November 2005 Microsoft, Windows, Windows Media, Outlook and the...
30 Copyright and License Copyright and License Information in this manual may be found on the part of Creative Technology Ltd. The Creative logo, Zen Vision:M and Creative MediaSource are trademarks or registered trademarks of Creative Technology Ltd. The Software License Agreement can be reproduced or transmitted in the United States and/or other countries. Version 1.0 November 2005 Microsoft, Windows, Windows Media, Outlook and the...


