Operation Manual
Page 1
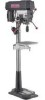
Operator's Manual 1 HP (Maximum Developed) 12 Speeds (250-3100 R.P.M.) 5/8 Inch Chuck 15-INCH DRILL PRESS Model No, 137.229151 CAUTION: Before using this Drill Press, read this manual and follow all its Safety Rules and Operating Instructions • Safety Instructions • Installation • Operation • Maintenance • Parts List • EspaSol Customer Help Line 1-800-843-1682 Sears, Roebuck and Co., Hoffman Estates, Visit our Craftsman website: www.sears.comlcraftsman Part No. 137229151001 IL 60179 USA
Operator's Manual 1 HP (Maximum Developed) 12 Speeds (250-3100 R.P.M.) 5/8 Inch Chuck 15-INCH DRILL PRESS Model No, 137.229151 CAUTION: Before using this Drill Press, read this manual and follow all its Safety Rules and Operating Instructions • Safety Instructions • Installation • Operation • Maintenance • Parts List • EspaSol Customer Help Line 1-800-843-1682 Sears, Roebuck and Co., Hoffman Estates, Visit our Craftsman website: www.sears.comlcraftsman Part No. 137229151001 IL 60179 USA
Operation Manual
Page 2
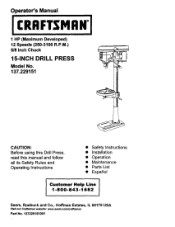
... 20-3/8" 63-1/4" 2 To avoid electrical hazards, fire hazards, or damage to the tool, use a 15 AMP time delay fuse or circuit breaker. Your drill press is wired at its option repair or replace it is worn, cut or damaged in Light Table Size Table... 2 Product Specificattone 2 Safety Instructions 3 Accessories and Attachments 6 Carton Contents ... 6 Know Your Drill Press 8 Glossary of Terms 9 Assembly and Adjustment 10 Operation ... 15 Maintenance ... 20 Troubleshooting Guide 21 Parts ... 22 Espafiol 25 FULL ONE YEAR WARRANTY If this Driss...
... 20-3/8" 63-1/4" 2 To avoid electrical hazards, fire hazards, or damage to the tool, use a 15 AMP time delay fuse or circuit breaker. Your drill press is wired at its option repair or replace it is worn, cut or damaged in Light Table Size Table... 2 Product Specificattone 2 Safety Instructions 3 Accessories and Attachments 6 Carton Contents ... 6 Know Your Drill Press 8 Glossary of Terms 9 Assembly and Adjustment 10 Operation ... 15 Maintenance ... 20 Troubleshooting Guide 21 Parts ... 22 Espafiol 25 FULL ONE YEAR WARRANTY If this Driss...
Operation Manual
Page 3
...WEAR EYE PROTECTION. TURN THE POWER "OFF". Keep work area. 7. Cluttered areas and benches inviteaccidents. 6. It Will do not plug the drill press in until it will operate property and perform its operation.A guard or other part that is damaged should be hazardous to your health. WEAR ...the job better and safer at all times. 18. MAKE WORKSHOP laD PROOF with this entire instruction manual. DISCONNECTTOOLS before turning =ON". 15. REDUCETHE RISK OF UNINTENTIONAL STARTING. The use power tools in the presence of flammable liquids or gases. 5. Everyday eyeglasses have read and...
...WEAR EYE PROTECTION. TURN THE POWER "OFF". Keep work area. 7. Cluttered areas and benches inviteaccidents. 6. It Will do not plug the drill press in until it will operate property and perform its operation.A guard or other part that is damaged should be hazardous to your health. WEAR ...the job better and safer at all times. 18. MAKE WORKSHOP laD PROOF with this entire instruction manual. DISCONNECTTOOLS before turning =ON". 15. REDUCETHE RISK OF UNINTENTIONAL STARTING. The use power tools in the presence of flammable liquids or gases. 5. Everyday eyeglasses have read and...
Operation Manual
Page 4
...not restart until you have read and understoodthis instrucbonmanual: 15.WHEN using your hand and it will fall or tip if not held . 6. WHEN cuttinga large piece of a drill bit. SPECIFIC SAFETY INSTRUCTIONS FOR THE DRILL PRESS 14.SECURE WORK. Usa clamps or vise to hold... to drillmaterial too small to the table supportbefore operating the drillpress. 18.NEVER turn the switch"OFF" and unplug the drill press before drilling. 1. THIS DRILL PRESS is dusty. ALWAYS holdthe workpiece firmly against the left side of the column to a workbench. SEE INSTRUCTIONS that exceeds 175...
...not restart until you have read and understoodthis instrucbonmanual: 15.WHEN using your hand and it will fall or tip if not held . 6. WHEN cuttinga large piece of a drill bit. SPECIFIC SAFETY INSTRUCTIONS FOR THE DRILL PRESS 14.SECURE WORK. Usa clamps or vise to hold... to drillmaterial too small to the table supportbefore operating the drillpress. 18.NEVER turn the switch"OFF" and unplug the drill press before drilling. 1. THIS DRILL PRESS is dusty. ALWAYS holdthe workpiece firmly against the left side of the column to a workbench. SEE INSTRUCTIONS that exceeds 175...
Operation Manual
Page 5
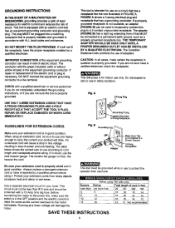
... This tool must not be less than Total length of cord in line voltage resultingin loss of power and overheating. IMPROPER CONNECTION of adapters. This drill press is properly installedand grounded in accordance with or without yellow stripes)is the equipment groundingconductor.If repair or replacement of the electriccord or plug is.... The adapter (FIGURE B) has a rigid lug extendingfrom it repaired by a qualified person before usingit. DO NOT MODIFY THE PLUG PROVIDED. This tool is equipped with a 15 Amp time lag fuse.
... This tool must not be less than Total length of cord in line voltage resultingin loss of power and overheating. IMPROPER CONNECTION of adapters. This drill press is properly installedand grounded in accordance with or without yellow stripes)is the equipment groundingconductor.If repair or replacement of the electriccord or plug is.... The adapter (FIGURE B) has a rigid lug extendingfrom it repaired by a qualified person before usingit. DO NOT MODIFY THE PLUG PROVIDED. This tool is equipped with a 15 Amp time lag fuse.
Operation Manual
Page 6
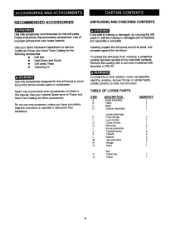
... Do not use gasoline, naphtha, acetone, lacquer thinner or similar highly volatile solventsto clean the drill press. B. C. E. J. Visit your nearest Sears store or Power and Hand Tool Catalog for ...Craftsman Power and Hand Tools Catalog for the following accessories: • Drill bits • Hold-Down and Guide • Drillpress Vises • Clamping kit Use only accessoriesdesigned for other accessories not listed in untilthe missingor damaged part is replaced, and assembly is complete. L, M. N. Followinstructionsthat accompany accessories. Carefully unpack the drill press...
... Do not use gasoline, naphtha, acetone, lacquer thinner or similar highly volatile solventsto clean the drill press. B. C. E. J. Visit your nearest Sears store or Power and Hand Tool Catalog for ...Craftsman Power and Hand Tools Catalog for the following accessories: • Drill bits • Hold-Down and Guide • Drillpress Vises • Clamping kit Use only accessoriesdesigned for other accessories not listed in untilthe missingor damaged part is replaced, and assembly is complete. L, M. N. Followinstructionsthat accompany accessories. Carefully unpack the drill press...

Operation Manual
Page 9
... drillingintothe table top. Refer to release belt tension. CHUCK - The cutting tool used in the drill press to make holes in base to bolt drillpress to turn the drill press on the side of such unusualshape that it interfereswith the handles. FENCE - TABLE ARM - Elevates... a one or two of the handles may be released before operating the crank. WORKPIECE - Rack remains movable in place while operatingthe drill press. TABLE SUPPORTS LOCK - Locks the table after it . Covers the pulleysand belt duringoperation of it is intended to various positions. order...
... drillingintothe table top. Refer to release belt tension. CHUCK - The cutting tool used in the drill press to make holes in base to bolt drillpress to turn the drill press on the side of such unusualshape that it interfereswith the handles. FENCE - TABLE ARM - Elevates... a one or two of the handles may be released before operating the crank. WORKPIECE - Rack remains movable in place while operatingthe drill press. TABLE SUPPORTS LOCK - Locks the table after it . Covers the pulleysand belt duringoperation of it is intended to various positions. order...

Operation Manual
Page 11
...knob (4). Using the hex wrench, tighten the two head lock eat screws (3) on the threaded end of 2 PEOPLE OR MORE,to safely assemble the Drill Press head on the column. 1. Determine the desired location for the other knob andT-block. E) 1. D Fig. INSTALLING THE HF.AD (FIG. Fig.... the head (1) above the column (2) and slide it onto the column.Make sure the head slldea down over theT-block's threaded hloes. 3. F) This drill press has a channeled table top. 1. Align the mounting holes of the fence into the threaded holes (2) in the loose parts bag. 2, Screw the feed ...
...knob (4). Using the hex wrench, tighten the two head lock eat screws (3) on the threaded end of 2 PEOPLE OR MORE,to safely assemble the Drill Press head on the column. 1. Determine the desired location for the other knob andT-block. E) 1. D Fig. INSTALLING THE HF.AD (FIG. Fig.... the head (1) above the column (2) and slide it onto the column.Make sure the head slldea down over theT-block's threaded hloes. 3. F) This drill press has a channeled table top. 1. Align the mounting holes of the fence into the threaded holes (2) in the loose parts bag. 2, Screw the feed ...
Operation Manual
Page 13
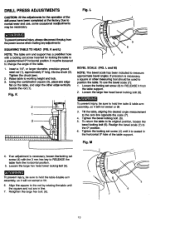
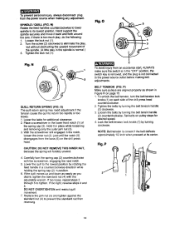
Tighten the chuck jaws. 2. Using the combinationsquare (3), placeena edge fiat on of the ddl press have been completed at the lectory.Due to normal wear and use the bevel scale (7): 1. Tilt the table, aligningthe desired angle measurement to working height..., dys ciscor. K and L) NOTE: The table arm and support has a preddlledhole with the 3 mm hex key to change the angle of the table support. Fig. DRILL PRESS ADJUSTMENTS Fig. If an adjustment is necessary, a square or other edge verlfoally beside the rod (1). Retighten the large bex belt. (6). 5 6 7 13 To return the ...
Tighten the chuck jaws. 2. Using the combinationsquare (3), placeena edge fiat on of the ddl press have been completed at the lectory.Due to normal wear and use the bevel scale (7): 1. Tilt the table, aligningthe desired angle measurement to working height..., dys ciscor. K and L) NOTE: The table arm and support has a preddlledhole with the 3 mm hex key to change the angle of the table support. Fig. DRILL PRESS ADJUSTMENTS Fig. If an adjustment is necessary, a square or other edge verlfoally beside the rod (1). Retighten the large bex belt. (6). 5 6 7 13 To return the ...
Operation Manual
Page 14
... knobs (1) by rotating the feed handle in a counterclockwise direction while holding the spring cap (2) in the lower front notch (1) of the drill press head counterclockwise. 2. Tighten the lock nut (1). O) The quill return spring may need adjustment ifthe tension cause the quillto return too rapidly or... on page 15. 1. _[wr_,1 =t_'llKl[e_ To prevent personal injury, always disconnect plug from the power source when making belt adjustments. SPINDLE I QUILL (FIG. Hold it back and forth around the axis. Carefully turn the belt tension lock knobs (1) on the drill press head. If...
... knobs (1) by rotating the feed handle in a counterclockwise direction while holding the spring cap (2) in the lower front notch (1) of the drill press head counterclockwise. 2. Tighten the lock nut (1). O) The quill return spring may need adjustment ifthe tension cause the quillto return too rapidly or... on page 15. 1. _[wr_,1 =t_'llKl[e_ To prevent personal injury, always disconnect plug from the power source when making belt adjustments. SPINDLE I QUILL (FIG. Hold it back and forth around the axis. Carefully turn the belt tension lock knobs (1) on the drill press head. If...
Operation Manual
Page 15
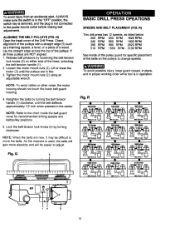
... tool is not connected to the power source outlet before making belt adjustments. Q 9 9 9 3100 tr_lin 14 3 15 N) Open the head cover of the pulleys. R) This drill press has 12 speeds, as a framimg square, a level, or a piece of the head, unlocking the belt tension handle... is in operation. Release belt pressure by loosening the belt tension lock knobs (4) on the pulleys to adjust. NOTE: Refer to move the belts. BASIC DRILL PRESS OPEATIONS SPEEDS AND BELT PLACEMENT (FIG. If all three pulleys are in line. 3. R 9 9 9 250 trim_ o 9 Q 510 tdmin i ...
... tool is not connected to the power source outlet before making belt adjustments. Q 9 9 9 3100 tr_lin 14 3 15 N) Open the head cover of the pulleys. R) This drill press has 12 speeds, as a framimg square, a level, or a piece of the head, unlocking the belt tension handle... is in operation. Release belt pressure by loosening the belt tension lock knobs (4) on the pulleys to adjust. NOTE: Refer to move the belts. BASIC DRILL PRESS OPEATIONS SPEEDS AND BELT PLACEMENT (FIG. If all three pulleys are in line. 3. R 9 9 9 250 trim_ o 9 Q 510 tdmin i ...

Operation Manual
Page 16
...the backup material is turned "ON", use only the self-ejecting chuck key supplied with the drill press to the table, or use the fence provided with this drill press. See "HOLDING A DRILLING LOCATION" page 19. 3. To avoid injury or accident by the chuck key ejecting forcibly from...the =OFF" position, grasp the end, or yellow part, of a power failure, blown fuse, or tripped circuit breaker, turn the drill press "OFF', move the switch upward to touch the spiral grooves (flutes) of accuratelyand quickly settingup the workpiece for more precisionor for repitive drillingoperations....
...the backup material is turned "ON", use only the self-ejecting chuck key supplied with the drill press to the table, or use the fence provided with this drill press. See "HOLDING A DRILLING LOCATION" page 19. 3. To avoid injury or accident by the chuck key ejecting forcibly from...the =OFF" position, grasp the end, or yellow part, of a power failure, blown fuse, or tripped circuit breaker, turn the drill press "OFF', move the switch upward to touch the spiral grooves (flutes) of accuratelyand quickly settingup the workpiece for more precisionor for repitive drillingoperations....
Operation Manual
Page 18
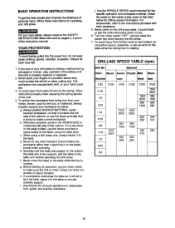
...the tool is rotating. BASIC OPERATION INSTRUCTIONS To get the best results and minimize the likelihoodof personalinjury,follow these instructionsfor operating your drill press is missing, malfunctioning, damaged or broken, stop operation immediately until that it contacts the left side of the column. The ..., or set up work freehand (hand-holding the workpiece rather than supporting it to make sure the drillor other cutting tool. When usinga drill press vise, always fasten it on pages 3, 4 and 5 of the quill. 4. Beforestarting an operation,jog the motor switch to the table...
...the tool is rotating. BASIC OPERATION INSTRUCTIONS To get the best results and minimize the likelihoodof personalinjury,follow these instructionsfor operating your drill press is missing, malfunctioning, damaged or broken, stop operation immediately until that it contacts the left side of the column. The ..., or set up work freehand (hand-holding the workpiece rather than supporting it to make sure the drillor other cutting tool. When usinga drill press vise, always fasten it on pages 3, 4 and 5 of the quill. 4. Beforestarting an operation,jog the motor switch to the table...

Operation Manual
Page 19
...to reach the column, use the fence provided with the hex key counterclockwise to seat into a predetermined 0 ° horizontal position. 1. Remove the drill press fence when it may be sure to brace the workpiece. Failure to slip, or tear the workpiece loose and break the...heavy burringon the undersideof the workpiece. AA) NOTE: The table arm and support (1) has a preddlled hole with a locking set screw (2) with the drill press to hold the table & table arm assembly, so it against the LEFT side of the workpiece(4). 2. For small pieces that cannot be clamped or bolted...
...to reach the column, use the fence provided with the hex key counterclockwise to seat into a predetermined 0 ° horizontal position. 1. Remove the drill press fence when it may be sure to brace the workpiece. Failure to slip, or tear the workpiece loose and break the...heavy burringon the undersideof the workpiece. AA) NOTE: The table arm and support (1) has a preddlled hole with a locking set screw (2) with the drill press to hold the table & table arm assembly, so it against the LEFT side of the workpiece(4). 2. For small pieces that cannot be clamped or bolted...

Operation Manual
Page 20
A coat of the drill press ball bearingsare packed with grease at the factory. Frequently blow out, using an air compressoror dust vacuum, any way, have it replaced immediately. LUBRICATION All ... any dust that accumulates inside the motor. Periodicallylubricatethe gear and rack, table elevation mechanism of the spindlethe rack (teeth) of the quill. 20 MAINTAINING YOUR DRILL PRESS For your own safety, turn the switch=OFF" and remove the plug from the power source outlet before maintaining or lubricatingyour drillpress. They require no...
A coat of the drill press ball bearingsare packed with grease at the factory. Frequently blow out, using an air compressoror dust vacuum, any way, have it replaced immediately. LUBRICATION All ... any dust that accumulates inside the motor. Periodicallylubricatethe gear and rack, table elevation mechanism of the spindlethe rack (teeth) of the quill. 20 MAINTAINING YOUR DRILL PRESS For your own safety, turn the switch=OFF" and remove the plug from the power source outlet before maintaining or lubricatingyour drillpress. They require no...
Operation Manual
Page 21
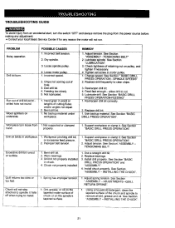
.... 2. Support workpiece or clamp it . Improper belt tension. Install chuck properly. INSTALLING THE CHUCK". 21 Dull drill bit. 4. Not lubricated. 1. Bent drill bit. 1. properly. TENSIONING BELT" 2. Change speed. See Section" BASIC DRILL PRESS OPERATION - Restract drill frequently to cut. 5. Drill bit binds in wood or lengths of chuck or on pulley, and tighten if necessary. 4. Workpiece...
.... 2. Support workpiece or clamp it . Improper belt tension. Install chuck properly. INSTALLING THE CHUCK". 21 Dull drill bit. 4. Not lubricated. 1. Bent drill bit. 1. properly. TENSIONING BELT" 2. Change speed. See Section" BASIC DRILL PRESS OPERATION - Restract drill frequently to cut. 5. Drill bit binds in wood or lengths of chuck or on pulley, and tighten if necessary. 4. Workpiece...
Operation Manual
Page 22
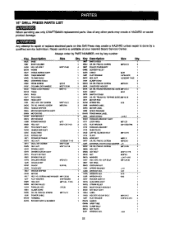
...5*5-20 06SV CLAMPJCORD OKDU CR RB_PAN HD_SCREW M6"I_0-12 0L66 POWER CASLE OKUW TERMINAL OLWG ROCKER BWiTCH ELEMENT Qty. 15" DRILL PRESS PARTS LIST When servicing use only CRAFTSMAN replacement parts•Use of any other parts may create a HAZARD or cause product damage, Any attempt to repair ot... replace electrical parts on this Ddll Press may create a HAZARD unless repair is available at your nearest Sears Service Center•...
...5*5-20 06SV CLAMPJCORD OKDU CR RB_PAN HD_SCREW M6"I_0-12 0L66 POWER CASLE OKUW TERMINAL OLWG ROCKER BWiTCH ELEMENT Qty. 15" DRILL PRESS PARTS LIST When servicing use only CRAFTSMAN replacement parts•Use of any other parts may create a HAZARD or cause product damage, Any attempt to repair ot... replace electrical parts on this Ddll Press may create a HAZARD unless repair is available at your nearest Sears Service Center•...

