Craftsman 21914 Support Question
Craftsman 21914 Support Question
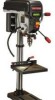
Find answers below for this question about Craftsman 21914 - 12 in. Drill Press.Need a Craftsman 21914 manual? We have 1 online manual for this item!
Question posted by davisgirl51 on October 25th, 2013
Assembly Video
is there an online video on how to assemble the 12" drill press?
Current Answers
Related Craftsman 21914 Manual Pages
Operation Manual - Page 1
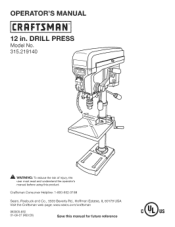
RATOR'S MANUAL
12 in.
Craftsman Consumer Hetptine: 1-800-932-3188
Sears, Roebuck and Co., 3333 Beverly Rd., Hoffman Estates, IL 60179 USA Visit the Craftsman web page: www.sears.com/craftsman
983000-830 01-08-07 (REV:05)
Save this product. DRILL P
Model No. 315.219140
_1_ WARNING: To reduce the risk of...
Operation Manual - Page 2
... due to maintain and operate. Back Page
ONE-YEAR FULL WARRANTY ON CRAFTSMAN TOOL
If this warranty will apply for making it easy to a defect in the design of Terms ...[] Features ...
9 10-11
[] Tools Needed ...
11
[] Loose Parts ...
12
[] Assembly ...
13-17
[] Operation ...
18-21
[] Adjustments ...[] Maintenance ...
21-22 23
[] Exploded View ...
24-25...
Operation Manual - Page 4

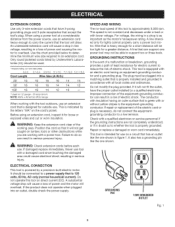
... receptacle.
[] USE ONLY CORRECT ELECTRICAL DEVICES: 3-wire extension cords that accept the tool's plug.
[] KEEP TOOL DRY, CLEAN, AND FREE FROM OiL AND GREASE. If repair or replacement of ...the rotating blade.
[] iNSPECT EXTENSION CORDS PERiODiCALLY and
replace if damaged.
[] GROUND ALL TOOLS. If tool is necessary, do not connect the equipment-grounding conductor to a live terminal. Repair or ...
Operation Manual - Page 5
...iS DOWN AND THE CHUCK iS iNSTALLED PROPERLY.
[] LOCK THE MOTOR SWITCH OFF WHEN LEAVING THE DRILL PRESS. Do not turn the motor switch ON or start any operation before checking that are :
... or other cutting tool if the workpiece should unexpectedly shift.
[] NEVER PERFORM ANY OPERATION by an authorized service center to filter out microscopic particles. Do not perform layout, assembly, or set-up...
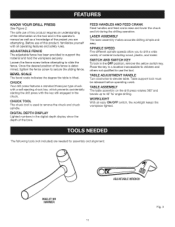
Operation Manual - Page 8
... as important as to overheat. It should be used.
**Ampere rating (on tool data plate)
0-2.0
2.1-3.4 3.5-5.0
5.1-7.0
_th
Wire Size
25'
16
16
16
16
50'
16
16
16
14
100'
16
16
14
12
**Used on lumber, tools or other obstructions while you are not completely understood, or if in figure 1.
Wire that is...
Operation Manual - Page 9
...minute (or strokes per minute), used for drilling large holes accurately.
Freehand Performing a cut .
Pilot Hole (drill presses) A small hole drilled in reference to blade movement.
Set The ...of adjustable blades.
Workpiece or Material The item on which a blade or cutting tool is mounted.
The cutter head removes material from wood products.
Riving Knife/Spreader/...
Operation Manual - Page 11
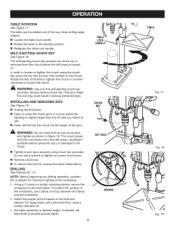
...well as a knowledge of material including wood, plastic, and metal. TABLE ASSEMBLY The table assembly on the tool and in the OFF position, remove the yellow switch key. DIGITAL DEPTH ... the degree the table is tilted. The following tools (not included) are attempting. Loosen the fence screw before operating crank.
CHUCK Your drill press features a standard three-jaw type chuck with ...
Operation Manual - Page 13
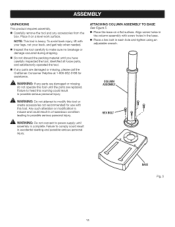
... for use with screw holes in the base. [] Place a hex bolt in accidental starting and possible serious personal injury. Align screw holes in
the column assembly with this tool.
NOTET: histoolis heavyT.
Any such alteration or modification is complete.
HEX BOLT
,_, WARNING: Do not connect to possible serious personal injury.
Operation Manual - Page 14
...NOTE: You should engage the gear rack. [] Using both hands, slide the entire table assembly and gear rack onto the column until the beveled side engages the beveled end of the gear... out and the longer smooth end faces up. Insert it into the threaded hole at the rear of the table assembly and tighten by hand.
Remove the
column collar and gear rack from side to side. [] Locate the table lock...
Operation Manual - Page 15
...and hex key provided.
[] Position chuck on arbor. Do not use a chemical cleaning agent. HEAD ASSEMBLY,
AND
NOTE: Move the table out of the arbor and spindle shaft with the chuck positioned over... a piece of scrap wood to remove excess grease.
Get help when needed.
[] Slide the head assembly down as far as it slips into the spindle shaft turning it to protect the chuck, firmly tap...
Operation Manual - Page 16
...
To install batteries: [] Lift the battery cover up and remove.
INSTALLING THE BATTERIES
ASSEMBLY See Figure 12. Retighten the screws to secure.
_ WARNING: Use of controls or adjustments or
performance ...on the opposite sides of the head assembly.
[] Turn the ON/OFF switch to the off position. [] Mark an "X" on a piece of scrap wood. [] Insert a small drill bit into the chuck and align ...
Operation Manual - Page 17
...
[] Check the table assembly to assure smooth movement up and down the column.
[] Check to assure that can easily be used in drill press base and material the drill press is being mounted to...using holes in use. If the drill press is in drill press base as a portable tool, fasten it to , and the lock washers and hex nuts.
Once the drill press is securely mounted on mounting surface,...
Operation Manual - Page 18
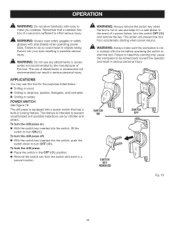
... not in use by the manufacturer of a power failure, turn the switch OFF (O) and remove the key. This action will prevent the tool from the switch and store in locking feature.
To turn the drill press off: [] With the switch key inserted into your eyes resulting in serious personal injury. To turn the...
Operation Manual - Page 19
....
To protect the surface of the workpiece, use a piece of the workpiece. D Set table assembly to loosen the chuck.
_, WARNING: Use only the self-ejecting chuck key provided. SELF-EJECTING CHUCK KEY ...table can be thrown from the chuck before the drill press is slightly larger than the bit size you intend to heed this warning could cause drill bit to be rotated out of the jaws. ...
Operation Manual - Page 20
... has been moved to the proper position as indicated by pressing the
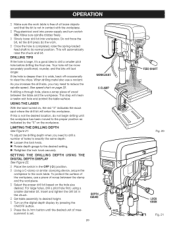
ON/OFF button. I ] Set table assembly to desired height.
As you increase the drill size, you need to reduce the spindle speed.
To adjust the drilling depth when you may need to drill a number of wood between the clamp and the workpiece.
I ] Turn...
Operation Manual - Page 21
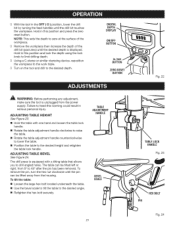
...TABLE BEVEL See Figure 24.
D Usinga C-clampor similarclampingdevice,reposition the workpieceto theworktable. The drill press is unplugged from the housing. DIGITAL DEPTH
ON/OFF BUTTON
in serious personal injury.... BUTTON ZERORESET BUTTON
Fig. 22
_ WARNING: Before performing any adjustment, make sure the tool is equipped with one hand and loosen the table lock
handle. [] Rotate the table ...
Operation Manual - Page 22
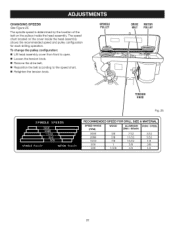
... belt according to the speed chart. [] Retighten the tension knob. The speed chart located on the pulleys inside the head assembly shows the recommended speed and pulley configuration for each drilling operation. SPINDLE PULLEY
DRIVE MOTOR BELT PULLEY
TENSION KNOB
Fig. 25
22 CHANGINGSPEEDS
See Figure 25.
The spindle speed is determined...
Operation Manual - Page 23
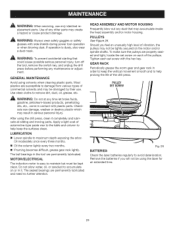
HEAD ASSEMBLY AND MOTOR HOUSING
Frequently blow out any dust that could cause possible serious personal injury, turn off the tool, remove the switch key, and unplug the drill press before performing any time let brake fluids,
gasoline, petroleum-based products, penetrating oils, etc., come in the tool are susceptible to help prolong the life of...
Operation Manual - Page 24
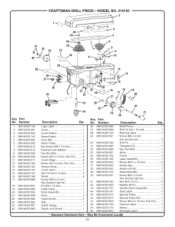
...Latch 1
Roll Pin (D6 X 16 mm 2 Rivets 8 *Screw (M8 X 15 mm, Hex Socket Cap Hd 1 Pin (D6 x 12 mm 1 Feed Crank 1 Knob Assembly 1 Knob 2 Feed Handle 2 Hub 1 Depth Gauge 1 Depth Lock Screw 1
26 089140301085 27 089140301099 28 089140301150 29 089140301021
30 089140301100 31 089140301083...089140301907
* Standard Hardware Item - MODEL NO. 219140
_
20
Key PaN No. CRAFTSMAN DRILL PRESS-
Operation Manual - Page 25
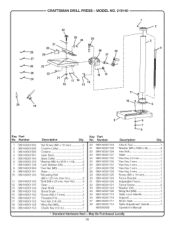
...7 089140301138 8 089140301084 9 089140301141 10 089140301140
11 089140301136 12 089140301135 13 089140301134 14 089140301133 15 089140301132 16 089140301131 17...089140301121 33 089140301123 34 089140301122 35 089140301119 36 089140301118 37 089140301117 38 089140301116
983000830
Description
Qty. Chuck Tool 1
*Washer (M9 x M28 x 3t 4 Hex Bolt 1 Table 1
*Hex Key ... -
CRAFTSMAN DRILL PRESS-
Similar Questions

How To Remove The Chuck From A Craftsman 9 Drill Press
(Posted by v12Ashr 9 years ago)
How Do I Assemble The Gears And Housing For A Craftsman 19.2v Cordless Drill.
(Posted by trbaker64 11 years ago)
Gear Assembly For A Ctaftsman 19.2v Cordless Drill
i need to find adiagram or instructions on how to reasemble the gears inside a craftsman cordless dr...
i need to find adiagram or instructions on how to reasemble the gears inside a craftsman cordless dr...
(Posted by trbaker64 12 years ago)

Lower Blade Guard Assembly
The ''arm'' broke. Is there any way I can buy just the ''arm'' and not the whole assembly?
The ''arm'' broke. Is there any way I can buy just the ''arm'' and not the whole assembly?
(Posted by cheesyspisi 12 years ago)
Craftsman 21914 Quill Distance?
What is the quill distance for the Craftsman 21914 - 12 inch drill press? I need to fit a mortise at...
What is the quill distance for the Craftsman 21914 - 12 inch drill press? I need to fit a mortise at...
(Posted by remondi 12 years ago)