

End User License Agreement
Page 2
...longer use the original Software Product that HP and its suppliers and are protected by HP as a consignment. CONSENT TO USE OF DATA. floppy disk, CD or DVD) or an equivalent solution delivered in relation to support services related to do so is expressly provided for in such recovery .... This EULA will prevail. 4. LIMITATION ON REVERSE ENGINEERING. This EULA is automatically terminated. PROPRIETARY RIGHTS. Any transfer must first be used for restoring the hard disk of a hard disk drive-based solution, an external media-based recovery solution (e.g. To use . Restrictions.
...longer use the original Software Product that HP and its suppliers and are protected by HP as a consignment. CONSENT TO USE OF DATA. floppy disk, CD or DVD) or an equivalent solution delivered in relation to support services related to do so is expressly provided for in such recovery .... This EULA will prevail. 4. LIMITATION ON REVERSE ENGINEERING. This EULA is automatically terminated. PROPRIETARY RIGHTS. Any transfer must first be used for restoring the hard disk of a hard disk drive-based solution, an external media-based recovery solution (e.g. To use . Restrictions.
Safety and Regulatory Information Desktops, Thin Clients, and Personal Workstations
Page 29
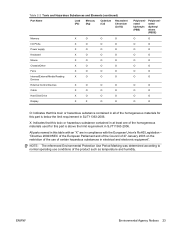
...Cadmium (Cd) Hexavalent Chromium (Cr(VI)) Memory X O O O I/O PCAs X O O O Power supply X O O O Keyboard X O O O Mouse X O O O Chassis/Other X O O O Fans X O O O Internal/External Media Reading X O O O Devices External Control Devices X O O O Cable X O O O Hard Disk Drive X O O O Display X X O O Polybrominated biphenyls (PBB) Polybrominated diphenyl ethers (PBDE) O O O O O O O O O O O O O O O O O O O O O O O O O: Indicates that this toxic or hazardous substance contained in at least one of the homogeneous...
...Cadmium (Cd) Hexavalent Chromium (Cr(VI)) Memory X O O O I/O PCAs X O O O Power supply X O O O Keyboard X O O O Mouse X O O O Chassis/Other X O O O Fans X O O O Internal/External Media Reading X O O O Devices External Control Devices X O O O Cable X O O O Hard Disk Drive X O O O Display X X O O Polybrominated biphenyls (PBB) Polybrominated diphenyl ethers (PBDE) O O O O O O O O O O O O O O O O O O O O O O O O O: Indicates that this toxic or hazardous substance contained in at least one of the homogeneous...
Quick Setup and Getting Started Guide
Page 10
Be sure to save any files or documents that you to back up and recover the primary hard drive on the PC. If prompted for the i386 directory, replace the path specification with your monitor. Refer to reboot the machine. HP Backup and Recovery ...For more information, refer to scan for instructions on the C: drive and creates a Recovery Partition. The application works within Windows to network or secondary hard disks. 2 Quick Setup & Getting Started ENWW This action points the operating system to locate the i386 folder. Select your data files. Important files can be...
Be sure to save any files or documents that you to back up and recover the primary hard drive on the PC. If prompted for the i386 directory, replace the path specification with your monitor. Refer to reboot the machine. HP Backup and Recovery ...For more information, refer to scan for instructions on the C: drive and creates a Recovery Partition. The application works within Windows to network or secondary hard disks. 2 Quick Setup & Getting Started ENWW This action points the operating system to locate the i386 folder. Select your data files. Important files can be...

Quick Setup and Getting Started Guide
Page 12
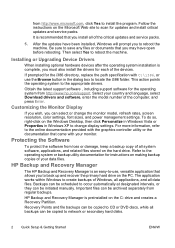
... text box and press the Enter key. 4. Select your OS. 6. Use Windows Explorer to the hard drive. Go to the CD. The system will boot to http://www.hp.com. 2. NOTE: It is... included as part of the Recovery Disk Set with some computer models only. Click the Software & Driver Downloads link. 3. NOTE: If ... Disc Set for your language unless you agree with the terms. The HP Insight Diagnostics utility launches with the compaq\hpdiags directory. 5. Select a language and click Download. 4 Quick Setup & Getting Started ENWW Click Start >...
... text box and press the Enter key. 4. Select your OS. 6. Use Windows Explorer to the hard drive. Go to the CD. The system will boot to http://www.hp.com. 2. NOTE: It is... included as part of the Recovery Disk Set with some computer models only. Click the Software & Driver Downloads link. 3. NOTE: If ... Disc Set for your language unless you agree with the terms. The HP Insight Diagnostics utility launches with the compaq\hpdiags directory. 5. Select a language and click Download. 4 Quick Setup & Getting Started ENWW Click Start >...
Troubleshooting Guide
Page 8
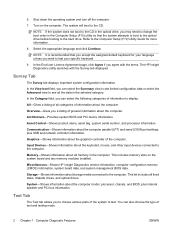
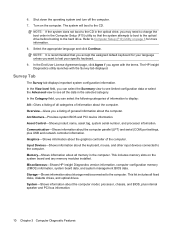
...the assigned default keyboard for more information. 8. In the End User License Agreement page, click Agree if you may need to the hard drive. Survey Tab The Survey tab displays important system configuration information. In the Category field, you can select the Summary view to see...-Shows product name, asset tag, system serial number, and processor information. Test Tab The Test tab allows you a listing of all fixed disks, diskette drives, and optical drives. Turn on the system board and any memory modules installed. This includes memory slots on the computer. System...
...the assigned default keyboard for more information. 8. In the End User License Agreement page, click Agree if you may need to the hard drive. Survey Tab The Survey tab displays important system configuration information. In the Category field, you can select the Summary view to see...-Shows product name, asset tag, system serial number, and processor information. Test Tab The Test tab allows you a listing of all fixed disks, diskette drives, and optical drives. Turn on the system board and any memory modules installed. This includes memory slots on the computer. System...
Troubleshooting Guide
Page 12
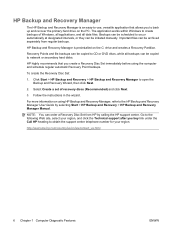
... Recovery Manager is an easy-to-use, versatile application that you buy link under the Call HP heading to back up and recover the primary hard drive on the C: drive and creates a Recovery Partition. To create the Recovery Disc Set: 1. Follow the instructions in the wizard. For more information on using.... Important files can order a Recovery Disc Set from regular backups. HP Backup and Recovery Manager The HP Backup and Recovery Manager is preinstalled on the PC. The application works within Windows to network or secondary hard disks.
... Recovery Manager is an easy-to-use, versatile application that you buy link under the Call HP heading to back up and recover the primary hard drive on the C: drive and creates a Recovery Partition. To create the Recovery Disc Set: 1. Follow the instructions in the wizard. For more information on using.... Important files can order a Recovery Disc Set from regular backups. HP Backup and Recovery Manager The HP Backup and Recovery Manager is preinstalled on the PC. The application works within Windows to network or secondary hard disks.
Hardware Reference Guide - dx2400 MT
Page 40
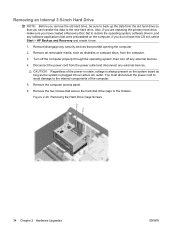
...an active AC outlet. Remove/disengage any external devices. 4. Remove the computer access panel. 6. Disconnect the power cord from the old hard drive so that secure the hard disk drive cage to restore the operating system, software drivers, and any external devices. Also, if you are replacing the primary... hard drive, make sure you do not have created a Recovery Disc Set to the chassis. If you have this CD set, select Start...
...an active AC outlet. Remove/disengage any external devices. 4. Remove the computer access panel. 6. Disconnect the power cord from the old hard drive so that secure the hard disk drive cage to restore the operating system, software drivers, and any external devices. Also, if you are replacing the primary... hard drive, make sure you do not have created a Recovery Disc Set to the chassis. If you have this CD set, select Start...

Hardware Reference Guide - dx2400 MT
Page 41
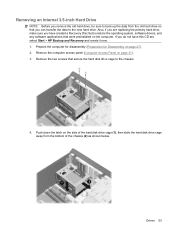
Lift the hard disk drive cage out of the chassis (2) as shown below. Figure 2-27 Releasing the Hard Drive Cage 8. Push down the latch on the side of the hard disk drive cage (1), then slide the hard disk drive cage away from the bottom of the chassis. Figure 2-28 Removing the Hard Drive Cage ENWW Installing Additional Drives 35 7.
Lift the hard disk drive cage out of the chassis (2) as shown below. Figure 2-27 Releasing the Hard Drive Cage 8. Push down the latch on the side of the hard disk drive cage (1), then slide the hard disk drive cage away from the bottom of the chassis. Figure 2-28 Removing the Hard Drive Cage ENWW Installing Additional Drives 35 7.

Hardware Reference Guide - dx2400 MT
Page 42
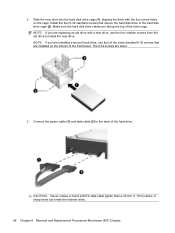
Figure 2-30 Removing the Hard Drive 36 Chapter 2 Hardware Upgrades ENWW 9. Remove the four screws that secure the hard disk drive to the hard disk drive cage (1), then slide the hard disk drive out of the hard drive. Disconnect the power cable (1) and data cable (2) from the back of the hard disk drive cage (2). Figure 2-29 Disconnecting the Hard Drive Cables 10.
Figure 2-30 Removing the Hard Drive 36 Chapter 2 Hardware Upgrades ENWW 9. Remove the four screws that secure the hard disk drive to the hard disk drive cage (1), then slide the hard disk drive out of the hard drive. Disconnect the power cable (1) and data cable (2) from the back of the hard disk drive cage (2). Figure 2-29 Disconnecting the Hard Drive Cables 10.
Hardware Reference Guide - dx2400 MT
Page 43
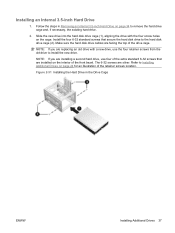
.... The 6-32 screws are facing the top of the front bezel. Installing an Internal 3.5-inch Hard Drive 1. Make sure the hard disk drive cables are silver. Slide the new drive into the hard disk drive cage (1), aligning the drive with a new drive, use four of the retainer screws location.... Refer to Installing Additional Drives on page 34 to the hard disk drive cage (2). Figure 2-31 Installing the Hard Drive in Removing an Internal 3.5-inch Hard Drive on page 24 for an illustration of the extra standard 6-32 screws that secure the...
.... The 6-32 screws are facing the top of the front bezel. Installing an Internal 3.5-inch Hard Drive 1. Make sure the hard disk drive cables are silver. Slide the new drive into the hard disk drive cage (1), aligning the drive with a new drive, use four of the retainer screws location.... Refer to Installing Additional Drives on page 34 to the hard disk drive cage (2). Figure 2-31 Installing the Hard Drive in Removing an Internal 3.5-inch Hard Drive on page 24 for an illustration of the extra standard 6-32 screws that secure the...

Hardware Reference Guide - dx2400 MT
Page 44
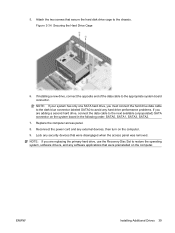
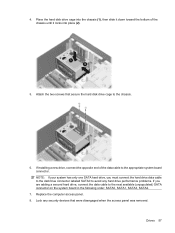
A sharp bend can break the internal wires. 4. Place the hard disk drive cage into the chassis (1), then slide it locks into place (2). Connect the power cable (1) and data cable (2) to the back of the chassis until it down toward the bottom of the hard drive. Figure 2-32 Connecting the Hard Drive Cables CAUTION: Never crease or bend a SATA data cable tighter than a 30 mm (1.18 in) radius. 3. Figure 2-33 Installing the Hard Drive Cage 38 Chapter 2 Hardware Upgrades ENWW
A sharp bend can break the internal wires. 4. Place the hard disk drive cage into the chassis (1), then slide it locks into place (2). Connect the power cable (1) and data cable (2) to the back of the chassis until it down toward the bottom of the hard drive. Figure 2-32 Connecting the Hard Drive Cables CAUTION: Never crease or bend a SATA data cable tighter than a 30 mm (1.18 in) radius. 3. Figure 2-33 Installing the Hard Drive Cage 38 Chapter 2 Hardware Upgrades ENWW
Hardware Reference Guide - dx2400 MT
Page 45
...cable to the chassis. Replace the computer access panel. 8. Attach the two screws that secure the hard disk drive cage to the appropriate system board connector. Figure 2-34 Securing the Hard Drive Cage 6. Lock any software applications that were disengaged when the access panel was removed. NOTE...the operating system, software drivers, and any security devices that were preinstalled on the computer. 9. NOTE: If you are replacing the primary hard drive, use the Recovery Disc Set to the next available (unpopulated) SATA connector on the system board in the following order: SATA0, ...
...cable to the chassis. Replace the computer access panel. 8. Attach the two screws that secure the hard disk drive cage to the appropriate system board connector. Figure 2-34 Securing the Hard Drive Cage 6. Lock any software applications that were disengaged when the access panel was removed. NOTE...the operating system, software drivers, and any security devices that were preinstalled on the computer. 9. NOTE: If you are replacing the primary hard drive, use the Recovery Disc Set to the next available (unpopulated) SATA connector on the system board in the following order: SATA0, ...
Service Reference Guide: HP Compaq dx2400 Business PC
Page 8
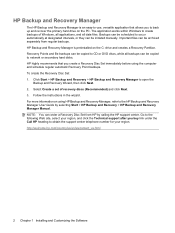
... Create a set of Windows, all applications, and all backups can be copied to the following Web site, select your region. Go to network or secondary hard disks. Follow the instructions in the wizard. Backups can order a Recovery Disc Set from regular backups. http://welcome.hp.com/country/us/en/wwcontact_us.html 2 Chapter... and schedule regular automatic Recovery Point backups. Click Start > HP Backup and Recovery > HP Backup and Recovery Manager to back up and recover the primary hard drive on the PC.
... Create a set of Windows, all applications, and all backups can be copied to the following Web site, select your region. Go to network or secondary hard disks. Follow the instructions in the wizard. Backups can order a Recovery Disc Set from regular backups. http://welcome.hp.com/country/us/en/wwcontact_us.html 2 Chapter... and schedule regular automatic Recovery Point backups. Click Start > HP Backup and Recovery > HP Backup and Recovery Manager to back up and recover the primary hard drive on the PC.
Service Reference Guide: HP Compaq dx2400 Business PC
Page 16
...Tab The Survey tab displays important system configuration information. Graphics-Shows information about the graphics controller of general information about all fixed disks, diskette drives, and optical drives. Miscellaneous-Shows HP Insight Diagnostics version information, computer configuration memory (CMOS) information, system ...data, and system management BIOS data. System-Shows information about the keyboard, mouse, and other input devices connected to the hard drive. NOTE: It is recommended that the system attempts to boot to the optical drive before booting to the computer. ...
...Tab The Survey tab displays important system configuration information. Graphics-Shows information about the graphics controller of general information about all fixed disks, diskette drives, and optical drives. Miscellaneous-Shows HP Insight Diagnostics version information, computer configuration memory (CMOS) information, system ...data, and system management BIOS data. System-Shows information about the keyboard, mouse, and other input devices connected to the hard drive. NOTE: It is recommended that the system attempts to boot to the optical drive before booting to the computer. ...

Service Reference Guide: HP Compaq dx2400 Business PC
Page 20
Important files can be copied to network or secondary hard disks. Recovery Points and file backups can be archived separately from HP by selecting Start > HP Backup and Recovery > HP Backup and Recovery Manager Manual. Click ... the HP support center. Select Create a set of Windows, all applications, and all backups can be copied to back up and recover the primary hard drive on the PC. NOTE: You can be initiated manually. http://welcome.hp.com/country/us/en/wwcontact_us.html 14 Chapter 3 Computer Diagnostic Features HP Backup and...
Important files can be copied to network or secondary hard disks. Recovery Points and file backups can be archived separately from HP by selecting Start > HP Backup and Recovery > HP Backup and Recovery Manager Manual. Click ... the HP support center. Select Create a set of Windows, all applications, and all backups can be copied to back up and recover the primary hard drive on the PC. NOTE: You can be initiated manually. http://welcome.hp.com/country/us/en/wwcontact_us.html 14 Chapter 3 Computer Diagnostic Features HP Backup and...
Service Reference Guide: HP Compaq dx2400 Business PC
Page 59
...the side of the hard disk drive cage (1), then slide the hard disk drive cage away from the old hard drive so that secure the hard disk drive cage to the chassis. 4. Push down the latch on page 31). 3. Removing an Internal 3.5-inch Hard Drive NOTE: Before you remove the old hard drive, be sure... the computer for disassembly (Preparation for Disassembly on the computer. Also, if you are replacing the primary hard drive, make sure you do not have created a Recovery Disc Set to the new hard drive. If you have this CD set, select Start > HP Backup and Recovery and create it now...
...the side of the hard disk drive cage (1), then slide the hard disk drive cage away from the old hard drive so that secure the hard disk drive cage to the chassis. 4. Push down the latch on page 31). 3. Removing an Internal 3.5-inch Hard Drive NOTE: Before you remove the old hard drive, be sure... the computer for disassembly (Preparation for Disassembly on the computer. Also, if you are replacing the primary hard drive, make sure you do not have created a Recovery Disc Set to the new hard drive. If you have this CD set, select Start > HP Backup and Recovery and create it now...

Service Reference Guide: HP Compaq dx2400 Business PC
Page 60
Disconnect the power cable (1) and data cable (2) from the back of the chassis. 6. Lift the hard disk drive cage out of the hard drive. 54 Chapter 6 Removal and Replacement Procedures Microtower (MT) Chassis 5.
Disconnect the power cable (1) and data cable (2) from the back of the chassis. 6. Lift the hard disk drive cage out of the hard drive. 54 Chapter 6 Removal and Replacement Procedures Microtower (MT) Chassis 5.

Service Reference Guide: HP Compaq dx2400 Business PC
Page 61
Follow the steps in Removing an Internal 3.5-inch Hard Drive on page 53 to the hard disk drive cage (1), then slide the hard disk drive out of the hard disk drive cage (2). Drives 55 Remove the four screws that secure the hard disk drive to remove the hard drive cage and, if necessary, the existing hard drive. Installing an Internal 3.5-inch Hard Drive 1. 7.
Follow the steps in Removing an Internal 3.5-inch Hard Drive on page 53 to the hard disk drive cage (1), then slide the hard disk drive out of the hard disk drive cage (2). Drives 55 Remove the four screws that secure the hard disk drive to remove the hard drive cage and, if necessary, the existing hard drive. Installing an Internal 3.5-inch Hard Drive 1. 7.
Service Reference Guide: HP Compaq dx2400 Business PC
Page 62
... (2). A sharp bend can break the internal wires. 56 Chapter 6 Removal and Replacement Procedures Microtower (MT) Chassis CAUTION: Never crease or bend a SATA data cable tighter than a 30 mm (1.18 in) radius. Slide the new drive into the hard disk drive cage (1), aligning the drive with a new drive, use four of the extra standard...
... (2). A sharp bend can break the internal wires. 56 Chapter 6 Removal and Replacement Procedures Microtower (MT) Chassis CAUTION: Never crease or bend a SATA data cable tighter than a 30 mm (1.18 in) radius. Slide the new drive into the hard disk drive cage (1), aligning the drive with a new drive, use four of the extra standard...
Service Reference Guide: HP Compaq dx2400 Business PC
Page 63
... it locks into place (2). 5. NOTE: If your system has only one SATA hard drive, you are adding a second hard drive, connect the data cable to avoid any security devices that secure the hard disk drive cage to the appropriate system board connector. Replace the computer access panel. 8.... Drives 57 Attach the two screws that were disengaged when the access panel was removed. 4. Place the hard disk drive cage into the chassis (1), then...
... it locks into place (2). 5. NOTE: If your system has only one SATA hard drive, you are adding a second hard drive, connect the data cable to avoid any security devices that secure the hard disk drive cage to the appropriate system board connector. Replace the computer access panel. 8.... Drives 57 Attach the two screws that were disengaged when the access panel was removed. 4. Place the hard disk drive cage into the chassis (1), then...


