
Wireless Setup Guide
Page 4
...to your network can access a Web site. 4 6 Run the Network Setup Wizard on the screen. Wireless Router Security Level Disable (no security) WEP WPA-PSK On the Wireless Network Connection screen: 1 Select the check box for Allow me to connect to the selected wireless network, even ... Network key field. (You recorded this key in the Available wireless networks list. 3 Complete the following steps that correspond with wireless notebooks and wired desktop PROGRESS CHECK If you successfully complete step 6, all computers on your network. Example of network with your home or ...
...to your network can access a Web site. 4 6 Run the Network Setup Wizard on the screen. Wireless Router Security Level Disable (no security) WEP WPA-PSK On the Wireless Network Connection screen: 1 Select the check box for Allow me to connect to the selected wireless network, even ... Network key field. (You recorded this key in the Available wireless networks list. 3 Complete the following steps that correspond with wireless notebooks and wired desktop PROGRESS CHECK If you successfully complete step 6, all computers on your network. Example of network with your home or ...

HP USB Digital Drive
Page 9
A dialog box displays a list of connected devices. 2. Disconnecting the Digital Drive ✎ Do not attempt to Remove Hardware" message appears on its track for safe storage. 8 User Guide Select the "Safely Remove Hardware" icon on the Digital Drive is in the extended position, return it on your taskbar. Select the Digital Drive and wait until the "Safe to remove the Digital Drive when the status light on your screen. 3. Gently unplug the Digital Drive from the USB port. ✎ If the USB connector cable is flashing. 1.
A dialog box displays a list of connected devices. 2. Disconnecting the Digital Drive ✎ Do not attempt to Remove Hardware" message appears on its track for safe storage. 8 User Guide Select the "Safely Remove Hardware" icon on the Digital Drive is in the extended position, return it on your taskbar. Select the Digital Drive and wait until the "Safe to remove the Digital Drive when the status light on your screen. 3. Gently unplug the Digital Drive from the USB port. ✎ If the USB connector cable is flashing. 1.
Using LightScribe (Select Models Only)
Page 3
... logo on the retail packaging and on the label side of a LightScribe disc. A LightScribe-enabled optical drive uses an optical laser to create precise silk-screen-quality labels for discs. All you have to do is a direct disc-labeling technology that provides a simple way to burn an image into the thin... the inner area of your computer with enhanced disc-labeling software, and specially coated CD or DVD discs (sold separately). Creating Disc Labels on Your Notebook Using LightScribe LightScribe is burn, flip the disc, and then burn again.
... logo on the retail packaging and on the label side of a LightScribe disc. A LightScribe-enabled optical drive uses an optical laser to create precise silk-screen-quality labels for discs. All you have to do is a direct disc-labeling technology that provides a simple way to burn an image into the thin... the inner area of your computer with enhanced disc-labeling software, and specially coated CD or DVD discs (sold separately). Creating Disc Labels on Your Notebook Using LightScribe LightScribe is burn, flip the disc, and then burn again.
Using LightScribe (Select Models Only)
Page 7
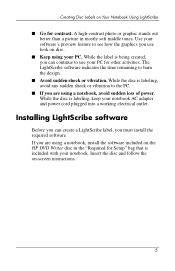
...being created, you can create a LightScribe label, you are using a notebook, install the software included on disc. ■ Keep using a notebook, avoid sudden loss of power. The LightScribe software indicates the time remaining to the PC. ■ If you must install the required software. Installing LightScribe ...any sudden shock or vibration to burn the design. ■ Avoid sudden shock or vibration. If you use your notebook AC adapter and power cord plugged into a working electrical outlet. Creating Disc Labels on -screen instructions. 5 While the disc is included with your...
...being created, you can create a LightScribe label, you are using a notebook, install the software included on disc. ■ Keep using a notebook, avoid sudden loss of power. The LightScribe software indicates the time remaining to the PC. ■ If you must install the required software. Installing LightScribe ...any sudden shock or vibration to burn the design. ■ Avoid sudden shock or vibration. If you use your notebook AC adapter and power cord plugged into a working electrical outlet. Creating Disc Labels on -screen instructions. 5 While the disc is included with your...
Using LightScribe (Select Models Only)
Page 10
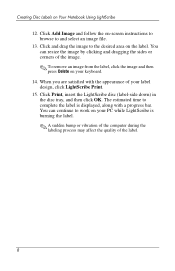
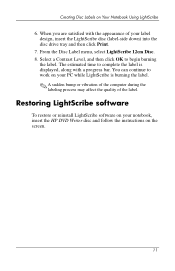
When you are satisfied with a progress bar. The estimated time to the desired area on your PC while LightScribe is displayed, along with the appearance of your keyboard. 14. You can continue to and select an image file. 13. Click Print, insert ... of the image. ✎ To remove an image from the label, click the image and then press Delete on Your Notebook Using LightScribe 12. Click Add Image and follow the on-screen instructions to browse to work on the label. Creating Disc Labels on your label design, click LightScribe Print. 15. You...
When you are satisfied with a progress bar. The estimated time to the desired area on your PC while LightScribe is displayed, along with the appearance of your keyboard. 14. You can continue to and select an image file. 13. Click Print, insert ... of the image. ✎ To remove an image from the label, click the image and then press Delete on Your Notebook Using LightScribe 12. Click Add Image and follow the on-screen instructions to browse to work on the label. Creating Disc Labels on your label design, click LightScribe Print. 15. You...
Using LightScribe (Select Models Only)
Page 13
...then click Print. 7. When you are satisfied with a progress bar. Creating Disc Labels on the screen. 11 Restoring LightScribe software To restore or reinstall LightScribe software on your PC while LightScribe is displayed, along with the appearance of the label. Select a Contrast Level, and ...then click OK to work on your notebook, insert the HP DVD Writer disc and follow the instructions on Your Notebook Using LightScribe 6. From the...
...then click Print. 7. When you are satisfied with a progress bar. Creating Disc Labels on the screen. 11 Restoring LightScribe software To restore or reinstall LightScribe software on your PC while LightScribe is displayed, along with the appearance of the label. Select a Contrast Level, and ...then click OK to work on your notebook, insert the HP DVD Writer disc and follow the instructions on Your Notebook Using LightScribe 6. From the...

Compaq Presario V5000 Notebook PC - Maintenance and Service Guide
Page 19
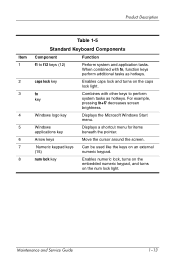
Product Description Item 1 2 3 4 5 6 7 8 Table 1-5 Standard Keyboard Components Component Function f1 to perform key system tasks as hotkeys. For example, pressing fn+f7 decreases screen brightness. Windows logo key Displays the Microsoft Windows Start menu. Maintenance and Service Guide 1-13 Numeric keypad keys (15) Can be used like the keys ... for items beneath the pointer. caps lock key Enables caps lock and turns on the caps lock light. Arrow keys Move the cursor around the screen.
Product Description Item 1 2 3 4 5 6 7 8 Table 1-5 Standard Keyboard Components Component Function f1 to perform key system tasks as hotkeys. For example, pressing fn+f7 decreases screen brightness. Windows logo key Displays the Microsoft Windows Start menu. Maintenance and Service Guide 1-13 Numeric keypad keys (15) Can be used like the keys ... for items beneath the pointer. caps lock key Enables caps lock and turns on the caps lock light. Arrow keys Move the cursor around the screen.
Compaq Presario V5000 Notebook PC - Maintenance and Service Guide
Page 23
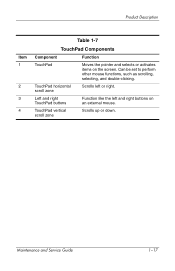
Can be set to perform other mouse functions, such as scrolling, selecting, and double-clicking. TouchPad horizontal scroll zone Scrolls left and right buttons on the screen. TouchPad vertical scroll zone Scrolls up or down. Maintenance and Service Guide 1-17 Left and right TouchPad buttons Function like the left or right. Product Description Item 1 2 3 4 Table 1-7 TouchPad Components Component Function TouchPad Moves the pointer and selects or activates items on an external mouse.
Can be set to perform other mouse functions, such as scrolling, selecting, and double-clicking. TouchPad horizontal scroll zone Scrolls left and right buttons on the screen. TouchPad vertical scroll zone Scrolls up or down. Maintenance and Service Guide 1-17 Left and right TouchPad buttons Function like the left or right. Product Description Item 1 2 3 4 Table 1-7 TouchPad Components Component Function TouchPad Moves the pointer and selects or activates items on an external mouse.
Compaq Presario V5000 Notebook PC - Maintenance and Service Guide
Page 28
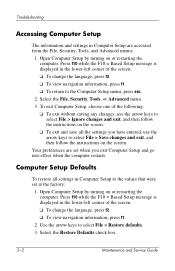
...were set when you have entered, use the arrow keys to select File > Save changes and exit, and then follow the instructions on the screen. Troubleshooting Accessing Computer Setup The information and settings in Computer Setup are set at the factory: 1. Select the Restore Defaults check box. 2-2... Setup by turning on or restarting the computer. Press f10 while the F10 = Based Setup message is displayed in the lower-left corner of the screen. ❏ To change the language, press f2. ❏ To view navigation information, press f1. ❏ To return to select File > Restore ...
...were set when you have entered, use the arrow keys to select File > Save changes and exit, and then follow the instructions on the screen. Troubleshooting Accessing Computer Setup The information and settings in Computer Setup are set at the factory: 1. Select the Restore Defaults check box. 2-2... Setup by turning on or restarting the computer. Press f10 while the F10 = Based Setup message is displayed in the lower-left corner of the screen. ❏ To change the language, press f2. ❏ To view navigation information, press f1. ❏ To return to select File > Restore ...

Compaq Presario V5000 Notebook PC - Maintenance and Service Guide
Page 29
..., keyboard controller version, and system ROM. Then exit and restart the computer. Select File > Save changes and exit, and then follow the instructions on the screen. Save system configuration settings to into effect when the computer restarts. To confirm the restoration, press f10. 5. Selecting from a diskette. Then exit and restart the...
..., keyboard controller version, and system ROM. Then exit and restart the computer. Select File > Save changes and exit, and then follow the instructions on the screen. Save system configuration settings to into effect when the computer restarts. To confirm the restoration, press f10. 5. Selecting from a diskette. Then exit and restart the...
Compaq Presario V5100 Notebook PC - Maintenance and Service Guide
Page 19
For example, pressing fn+f7 decreases screen brightness. Maintenance and Service Guide 1-13 Windows logo key Displays the Microsoft Windows Start menu. Windows applications key Displays a shortcut menu for items beneath the ... key system tasks as hotkeys. caps lock key Enables caps lock and turns on the caps lock light. Arrow keys Move the cursor around the screen.
For example, pressing fn+f7 decreases screen brightness. Maintenance and Service Guide 1-13 Windows logo key Displays the Microsoft Windows Start menu. Windows applications key Displays a shortcut menu for items beneath the ... key system tasks as hotkeys. caps lock key Enables caps lock and turns on the caps lock light. Arrow keys Move the cursor around the screen.

Compaq Presario V5100 Notebook PC - Maintenance and Service Guide
Page 23
TouchPad horizontal scroll zone Scrolls left and right buttons on the screen. Maintenance and Service Guide 1-17 Left and right TouchPad buttons Function like the left or right. Product Description Item 1 2 3 4 Table 1-7 TouchPad Components Component Function TouchPad Moves the pointer and selects or activates items on an external mouse. TouchPad vertical scroll zone Scrolls up or down. Can be set to perform other mouse functions, such as scrolling, selecting, and double-clicking.
TouchPad horizontal scroll zone Scrolls left and right buttons on the screen. Maintenance and Service Guide 1-17 Left and right TouchPad buttons Function like the left or right. Product Description Item 1 2 3 4 Table 1-7 TouchPad Components Component Function TouchPad Moves the pointer and selects or activates items on an external mouse. TouchPad vertical scroll zone Scrolls up or down. Can be set to perform other mouse functions, such as scrolling, selecting, and double-clicking.

Compaq Presario V5100 Notebook PC - Maintenance and Service Guide
Page 28
..., use the arrow keys to select File > Ignore changes and exit, and then follow the instructions on the screen. ❏ To exit and save all settings in the lower-left corner of the screen. ❏ To change the language, press f2. ❏ To view navigation information, press f1. ❏ ...to the Computer Setup menu, press esc. 2. Use the arrow keys to select File > Save changes and exit, and then follow the instructions on the screen. Select the File, Security, Tools, or Advanced menu. 3. To exit Computer Setup, choose one of the following: ❏ To exit without saving any ...
..., use the arrow keys to select File > Ignore changes and exit, and then follow the instructions on the screen. ❏ To exit and save all settings in the lower-left corner of the screen. ❏ To change the language, press f2. ❏ To view navigation information, press f1. ❏ ...to the Computer Setup menu, press esc. 2. Use the arrow keys to select File > Save changes and exit, and then follow the instructions on the screen. Select the File, Security, Tools, or Advanced menu. 3. To exit Computer Setup, choose one of the following: ❏ To exit without saving any ...

Compaq Presario V5100 Notebook PC - Maintenance and Service Guide
Page 29
..., memory and cache size, video revision, keyboard controller version, and system ROM. Select File > Save changes and exit, and then follow the instructions on the screen. Troubleshooting 4.
..., memory and cache size, video revision, keyboard controller version, and system ROM. Select File > Save changes and exit, and then follow the instructions on the screen. Troubleshooting 4.
Notebook PC User Guide
Page 3
Table of contents 1 Notebook Tour Components ...1 Top components ...2 Keys ...2 TouchPad ...3 Buttons and switches 4 Lights ...5 Display components 6 Front components ...6 Rear components ...7 Right-side components ...7 Left-side components ...9 Bottom components ...10 ... Open the Help and Support Center (fn+f1 21 Open the Print Options window (fn+f2 21 Open a Web browser (fn+f3 21 Switch the screen image (fn+f4 22 Initiate standby (fn+f5 22 Initiate QuickLock (fn+f6 23 Decrease...
Table of contents 1 Notebook Tour Components ...1 Top components ...2 Keys ...2 TouchPad ...3 Buttons and switches 4 Lights ...5 Display components 6 Front components ...6 Rear components ...7 Right-side components ...7 Left-side components ...9 Bottom components ...10 ... Open the Help and Support Center (fn+f1 21 Open the Print Options window (fn+f2 21 Open a Web browser (fn+f3 21 Switch the screen image (fn+f4 22 Initiate standby (fn+f5 22 Initiate QuickLock (fn+f6 23 Decrease...

Notebook PC User Guide
Page 4
... a battery pack 40 Charging a battery pack ...41 Monitoring the charge of the battery pack 42 Obtaining accurate charge information 42 Displaying charge information on the screen 42 Viewing charge displays 42 Interpreting charge indicators 42 Managing low-battery conditions 43 Identifying low-battery conditions 43 Low-battery condition 43 Critical low...
... a battery pack 40 Charging a battery pack ...41 Monitoring the charge of the battery pack 42 Obtaining accurate charge information 42 Displaying charge information on the screen 42 Viewing charge displays 42 Interpreting charge indicators 42 Managing low-battery conditions 43 Identifying low-battery conditions 43 Low-battery condition 43 Critical low...
Notebook PC User Guide
Page 8
... Disk Cleanup 152 Regular tune-ups ...153 Traveling and shipping ...154 15 Troubleshooting Quick checklist ...155 The computer will not start up 155 The computer screen is blank 156 The software is functioning abnormally 156 The computer is turned on, but is not responding 157 The computer is extremely warm 157...
... Disk Cleanup 152 Regular tune-ups ...153 Traveling and shipping ...154 15 Troubleshooting Quick checklist ...155 The computer will not start up 155 The computer screen is blank 156 The software is functioning abnormally 156 The computer is turned on, but is not responding 157 The computer is extremely warm 157...

Notebook PC User Guide
Page 13
... set to perform other mouse functions, such as scrolling, selecting, and doubleclicking. Functions like the left or right. Functions like the right button on the screen.
... set to perform other mouse functions, such as scrolling, selecting, and doubleclicking. Functions like the left or right. Functions like the right button on the screen.

Notebook PC User Guide
Page 27
... scrolling, selecting, and doubleclicking. (2) Left TouchPad button* (3) TouchPad horizontal scroll zone* (4) Right TouchPad button* (5) TouchPad vertical scroll zone* Functions like the right button on the screen. To view and change TouchPad preferences, select Start > Control Panel > Printers and Other Hardware > Mouse. Component Description (1) TouchPad* Moves the pointer and selects or activates...
... scrolling, selecting, and doubleclicking. (2) Left TouchPad button* (3) TouchPad horizontal scroll zone* (4) Right TouchPad button* (5) TouchPad vertical scroll zone* Functions like the right button on the screen. To view and change TouchPad preferences, select Start > Control Panel > Printers and Other Hardware > Mouse. Component Description (1) TouchPad* Moves the pointer and selects or activates...
Notebook PC User Guide
Page 30
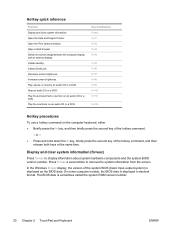
...key, briefly press the second key of the hotkey command. - Decrease screen brightness. Play the previous track or section on an audio CD or a DVD. Switch the screen image between the computer display and an external display. Initiate standby. Increase screen brightness. Display and clear system information (fn+esc) Press fn+esc ...to remove the system information from the screen. In the Windows fn+esc display, the version of the system BIOS (basic input-output system) is displayed in decimal format. The BIOS date is...
...key, briefly press the second key of the hotkey command. - Decrease screen brightness. Play the previous track or section on an audio CD or a DVD. Switch the screen image between the computer display and an external display. Initiate standby. Increase screen brightness. Display and clear system information (fn+esc) Press fn+esc ...to remove the system information from the screen. In the Windows fn+esc display, the version of the system BIOS (basic input-output system) is displayed in decimal format. The BIOS date is...


